Mazda 2: Wiper Blades
CAUTION
Hot waxes applied by automatic car washers have been known to affect the wiper's ability to clean windows.
To prevent damage to the wiper blades, do not use petrol, paraffi n, paint thinner, or other solvents on or near them.
When the wiper lever is in the AUTO position and the ignition is switched ON, the wipers may move automatically in the following cases:
- If the windscreen above the rain sensor is touched.
- If the windscreen above the rain sensor is wiped with a cloth.
- If the windscreen is struck with a hand or other object.
- If the rain sensor is struck with a hand or other object from inside the vehicle.
Be careful not to pinch hands or fi ngers as it may cause injury, or damage the wipers. When washing or servicing the vehicle, make sure the wiper lever is in the OFF position.
Contamination of either the windscreen or the blades with foreign matter can reduce wiper effectiveness. Common sources are insects, tree sap, and hot wax treatments used by some commercial car washes.
If the blades are not wiping properly, clean the window and blades with a good cleaner or mild detergent; then rinse thoroughly with clean water. Repeat if necessary.
Replacing Windscreen Wiper Blades
When the wipers no longer clean well, the blades are probably worn or cracked.
Replace them.
CAUTION
To prevent damage to the wiper arms and other components, do not try to sweep the wiper arm by hand.
NOTE
To prevent damage to the wiper arm blades when raising both the driver and passenger side wiper arms, raise the driver side wiper arm fi rst. Conversely, when setting down the wiper arms, set the passenger side wiper arm down fi rst.
(Type A)
- Raise the wiper arm.
- Open the clip and slide the blade assembly in the direction of the arrow.
- Tilt the blade assembly and remove it from the arm.
CAUTION
To prevent damage to the windscreen let the wiper arm down easily, do not let it slap down on the windscreen.
- Pull down the blade rubber and slide it out of blade holder.
- Remove the metal stiffeners from each blade rubber and install them in the new blade.
CAUTION
- Do not bend or discard the stiffeners.
You need to use them again.
- If the metal stiffeners are switched,
the blade's wiping effi ciency could
be reduced.
So do not use the driver's side metal stiffeners on the passenger's side, or vice versa.
- Be sure to reinstall the metal stiffeners in the new blade rubber so that the curve is the same as it was in the old blade rubber.
- Carefully insert the new blade rubber.
Then install the blade assembly in the reverse order of removal.
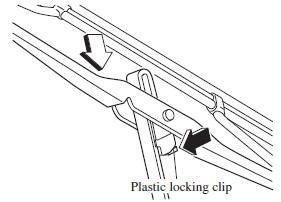
(Type B)
- Raise the wiper arm and turn the blade
assembly to expose the plastic locking
clip.
Compress the clip and slide the assembly downward; then lift it off the arm.
CAUTION
To prevent damage to the windscreen let the wiper arm down easily, don't let it slap down on the windscreen.
- Hold the end of the rubber and pull until the tabs are free of the metal support.
- Remove the metal stiffeners from each blade rubber and install them in the new blade.
CAUTION
- Do not bend or discard the stiffeners.
You need to use them again.
- If the metal stiffeners are switched,
the blade's wiping effi ciency could
be reduced.
So don't use the driver's side metal stiffeners on the passenger's side, or vice versa.
- Be sure to reinstall the metal stiffeners in the new blade rubber so that the curve is the same as it was in the old blade rubber.
- Carefully insert the new blade rubber.
Then install the blade assembly in the reverse order of removal.
NOTE
Install the blade so that the tabs are toward the bottom of the wiper arm.
Replacing Rear Window Wiper Blade (Hatchback)
When the wiper no longer cleans well, the blade is probably worn or cracked.
Replace it.
CAUTION
To prevent damage to the wiper arm and other components, do not move the wiper by hand.
- Raise the wiper arm and rotate the wiper blade to the right until it unlocks, then remove the blade.
CAUTION
To prevent damage to the rear window, do not let the wiper arm fall on it.
- Pull down the blade rubber and slide it out of the blade holder.
- Remove the metal stiffeners from the blade rubber and install them in the new blade.
CAUTION
Do not bend or discard the stiffeners.
You need to use them again.
- Carefully insert the new blade rubber.
Then install the blade assembly in the reverse order of removal.