Mazda 2: Emergency Flat Tyre Repair Kit
The emergency fl at tyre repair kit included with your Mazda is for a temporary repair of a slightly damaged fl at tyre resulting from running over nails or similar sharp objects on the road surface.
Perform the emergency fl at tyre repair without removing the nail or similar sharp object which punctured the tyre.
NOTE
Your vehicle is not equipped with a spare tyre. In the event of a fl at tyre, use the emergency fl at tyre repair kit to repair the tyre temporarily. When doing the repair, refer to the instructions included in the emergency fl at tyre repair kit. If an emergency repair was performed on a fl at tyre using the emergency fl at tyre repair kit, have an expert repairer, we recommend an Authorised Mazda Repairer, repair or replace the tyre as soon as possible.
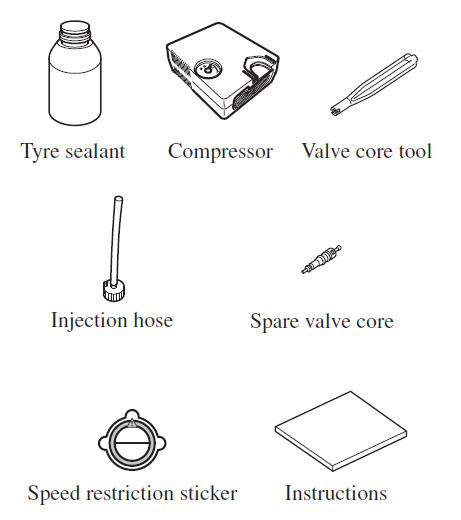
About the Emergency Flat Tyre Repair Kit
The emergency fl at tyre repair kit includes the following items.
WARNING
Do not allow children to touch the tyre sealant:
- Ingestion of tyre sealant is dangerous. In the event tyre sealant is accidentally swallowed, drink large amounts of water immediately and seek medical assistance
- Tyre sealant that comes into contact
with the eyes and skin is dangerous.
If tyre sealant enters the eyes or contacts the skin, fl ush immediately with large amounts of water and seek medical assistance.
NOTE
The tyre sealant cannot be reused.
Purchase new tyre sealant at an Authorised Mazda Repairer.
The emergency fl at tyre repair kit cannot be used in the following cases.
Consult an expert repairer, we recommend an Authorised Mazda Repairer.
- The period of effective use for the tyre sealant has expired. (The period of effectiveness is indicated on the bottle label.)
- The tear or puncture exceeds about 4 mm (0.16 in).
- The tear or puncture exceeds about 4 mm (0.16 in).
- The damage has occurred to an area of the tyre other than the tread.
- The vehicle has been driven with nearly no air remaining in the tyre.
- The tyre has come off the wheel rim.
- Damage to the wheel rim has occurred.
- The tyre has two or more punctures.
Using the Emergency Flat Tyre Repair Kit
- Park on a level surface off the right-ofway and set the parking brake.
- Put a vehicle with an automatic transaxle in Park (P), a manual transaxle in Reverse (R) or 1, and turn off the engine.
- Turn on the hazard warning fl asher.
- Unload passengers and luggage, and remove the emergency fl at tyre repair kit.
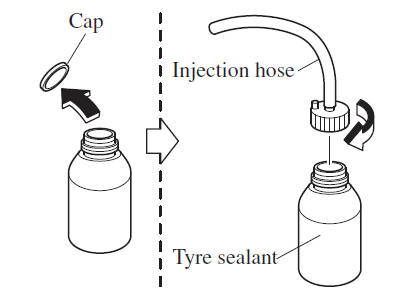
- Shake the tyre sealant well.
CAUTION
If the bottle is shaken after the injection hose is screwed on, tyre sealant could spray out from the injection hose. Tyre sealant contacting clothing or other objects may be impossible to remove.
Shake the bottle before screwing on the injection hose.
NOTE
The tyre sealant can be used at outside temperatures down to -30 °C (-22 °F). In extremely cold temperatures (0 °C (32 °F) or below), the tyre sealant hardens easily and injection of the sealant will be diffi cult. Warm the sealant inside the vehicle before doing the injection work.
- Remove the cap from the bottle. Screw on the injection hose with the bottle's inner cap left on to break the inner cap.
- Remove the valve cap from the fl at tyre. Press the back of a valve core tool to the core of the tyre valve and bleed all the remaining air.
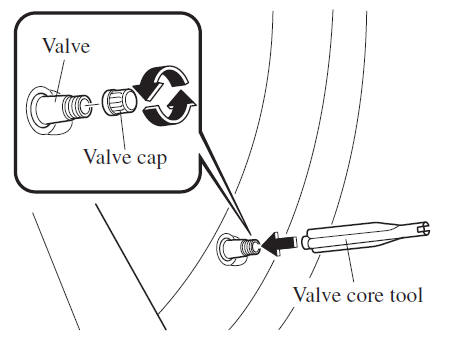
CAUTION
If there is air remaining in the tyre when the valve core is removed, the valve core could fl y out. Remove the valve core carefully.
- Turn the valve core anticlockwise with the valve core tool and remove the valve core.
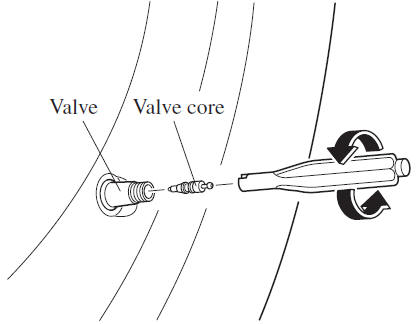
NOTE
Store the valve core in a place where it will not get dirty.
- Insert the injection hose into the valve.

- Hold the bottom of the bottle upright, squeeze the bottle with your hands, and inject the entire amount of tyre sealant into the tyre.
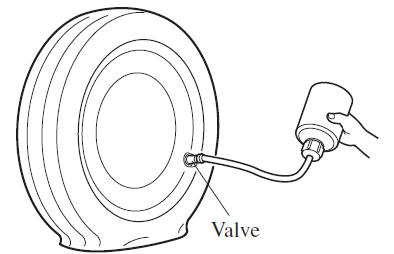
- Pull out the injection hose from the valve.
NOTE
The tyre sealant cannot be reused.
Purchase a new tyre sealant kit at an Authorised Mazda Repairer.
- Reinsert the valve core into the valve and turn it clockwise to install it.
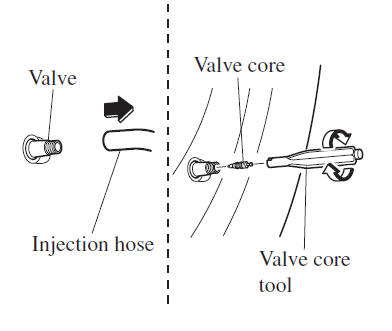
NOTE
Do not throw away the empty tyre sealant bottle after use. Return the empty tyre sealant bottle to an Authorised Mazda Repairer when replacing the tyre.
The empty tyre sealant bottle will need to be used to extract and dispose of the used sealant from the tyre.
- After that, install the injection hose to the tab of the bottle to prevent leakage of any remaining sealant.
- Attach the vehicle speed restriction sticker in a place where the driver can easily see it.
WARNING
Do not attach the vehicle speed restriction sticker to the instrument panel, as it would obstruct vision of areas such as warning light indicators or the speedometer: Attaching the vehicle speed restriction sticker to the steering wheel pad is dangerous. The sticker could interfere with air bag infl ation and cause serious injury.
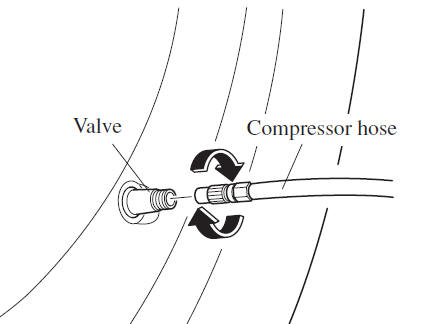
- Install the compressor hose to the tyre valve.
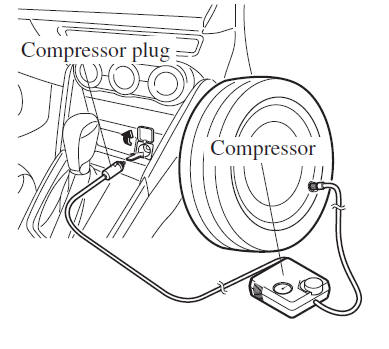
- Insert the compressor plug into the interior accessory socket and switch the ignition to ACC.
CAUTION
- Before pulling out the compressor plug from the electrical socket, make sure the compressor power switch is off.
- The compressor turns on and off with the push-button switch.
- Turn the compressor switch on and infl ate the tyre carefully to the correct infl ation pressure.
WARNING
Never operate the compressor above 300 kPa (3.1 kgf/cm 2 , 3 bar, 43.5 psi): Operating the compressor above 300 kPa (3.1 kgf/cm 2 , 3 bar, 43.5 psi) is dangerous. When the infl ation pressure rises above 300 kPa (3.1 kgf/cm 2 , 3 bar, 43.5 psi), heated air will be exhausted from the back of the compressor and you could be burned.
CAUTION
If the compressor operates slowly or becomes hot, it indicates overheating.
Turn the compressor off immediately and leave it turned off for 30 minutes or longer.
NOTE
- Check the tyre infl ation pressure label (driver's door frame) for the correct tyre infl ation pressure.
- Do not use the compressor for longer than 10 minutes because using the compressor for long periods could damage it.
- If the tyre does not infl ate, repair
of the tyre may not be possible. If
the tyre does not reach the correct
infl ation pressure within a 10-minute
period, it probably has received more
extensive damage.
When this happens, the emergency fl at tyre repair kit cannot be used to repair the tyre. Contact an expert repairer, we recommend an Authorised Mazda Repairer.
- If the tyre has been over-infl ated, loosen the screw cap on the compressor and bleed some of the air out.
- When the tyre has been infl ated to the proper infl ation pressure, turn the compressor switch off and remove the compressor hose from the tyre valve.
- Install the tyre valve cap.
- Put the emergency fl at tyre repair kit in the boot and continue driving.
CAUTION
- Drive carefully to an expert repairer, we recommend an Authorised Mazda Repairer and keep the vehicle speed below 80 km/h (50 mph).
- If the vehicle is driven 80 km/h (50 mph) or higher, the vehicle might begin to vibrate.
NOTE
(With tyre pressure monitoring system) If the tyre is not properly infl ated, the tyre pressure monitoring system warning light will illuminate.
- After driving the vehicle for 10 minutes or 5 km (3 miles), check the tyre pressure with the tyre pressure gauge equipped with the compressor. If the tyre pressure has fallen below the correct tyre pressure, infl ate the tyre to the correct pressure again following the steps from number 16.
CAUTION
- If the tyre infl ation pressure falls below 130 kPa (1.3 kgf/cm 2 or bar, 18.9 psi), repair cannot be done with the repair kit. Park the vehicle on a level surface off the right-of-way and contact an expert repairer, we recommend an Authorised Mazda Repairer.
- If the tyre infl ation pressure continues to remain low after repeating steps 15 to 21, park the vehicle on a level surface off the right-of-way and contact an expert repairer, we recommend an Authorised Mazda Repairer.
NOTE
When checking the tyre infl ation pressure with the tyre pressure gauge on the compressor unit, make sure the compressor switch is turned off.
- If the tyre infl ation pressure remains
stable, the tyre repair is complete.
Drive the vehicle with care to an expert repairer, we recommend an Authorised Mazda Repairer to have the tyre replaced.
CAUTION
- A tyre that has been temporarily repaired with the tyre sealant cannot be reused. Mazda recommends replacing the tyre with a new one.
- The wheel can be reused after any sealant adhering to it is wiped off and carefully inspected. However, replace the tyre valve with a new one.
Inspecting the Emergency Flat Tyre Repair Kit
Inspect the emergency fl at tyre repair kit at regular intervals.
- Check the tyre sealant period of effective use.
- Check the operation of the tyre compressor.
NOTE
The tyre sealant has a period of effective use. Check the period of effective use indicated on the bottle label and do not use it if it has expired. Have the tyre sealant replaced at an Authorised Mazda Repairer before the period of effective use has expired.

