Mazda 2: Bluetooth® Hands-Free (Type C/Type D)
Making a Call
Phonebook Usage
Telephone calls can be made by saying the contact name in the downloaded phonebook or the name of a person whose phone number has been registered in the Bluetooth® Hands-Free. Refer to Import contact (Download Phonebook).
- Press the talk button.
- Wait for the beep sound.
- Say: “Call XXXXX... (Ex. “John”) Mobile”.
- Follow the voice guidance to place the call.
Screen operation
- Select the
 icon on
the home screen and display the Communication screen. - Select
 to display the
contact list. - Select the contact you would like to call to display the details for the contact.
- Select the desired phone number to make the call.
Import contact (Download Phonebook)
Phonebook data from your device (Mobile phone) can be sent and registered to your Bluetooth® Hands-Free phonebook using Bluetooth® .
(Automatic downloading)
The “Auto Download Contacts” setting must be on. When hands-free is connected to the device, the phonebook is downloaded automatically.
Refer to Communication Settings on page 5-130 .
(Manually downloading)
If the “Auto Download Contacts” setting is off, download the phonebook using the following procedure.
- Select the
 icon on the
home screen and display the Communication screen. - Select
 to display the
contact list. - Select

- Select

- Select or

to switch to the device operation. - If
 is selected, select

. - Download will be started from the mobile phone.
NOTE
- If “Import All Contacts” is performed after saving the phonebook to the Bluetooth® unit, the phonebook will be overwritten.
- A maximum of 1000 contacts can be registered to the phonebook.
- Phonebook, incoming/outgoing call record, and favourite memories are exclusive to each mobile phone to protect privacy.
Favourites Contacts
A maximum of 50 contacts can be registered. It will take less time to make a call after registering the telephone number.
In addition, you do not have to look for the person you want to call in the phonebook.
Registering to your favourites
- Select the
 icon on the
home screen and display the Communication screen. - Select
 to display the
favourites list. - Select
 .
. - Select
 or
or

- Select from the displayed list.
NOTE
When “Add New Contact” is selected, information such as the selected person’s name is also registered. In addition, when “Add New Contact Details” is selected, only the telephone number of the selected person is registered.
Making a call from your favourites
- Select the
 icon on the
home screen and display the Communication screen. - Select
 to display the
favourites list. - (Only one phone number is
registered to contact)
Select the contact information you
would like to call. Go to Step 5.
(Multiple phone numbers are registered to contact) Select the contact you would like to call to display the screen indicating the details for the contact. Go to Step 4.
- Select the phone number you would like to call.
- Select

Deleting from your favourites
- Select the
 icon on the
home screen and display the Communication screen. - Select
 to display the
favourites list. - Select

- Select

- Select the contact information which you would like to delete.
- Select

Changing the display order of your favourites list
- Select the
 icon on the
home screen and display the Communication screen. - Select
 to display the
favourites list. - Select

- Select

- The contact can be moved after it is selected.
- Slide the contact or move it using the
commander switch, then select

Changing contact name of your favourites
- Select the
 icon on the home
screen and display the Communication screen. - Select
 to display the
favourites list. - Select

- Select

- Select the contact to display the keyboard screen.
- If a new name is input and

is selected, the contact name is stored.
NOTE
If the contact is long-pressed when the favourites list is displayed, the contact information can be edited (deleted, moved).
Telephone Number Input
NOTE
Practice this while parked until you are confi dent you can do it while driving in a non-taxing road situation. If you are not completely comfortable, make all calls from a safe parking position, and only start driving when you can devote your full attention to driving.
- Select the
 icon on the
home screen and display the Communication screen. - When
 is pressed, the dial
pad is displayed. - Input the telephone number using the dial pad.
- Select
 to make the call.
Numeral or symbol entry
Use the dial pad.
Long-press the  to input +.
Select  to delete the
currently input
value.
Long-press  to delete all input
values.
Redial Function
Makes a call to the last person called (latest person on outgoing call record) from the mobile phone/vehicle.
- Press the talk button.
- Wait for the beep sound.
- Say: “Redial”
Call back Function
Makes a call to the last person who called your (latest person on incoming call record) mobile phone/vehicle.
- Press the talk button.
- Wait for the beep sound.
- Say: “Call back”
Receiving an Incoming Call
When an incoming call is received, the incoming call notifi cation screen is displayed. The “Incoming Call Notifi cations” setting must be on.
Refer to Communication Settings on page 5-130 .
To accept the call, press the pick-up button on the audio control switch or
select  on
on
the screen.
To reject the call, press the hang-up button on the audio control switch or
select  on the
screen.
The following icons are displayed on the screen during a call. Icons which can be used differ depending on use conditions.
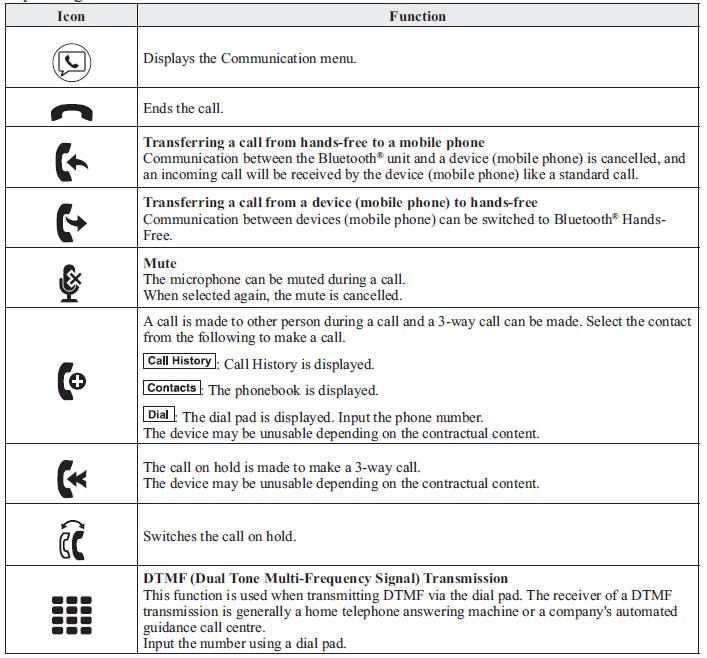
NOTE
- If the ignition is switched off during a hands-free call, the line is transferred to the device (Mobile phone) automatically.
- If the DTMF code has two or more digits or symbols, each one must be transmitted individually.
Call Interrupt
A call can be interrupted to receive an incoming call from a third party.
When  is selected or the pickup
button on the steering wheel is pressed,
the current call is held and the system
switches to the new incoming call.
When  is selected, the
current
call is ended and the system switches to
the new incoming call (GSM network
only).
When  is selected or the
hang-up
button on the steering wheel is pressed, an
incoming call is refused.
NOTE
- The function may not be available depending on the contractual content of the mobile device.
- The function may not be operable depending on the type of the telephone network and the mobile device.
Receiving and Replying to Messages (available only with E-mail/SMS compatible phones)
SMS (Short Message Service) messages, and E-mail received by connected devices can be downloaded, displayed, and played (read by the system).
Additionally, replies can also be made to calls and messages in the received messages.
Downloading messages
Up to 20 new messages can be downloaded and displayed from a connected device.
NOTE
For e-mail, 20 messages for each account can be downloaded.
(Automatic downloading)
The “Auto Download Email” (E-mail) or “Auto Download SMS” (SMS) setting must be on. A message is downloaded automatically when the Bluetooth ® unit is connected to the device.
Refer to Communication Settings on page 5-130 .
(Manually downloading)
When the “Auto Download Email” (E-mail) or “Auto Download SMS” (SMS) setting is off, the message is downloaded using the following procedure.
- Select the
 icon on the
home screen and display the Communication screen. - Select
 or
or
 to display the
Inbox. - Select

- Download will be started from the mobile phone.
NOTE
- Attached data is not downloaded.
- Messages up to 1 kilobyte (e-mail)/140-bytes (SMS) can be downloaded.
- A message list is created for each device.
- If the connected device does not correspond to MAP 1.0, the AT command is used to download. The downloaded message indicates that it is already read.
- Downloading using the AT command may not function depending on the connected device.
Receiving messages
(Method 1)
When a device receives a message, a message received notifi cation is displayed.
The “Email Notifi cations” (E-mail) or “SMS Notifi cations” (SMS) setting must be on.
Refer to Communication Settings on page 5-130 .
Select  and display the message.
(Method 2)
- Select the
 icon on the
home screen and display the Communication screen. - Select
 and display the new
message list for e-mail and SMS. - Select the message you would like to display.
The following icons are displayed in the lower part of the details on the message. Icons which can be used differ depending on use conditions.
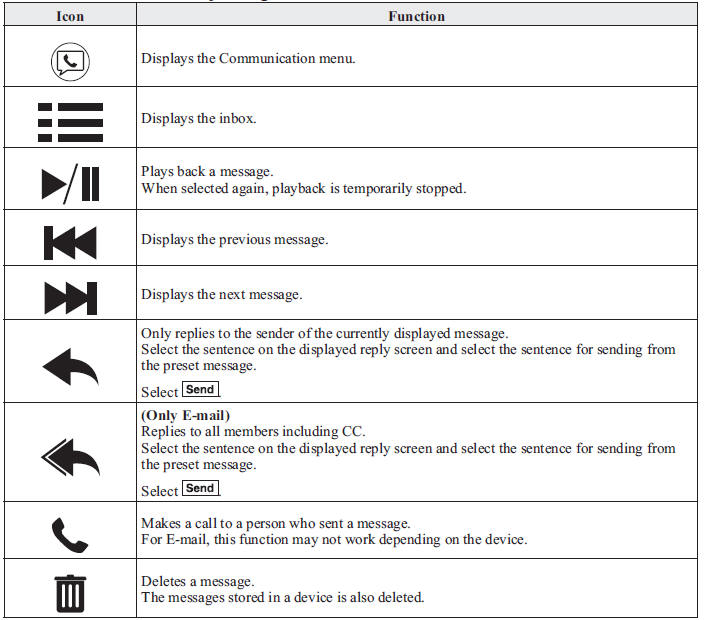
NOTE
Up to three preset messages can be selected.
Example of use (verify unread E-mail)
- Select the
 icon on the
home screen and display the Communication screen. - Select
 to display
the inbox.
- Select the unread message displayed in bold.
- The details of the message are displayed and replying to the message, making a call, or playback can be performed.
Changing account for displaying (E-mail only)
- Select

- Select the account which you would like to display. Only the messages for the selected account are displayed in the inbox.
Editing preset messages
- Select the
 icon on the
home screen and display the Communication screen. - Select

- Select

- Select the preset message which you would like to edit. The keyboard screen is displayed.
- When the message is input and
 is
is
selected, the message is stored as a preset message.
NOTE
- Select the
 icon to
change the language. - Select the
 icon
icon
to switch between capitalized and lower-case characters. - Select the
 icon to
return to the previous screen without storing the edit.
Communication Settings
Select the  icon on the home
screen and display the Communication screen.
Select  to change the setting.
| Item | Setting | Function |
| Bluetooth ® | — | Go to Bluetooth ® setting menu.
Refer to Bluetooth ® Preparation (Type C/Type D) on page 5-110 . |
| Incoming Call Notifi cations | On/Off | Notifi es when an incoming call is received. |
| Auto Download SMS | On/Off | Downloads SMS automatically when the Bluetooth ® unit is connected to the device. |
| SMS Notifi cations | On/Off | Notifi es when a new SMS is received. |
| Auto Download Email*1 | On/Off | Downloads E-mail automatically when the Bluetooth ® unit is connected to the device. |
| Email Notifi cations | On/Off | Notifi es when a new Email is received. |
| Auto Download Call History | On/Off | Downloads Call History automatically when the Bluetooth ® unit is connected to the device. |
| Auto Download Contacts*1 | On/Off | Downloads the phonebook automatically when the Bluetooth ® unit is connected to the device. |
| Ringtone | Fixed/In-band/ Off | Changes the ringtone setting. |
| Phone Volume | Adjusts using the slider. | Adjusts the conversation volume. |
| VR and Ringtone | Adjusts using the slider. | Adjusts the voice guidance and ringtone volume. |
| Contacts Sort Order | First Name, Last Name | Displays the contact information in alphabetical order of the fi rst name. |
| Last Name, First Name | Displays the contact information in alphabetical order of the last name. | |
| Preset Messages | — | Edits the preset message.
Refer to Receiving and Replying to Messages (available only with E-mail/SMS compatible phones) on page 5-127 . |
| Reset | — | Initializes all Communication Settings. |
*1 Depending on the device, it may be necessary to acquire download permission on the device side.

