Mazda 2: Bluetooth®
Bluetooth ® Hands-Free outline
When a Bluetooth ® device (mobile phone) is connected to the vehicle's Bluetooth ® unit via radio wave transmission, a call can be made or received by pressing the talk button, pickup button, or hang-up button on the audio remote control switch, or by operating the centre display. For example, even if a device (mobile phone) is in your coat pocket, a call can be made without taking the device (mobile phone) out and operating it directly.
Bluetooth ® audio outline
When a portable audio unit equipped with the Bluetooth ® communication function is paired to the vehicle, you can listen to music stored on the paired portable audio device from the vehicle's speakers. It is not necessary to connect the portable audio device to the vehicle's external input terminal. After programming, operate the vehicle audio control panel to play/ stop the audio.
NOTE
- For your safety, a device can be paired only when the vehicle is parked. If the vehicle starts to move, the pairing procedure will end. Park the vehicle in a safe place before pairing.
- The communication range of a Bluetooth ® equipped device is about 10 meters (32 ft) or less
- Basic audio operation is available using voice commands even if Bluetooth ® is not connected.
CAUTION
Some Bluetooth ® mobile devices are not compatible with the vehicle. Consult an Authorised Mazda Repairer, Mazda's call centre or Web support centre for information regarding Bluetooth ® mobile device compatibility: Phone: (Germany) 0800 4263 738 (8:00—18:00 Central European Time) (Except Germany) 00800 4263 7383 (8:00—18:00 Central European Time) (Worldwide) 49 (0) 6838 907 287 (8:00—18:00 Central European Time) Web: http://www.mazdahandsfree.com
Applicable Bluetooth ® specifi cation (Recommended)
Type A/Type B: Ver. 2.0
Type C/Type D: Ver. 1.1/1.2/2.0 EDR/2.1 EDR/3.0 (conformity)
Component Parts
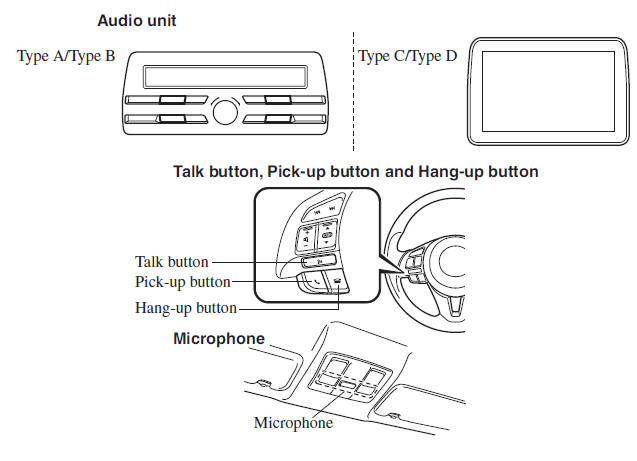
Microphone (hands-free)
The microphone is used for speaking voice commands or when making a Hands-free call.
Talk button, Pick-Up button and Hang-Up button (hands-free)
The basic functions of Bluetooth ® Hands-Free can be used for such things as making calls or hanging up using the talk, pick-up and hang-up buttons on the steering wheel.
Commander switch (Type C/Type D)
The commander switch is used for volume adjustment and display operation. Tilt or turn the commander knob to move the cursor. Press the commander knob to select the icon.
Volume adjustment
The power/volume dial of the audio unit *1 or the volume dial of the commander switch *2 is used to adjust the volume. Turn the dial to the right to increase volume, to the left to decrease it.
The volume can also be adjusted using the volume button on the steering wheel.
*1 Type A/Type B
*2 Type C/Type D
NOTE
If the volume is lower compared to other audio modes, increase the volume from the device side.
(Type C/Type D)
Conversation volume and the volume of the voice guidance and ringtone can each be set in advance.
- Select the
 icon on the home
screen and display the Communication screen. - Select

- Adjust the
 and the
 using the slider.
Bluetooth ® Preparation (Type A/ Type B)
Bluetooth ® Hands-Free Preparation
Pairing code setting
The 4-digit pairing code setting for registration of your cell phone (pairing) can be set beforehand.
NOTE
The initial setting value is “0000”.
- Press the pick-up button or talk button with a short press.
- Say: [Beep] “Setup”
- Prompt: “Select one of the following: Pairing options, confi rmation prompts, language, password, select phone or select music player.”
- Say: [Beep] “Pairing options”
- Prompt: “Select one of the following: Pair, Edit, Delete, List, or Set pin Code.”
- Say: [Beep] “Set pin code”
- Prompt: “Your current pin code is XXXX. Do you want to change it to a different pairing pin code?”
- Say: [Beep] “Yes”
- Prompt: “Please say a 4-digit pairing code.”
- Say: [Beep] “YYYY”
- Prompt: “YYYY is this correct?”
- Say: [Beep] “Yes” or “No”
- If “Yes”, go to Step 14. If “No”, the procedure returns to Step 9.
- Prompt: “Your new pairing pin code is YYYY. Use this pin code when pairing devices to the Hands free system. Do you want to pair a device now?”
- Say: [Beep] “Yes” or “No”
- If “Yes”, the system switches to the device registration mode. If “No”, the system returns to standby status.
Device pairing
To use Bluetooth ® Hands-Free, the device equipped with Bluetooth ® has to be paired to the Bluetooth ® unit using the following procedure.
A maximum of seven devices including hands-free mobile phones and Bluetooth ® audio devices can be paired to one vehicle.
NOTE
- A device can be paired only when the vehicle is parked. If the vehicle starts to move, the pairing procedure will end. Pairing is dangerous while driving - pair up your device before you start driving. Park the car in a safe place before paired.
- If a Bluetooth ® device has already been paired to the vehicle as a Bluetooth® audio device, it does not need to be paired again when using the device as a hands-free mobile phone. Conversely, it does not need to be paired again as a Bluetooth ® audio device if it has already been paired as a hands-free mobile phone.
- Since the communication range of a Bluetooth ® equipped device is about 10 meters (32 ft), if a device is placed within a 10-meter (32 ft) radius of the vehicle, it may be detected/paired unintentionally while another device is being paired.
- Activate the Bluetooth ® application of the device.
NOTE
For the operation of the device, refer to its instruction manual
- Press the pick-up button or talk button with a short press.
- Say: [Beep] “Setup”
- Prompt: “Select one of the following: Pairing options, confi rmation prompts, language, password, select phone or select music player.”
- Say: [Beep] “Pairing options”
- Prompt: “Select one of the following: Pair, edit, delete, list, or set pin code.”
- Say: [Beep] “Pair”
- Prompt: “Start the pairing process on your Bluetooth ® device. Your pin code is 0000 (XXXX). Input this on your Bluetooth® device. See device manual for instructions.”
- Using the device, perform a search for the Bluetooth ® device (Peripheral device).
NOTE
For the operation of the device, refer to its instruction manual.
- Select “Mazda” from the device list searched by the device.
- Input the 4-digit pairing code to the device.
- Prompt: “Please say the name of the device after the beep.”
- Say: [Beep] “XXXX - - -” (Speak a “device tag”, an arbitrary name for the device.) Example: “Stan's device.”
NOTE
Say a paired “device tag” within 10 seconds.
If more than two devices are to be paired, they cannot be paired with the same or similar “device tag”.
- Prompt: “Adding XXXXXX - - - (Ex.
“Stan's device”) (Device tag). Is this correct?”
- Say: [Beep] “Yes”
- Prompt: “Pairing complete”
After a device is registered, the system automatically identifi es the device. By activating Bluetooth ® Hands-Free again, or by activating Bluetooth ® Hands-Free fi rst after switching the ignition from OFF to ACC, the system reads out a voice guidance, “XXXXXX - - - (Ex. “Stan's device”) (Device tag) is connected”.
NOTE
- When the pairing is completed, the symbol is displayed.
- Some Bluetooth ® audio devices need a certain amount of time before the symbol is displayed.
- Device registration can also be done by operating the audio unit.
- Depending on the device, the registration status may be lost after a certain period of time. If this occurs, repeat the entire process from Step 1.
Registered device read-out
Bluetooth ® Hands-Free can read-out the devices registered to its system.
NOTE
Do this function only when parked. It is too distracting to attempt while driving and you may make too many errors to be effective
- Press the pick-up button or talk button with a short press.
- Say: [Beep] “Setup”
- Prompt: “Select one of the following: Pairing options, confi rmation prompts, language, password, select phone or select music player.”
- Say: [Beep] “Pairing options”
- Prompt: “Select one of the following: Pair, edit, delete, list, or set pin code.”
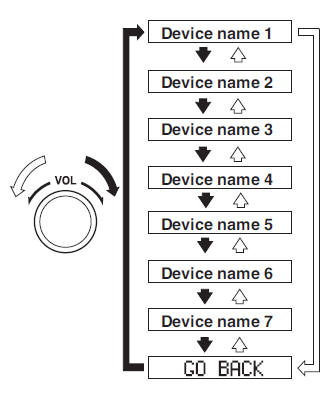
- Say: [Beep] “List”
- Prompt: “XXXXX..., XXXXX..., XXXXX... (Ex. Device A, device B, device C)” (The voice guidance reads out the device tags registered to the hands-free system.)
Press the talk button with a short press during the read-out at the desired device, and then say one of the following voice commands to execute it.
- “Select phone”: Selects device (Mobile phone) when the talk button is shortpressed.
- “Select music player”: Selects device (Music player) when the talk button is short-pressed.
- “Edit”: Edits device when the talk button is short-pressed.
- “Continue”: Continues the list readout.
- “Delete”: Deletes the registered device when the talk button is short-pressed.
- “Previous”: Returns to the previous device in read-out when the talk button is short-pressed.
- Prompt: “End of list, would you like to start from the beginning?”
- Say: [Beep] “No”
- Prompt: “Returning to main menu.”
Device selection
If several devices have been paired, the Bluetooth® unit links the device last paired. If you would like to link a different paired device, it is necessary to change the link. The order of device priority after the link has been changed is maintained even when the ignition is switched off.
(Hands-free phone)
- Press the pick-up button or talk button with a short press.
- Say: [Beep] “Setup”
- Prompt: “Select one of the following: Pairing options, confi rmation prompts, language, password, select phone or select music player.”
- Say: [Beep] “Select phone”
- Prompt: “Please say the name of
the device you would like to select.
Available devices are XXXXX... (Ex.
device A), XXXXX... (Ex. device B), XXXXX... (Ex. device C). Which device please?”
- Say: [Beep] “X” (Say the number for the mobile phone to be connected.)
- Prompt: “XXXXX... (Ex. device B...) (Registered device tag) is this correct?”
- Say: [Beep] “Yes”
- Prompt: “XXXXX... (Ex. device B...) (Device tag) selected.”
(Music player)
- Press the pick-up button or talk button with a short press.
- Say: [Beep] “Setup”
- Prompt: “Select one of the following: Pairing options, confi rmation prompts, language, password, select phone or select music player.”
- Say: [Beep] “Select music player”
- Prompt: “Please say the name of
the device you would like to select.
Available devices are XXXXX... (Ex.
device A), XXXXX... (Ex. device B), XXXXX... (Ex. device C). Which device please?”
- Say: [Beep] “X” (Say the number for the music player to be connected.)
- Prompt: “XXXXX... (Ex. device B...) (Registered device tag) is this correct?”
- Say: [Beep] “Yes”
- Prompt: “XXXXX... (Ex. device B...) (Device tag) selected.”
NOTE
- When the selected device connection
is completed, the or

symbol is displayed. - Some Bluetooth ® audio devices need
a certain amount of time before the
or
 symbol is displayed.
 - Device (Music player) selection can also be done by operating the panel button.
Deleting a device
Registered devices (Mobile phone) can be deleted individually or collectively.
NOTE
Do this function only when parked. It is too distracting to attempt while driving and you may make too many errors to be effective.
- Press the pick-up button or talk button with a short press.
- Say: [Beep] “Setup”
- Prompt: “Select one of the following: Pairing options, confi rmation prompts, language, password, select phone or select music player.”
- Say: [Beep] “Pairing options”
- Prompt: “Select one of the following: Pair, edit, delete, list, or set pin code.”
NOTE
A registered device (Mobile phone) can be deleted using the registration list.
- Say: [Beep] “Delete”
- Prompt: “Please say the name of
the device you would like to delete.
Available devices are XXXXX... (Ex.
device A), XXXXX... (Ex. device B), XXXXX... (Ex. device C), or all.
Which device please?”
- Say: [Beep] “X” (Say the number of the device to be deleted.)
NOTE
Say “All” to delete all devices (Mobile phone).
- Prompt: “Deleting XXXXX... (Ex.
device B...) (Registered device tag). Is this correct?”
- Say: [Beep] “Yes”
- Prompt: “Deleted”
Registered device editing
- Press the pick-up button or talk button with a short press.
- Say: [Beep] “Setup”
- Prompt: “Select one of the following: Pairing options, confi rmation prompts, language, password, select phone or select music player.”
- Say: [Beep] “Pairing options”
- Prompt: “Select one of the following: Pair, edit, delete, list, or set pin code.”
- Say: [Beep] “Edit”
- Prompt: “Please say the name of the
device you would like to edit. Available
devices are XXXXX... (Ex. device A),
XXXXX... (Ex. device B), XXXXX...
(Ex. device C). Which device please?”
- Say: [Beep] “X” (Say the number of the device to be edited.)
- Prompt: “New name please?”
- Say: [Beep] “XXXXX... (Ex. device C)” (Speak a “device tag”, an arbitrary name for the device.)
- Prompt: “XXXXX... (Ex. device C) (Device tag), is this correct?”
- Say: [Beep] “Yes”
- Prompt: “New name saved.”
Bluetooth ® Audio Preparation
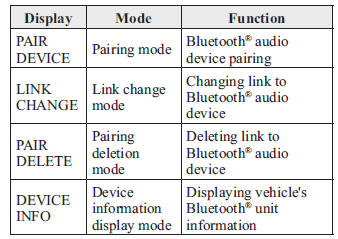
Bluetooth ® audio device set-up
Bluetooth ® audio pairing, changes, deletions, and display of paired device information can be performed.
- The mode changes as follows each time
the menu button (
 ) is
) is
pressed.Select “ BT SETUP ”.

Type B
* Depending on the mode selected, the indication changes.
- Turn the audio control dial and select a desired mode.
- Press the audio control dial to determine the mode.
Bluetooth ® audio device pairing
Any Bluetooth ® audio device must be paired to the vehicle's Bluetooth ® unit before it can be listened to over the vehicle's speakers.
A maximum of seven devices including Bluetooth® audio devices and handsfree mobile phones can be paired to one vehicle.
NOTE
- If a Bluetooth ® device has already
been paired to the vehicle as a handsfree
mobile phone, it does not need
to be paired again when using the
device as a Bluetooth ® audio device.
Conversely, it does not need to be paired again as a hands-free mobile phone if it has already been paired as a Bluetooth ® audio device.
- Device registration can also be done using voice recognition
Concerning the operation of a Bluetooth ® audio device itself, refer to its instruction manual.
Some Bluetooth ® audio devices have PIN codes (four digits). Refer to the audio device's instruction manual because the pairing procedure differs depending on whether it has a PIN code or not.
Pairing a Bluetooth ® audio device which has a four-digit PIN code
- Using the audio control dial, select the pairing mode “ PAIR DEVICE ” in the “ BT SETUP ” mode. (Refer to “Bluetooth® audio device set-up” for details.)
- Press the audio control dial to
determine the mode.
After “ ENTER PIN ” is displayed on the audio display for three seconds, “ PIN 0000 ” is displayed and the PIN code can be input.
- Input the PIN code of your Bluetooth ®
audio device by pressing channel preset
buttons 1 to 4 while “ PIN 0000 ” is
displayed.
Press channel preset button 1 to input the fi rst digit, 2 for the second, 3 for the third, and 4 for the forth. For example, if the PIN code were “4213”, press channel preset button 1 four times (1, 2, 3, 4), button 2 twice (1, 2), button 3 once (1), and button 4 three times (1, 2, 3). If the “ PIN 0000 ” display disappears before fi nishing the PIN code input, repeat the procedure from Step 1.
NOTE
Some devices accept only a particular pairing code (Usually, “0000” or “1234”).
If pairing cannot be completed, refer to the owner's manual of your mobile device, and try those numbers if necessary.
- Press the audio control dial while the
input PIN code is displayed.
“ PAIRING ” fl ashes on the display.
- Operate the Bluetooth ® audio device and set it to the pairing mode while “ PAIRING ” is fl ashing.
- When the pairing is completed, “

” and “ PAIR SUCCESS ” are displayed after about 10-30 seconds, after which “ PAIR SUCCESS ” continues to be displayed for three seconds, and then the unit returns to the normal display.
NOTE
- Some Bluetooth ® audio devices need
a certain amount of time before the
“
 ” symbol is displayed.
 - If the pairing failed, “ Err ” fl ashes for three seconds.
- Pairing cannot be performed while the vehicle is moving. If you attempt to perform pairing while the vehicle is moving, “ PAIR DISABLE ” is displayed.
- If seven Bluetooth ® audio devices
have already been paired to the
vehicle, pairing cannot be performed
and “ MEMORY FULL ” is displayed.
Delete one paired device to pair another one.
Pairing a Bluetooth ® audio device which does not have a four-digit PIN code
- Using the audio control dial, select the pairing mode “ PAIR DEVICE ” in the “ BT SETUP ” mode. (Refer to “Bluetooth® audio set up” for details.)
- Press the audio control dial to determine the mode. After “ ENTER PIN ” is displayed on the audio display for three seconds, “ PIN 0000 ” is displayed and the PIN code can be input.
- Press the audio control dial while “ PIN
0000 ” is displayed.
“ PAIRING ” fl ashes on the audio display.
- Operate the Bluetooth ® audio device and set it to the pairing mode while “ PAIRING ” is fl ashing
- As the Bluetooth ® audio device requires a PIN code, input “0000”.
- When the pairing is completed, “
” and
“ PAIR SUCCESS ” are displayed after about 10-30 seconds, after which “ PAIR SUCCESS ” continues to be displayed for three seconds, and then the unit returns to the normal display.
NOTE
- If pairing cannot be completed, try “1234” instead. Refer to the owner's manual of your mobile device for the right PIN code.
- Some Bluetooth ® audio devices need
a certain amount of time before the
“
 ” symbol is displayed.
 - If the pairing failed, “ Err ” fl ashes for three seconds.
- Pairing cannot be performed while the vehicle is moving. If you attempt to perform pairing while the vehicle is moving, “ PAIR DISABLE ” is displayed.
- If seven Bluetooth ® audio devices
have already been paired to the
vehicle, pairing cannot be performed
and “ MEMORY FULL ” is displayed.
Delete one paired device to pair another one.
Device selection
If several devices have been paired, the Bluetooth® unit links the device last paired. If you would like to link a different paired device, it is necessary to change the link. The order of device priority after the link has been changed is maintained even when the ignition is switched off.
- Using the audio control dial, select the link change mode “ LINK CHANGE ” in the “ BT SETUP ” mode. (Refer to “Bluetooth® audio device set-up” for details.)
- Press the audio control dial to determine the mode.
- The name of the currently linked
Bluetooth® audio device is displayed.
If no Bluetooth ® audio device is currently linked, the name of the fi rst device among the paired devices is displayed.
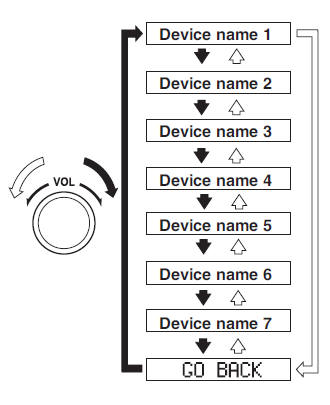
- Turn the audio control dial to select the name of the device you would like to link.
- Press the audio control dial to select the
device you would like to link.
The “
 ” symbol disappears, and
“ PAIRING ” fl ashes in the audio display.
NOTE
When “ GO BACK ” is selected and the audio control dial is pressed, the display returns to “ LINK CHANGE ”.
- If the link to the desired device is
successful, the “
 ” symbol is
displayed again, together with “ LINK CHANGED”. “ LINK CHANGED ” is displayed for three seconds, then it returns to the normal display.
NOTE
- Some Bluetooth ® audio devices need
a certain amount of time before the
“ ” symbol is displayed.
- If a hands-free type mobile phone has
been the most recently paired device,
the Bluetooth ® unit links this device.
If you would like to use a Bluetooth ® audio type device which has been previously paired to the Bluetooth ® unit, the link must be changed to this device.
- If an error occurs while trying to link a device, “ Err ” fl ashes in the display for three seconds, and the display returns to “ LINK CHANGE ”. If this occurs, check the pairing status of the Bluetooth ® audio device and the location of the device in the vehicle (not in the boot or a metal-type box), and then try the link operation again.
- Device selection can also be done using voice recognition.
How to confi rm the device currently linked
Switch to the link-change mode. (Refer to “Changing the link to a Bluetooth ® audio device”) The device name displayed fi rst is the device which is currently linked.
Deleting a device
- Using the audio control dial, select the pairing delete mode “ PAIR DELETE ” in the “ BT SETUP ” mode. (Refer to “Bluetooth® audio device set-up” for details.)
- Press the audio control dial to determine the mode.
- The name of the fi rst device among the paired devices is displayed.
- Rotate the audio control dial and select the name of the paired device you would like to delete.
NOTE
Only the names of paired devices can be displayed. If only one device is paired, only the name for this device is displayed.
- If a selection other than “ GO BACK ” is made and the audio control dial is pressed, “ SURE ? NO ” is displayed.
- Rotate the audio control dial clockwise and switch the display to “ SURE ? YES ”.
NOTE
The display changes as follows depending on whether the audio control dial is rotated clockwise or anticlockwise.
-Clockwise: “ SURE ? YES ” displayed -Anticlockwise: “ SURE ? NO ” displayed
- Press the audio control dial to delete the selected device.
NOTE
Select “ GO BACK ” and press the audio control dial to return to the “ PAIR DELETE ” display.
- “ PAIR DELETED ” is displayed for three seconds after the deletion is completed, and then it returns to the normal display.
NOTE
If an error occurs while trying to delete the paired device, “ Err ” fl ashes in the display for three seconds and the display returns to “ LINK DELETE ”.
Bluetooth ® audio device information display
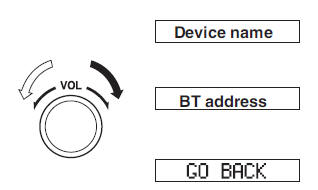
- Using the audio control dial, select the pair device information display mode “ DEVICE INFO ” in the “ BT SETUP ” mode. (Refer to “Bluetooth ® audio device set-up” for details.)
- Press the audio control dial to determine the mode.
- The name of the Bluetooth ® unit device is displayed
- Rotate the audio control dial to select the information for the Bluetooth ® unit which you would like to view.
NOTE
When “ GO BACK ” is selected and the audio control dial is pressed, the display returns to “ DEVICE INFO ”.
Available Language (Type A/Type B)
The available languages are English, French, Spanish, Italian, German, Dutch, and Portuguese. If the language setting is changed, all of the voice guidance and voice input commands are done in the selected language.
NOTE
- If the language setting is changed, device registration is maintained.
- Phonebook records are not cleared, but each language has a separate phonebook. Therefore, entries created in one language will need to be re-entered in the phonebook of the new language.
- Do these steps before you start driving. These less used functions are too distracting to undertake while driving until you are fully familiar with the system.
(Method 1)
- Press the pick-up button or talk button with a short press.
- Say: [Beep] “Setup”
- Prompt: “Select one of the following: Pairing options, confi rmation prompts, language, password, select phone or select music player.”
- Say: [Beep] “Language”
- Prompt: “Select a language: English, French, Spanish, Italian, German, Dutch, or Portuguese.”
- Say: [Beep] “French” (Speak the desired language: “English”, “French”, “Spanish”, “Italian”, “German”, “Dutch”, or “Portuguese”)
NOTE
Other language settings can also be made while in the current setting by saying the name of the language in the native pronunciation.
- Prompt: “French (Desired language) selected. Is this correct?”
- Say: [Beep] “Yes”
- Prompt: “Please wait. Switching to French phonebook. French selected.” (Spoken in the newly selected language).
(Method 2)
- Press the pick-up button or talk button with a short press.
- Say: [Beep] “French” (Say the desired language: “English”, “French”, “Spanish”, “Italian”, “German”, “Dutch”, or “Portuguese”). (Change the desired language by saying the language name.)
NOTE
Other language settings can also be made while in the current setting by saying the name of the language in the native pronunciation.
- Prompt: “Would you like to change the language to French (Desired language)?”
- Say: [Beep] “Yes”
- Prompt: “Please wait. Switching to French phonebook. French selected.” (Spoken in the newly selected language).
Voice Recognition (Type A/Type B)
In this section, the basic operation of the voice recognition is explained.
Activating Voice Recognition
To Activate the Main Menu: Press the pick-up button or talk button with a short press.
Ending Voice Recognition
Use one of the following methods:
- Press and hold the talk-button.
- Press the hang-up button.
Skipping Voice Guidance (for faster operation)
Press and release the talk-button.
NOTE
- The Bluetooth ® Hands-Free system is operable several seconds after the ignition is switched to ACC or ON (requires less than 15 seconds).
- When operating the audio unit or the A/C while using Bluetooth ® Hands-Free, the beep sounds or voice guidance (audio unit)/cannot be heard.
Tutorial
The tutorial explains how to use Bluetooth® Hands-Free.
To activate the tutorial, do the following:
- Press the pick-up button or talk button with a short press
- Say: [Beep] “Tutorial”
- Follow the prompts to receive the appropriate voice guidance instructions.
Commands useable anytime during voice recognition
“Help” or “Go Back” are commands which can be used at anytime during voice recognition.
Help function use
The help function informs the user of all the available voice commands under the current conditions.
- Say: [Beep] “Help”
- Follow the prompts to receive the appropriate voice guidance instructions.
Returning to previous operation
This command is for returning to the previous operation while in the voice recognition mode.
Say: [Beep] “Go Back”
To prevent a deterioration in the voice recognition rate and voice quality, the following points should be observed:
- The voice recognition cannot be performed while voice guidance or the beep sound is operating. Wait until the voice guidance or the beep sound is fi nished before saying your commands.
- Dialects or different wording other than hands-free prompts cannot be recognised by voice recognition. Speak in the wording specifi ed by the voice commands.
- It is not necessary to face the microphone or approach it. Speak the voice commands while maintaining a safe driving position.
- Do not speak too slow or too loud.
- Speak clearly, without pausing between words or numbers.
- Close the windows to reduce loud noises from outside the vehicle, or turn down the airfl ow of the air-conditioning system while Bluetooth ® Hands-Free is being used.
- Make sure the vents are not directing air up towards the microphone.
NOTE
If the voice recognition performance is not satisfactory.
Refer to Voice Recognition Learning Function (Speaker Enrolment) (Type A/ Type B) on page 5-108 .
Refer to Troubleshooting on page 5-145 .
Security Setting (Type A/Type B)
If a password is set, the system cannot be activated unless the password is input.
NOTE
Do this function only when parked. It is too distracting to attempt while driving and you may make too many errors to be effective.
Password setting
- Press the pick-up button or talk button with a short press
- Say: [Beep] “Setup”
- Prompt: “Select one of the following: Pairing options, confi rmation prompts, language, password, select phone or select music player.”
- Say: [Beep] “Password”
- Prompt: “Password is disabled. Would you like to enable it?”
- Say: [Beep] “Yes”
- Prompt: “Please say a 4-digit password. Remember this password. It will be required to use this system.”
- Say: [Beep] “XXXX” (Say a desired 4-digit password, “PCode”.)
- Prompt: “Password XXXX (Password, PCode). Is this correct?”
- Say: [Beep] “Yes”
- Prompt: “Password is enabled.”
Using Bluetooth ® Hands-Free with a password
- Press the pick-up button or talk button with a short press.
- Prompt: “Hands-Free system is locked. State the password to continue.”
- Say: [Beep] “XXXX” (Say the set password “PCode”.)
- If the correct password is input, voice
guidance “XXXXXX... (Ex. “Mary's
device”) (Device tag) is connected” is
announced.
If the password is incorrect, voice guidance “XXXX (4-digit password, Pcode) incorrect password, please try again” is announced.
Cancelling the password
NOTE
Do this function only when parked. It is too distracting to attempt while driving and you may make too many errors to be effective.
- Press the pick-up button or talk button with a short press.
- Say: [Beep] “Setup”
- Prompt: “Select one of the following: Pairing options, confi rmation prompts, language, password, select phone or select music player.”
- Say: [Beep] “Password”
- Prompt: “Password is enabled. Would you like to disable it?”
- Say: [Beep] “Yes”
- Prompt: “Password is disabled.”
Confi rmation Prompts
The confi rmation prompt confi rms the command content to the user before advancing to the operation requested by the user. When this function is turned on, the system reads out the voice input command previously received and confi rms whether the command is correct before advancing to the command execution.
When the confi rmation prompt function is turned on: (Ex. “Calling John's device. Is this correct?”) When the confi rmation prompt function is turned off: (Ex. “Calling John's device.”)
NOTE
If the confi rmation prompt function is turned off when making an emergency call, the system reads out and confi rms the command before executing it.
- Press the pick-up button or talk button with a short press.
- Say: [Beep] “Setup”
- Prompt: “Select one of the following: Pairing options, confi rmation prompts, language, password, select phone or select music player.”
- Say: [Beep] “Confi rmation prompts”
- Prompt: “Confi rmation prompts are on/off. Would you like to turn confi rmation prompts off/on?”
- Say: [Beep] “Yes”
- Prompt: “Confi rmation prompts are off/on.”
Voice Recognition Learning Function (Speaker Enrolment) (Type A/Type B)
The voice recognition learning function enables voice recognition appropriate to the characteristics of the user's voice. If the recognition of the voice input commands to the system is not adequate, this function can largely improve the system's voice recognition of the user. If your voice can be recognised suffi ciently without using this function, you may not realize the added benefi t of the function. To register your voice, the voice input command list must be read out. Read out the list when the vehicle is parked. Perform the registration in as quiet a place as possible 5-105 . The registration must be performed completely. The required time is a few minutes. The user needs to be seated in the driver's seat with the voice input command list for voice recognition learning open to the page indicated below.
When voice recognition learning is done for the fi rst time
- Press the pick-up button or talk button with a short press
- Say: [Beep] “Voice training”
- Prompt: “This operation must be
performed in a quiet environment while
the vehicle is stopped. See the owner's
manual for the list of required training
phrases. Press and release the talk
button when you are ready to begin.
Press the hang-up button to cancel at any time.”
- Press the talk button with a short press.
- The voice guidance reads out the voice input command number (refer to the voice input command list for voice recognition learning). (Ex. “Please read phrase 1” )
- Say: [Beep] “0123456789” (Say the voice input command for voice recognition learning (1 to 8) according to the voice guidance.)
- Prompt: “Speaker enrolment is complete.”
NOTE
If an error occurred in the voice recognition learning, re-learning can be done by pressing the talk button with a short press.
Voice recognition re-learning
If voice recognition learning has already been done.
- Press the pick-up button or talk button with a short press.
- Say: [Beep] “Voice training”
- Prompt: “Enrolment is enabled/ disabled. Would you like to disable/ enable or retrain?”
- Say: [Beep] “Retrain”
- Prompt: “This operation must be
performed in a quiet environment while
the vehicle is stopped. See the owner's
manual for the list of required training
phrases. Press and release the talk
button when you are ready to begin.
Press the hang-up button to cancel at any time.”
- Press the talk button with a short press.
- The voice guidance reads out the voice input command number (refer to the voice input command list for voice recognition learning). (Ex. “Please read phrase 1”)
- Say: [Beep] “0123456789” (Say the voice input command for voice recognition learning (1 to 8) according to the voice guidance.)
- Prompt: “Speaker enrolment is complete.”
NOTE
If an error occurred in the voice recognition learning, re-learning can be done by pressing the talk button with a short press.
Voice input command list for voice recognition learning
When reading out, the following points must be observed:
- Read out the numbers one at a time
correctly and naturally.
(For example, “1234” must be read out “one, two, three, four” not “twelve, thirty four”.)
- Do not read out parentheses. “(” and hyphens “-” are used for separating numbers in a phone number.
Ex.
“(888) 555-1212” must be spoken “Eight,
eight, eight, fi ve, fi ve, fi ve, one, two, one,
two.” 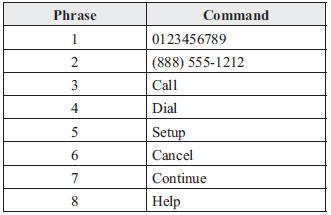
NOTE
- The applicable phrase appears in the audio display.
- After user voice registration is completed, voice guidance “Speaker enrolment is complete” is announced.
Voice recognition learning on/off
- Press the pick-up button or talk button with a short press.
- Say: [Beep] “Voice training”
- Prompt: “Enrolment is enabled/ disabled. Would you like to disable/ enable or retrain?”
- Say: [Beep] “Disable” or “Enable”
- When “Disable” is spoken, the voice
recognition learning is turned off.
When “Enable” is spoken, the voice recognition learning is turned on.
- Prompt: “Speaker Enrolment is disabled/enabled.”
Bluetooth ® Preparation (Type C/ Type D)
Device pairing
To use Bluetooth ® audio and Hands-Free, the device equipped with Bluetooth ® has to be paired to the unit using the following procedure. A maximum of seven devices including Bluetooth ® audio devices and hands-free mobile phones can be paired.
NOTE
The Bluetooth ® system may not operate for 1 or 2 minutes after the ignition is switched to ACC or ON. However, this does not indicate a problem. If the Bluetooth® system does not connect automatically after 1 or 2 minutes have elapsed, make sure that the Bluetooth ® setting on the device is normal and attempt to reconnect the Bluetooth ® device from the vehicle side.
Pairing Procedure
- Select the
 icon on
the home screen and display the Settings screen. - Select the
 tab.
tab. - Select

- Turn the Bluetooth ® setting on.
- Select
 to display
the message and switch to the device operation. - Using your device, perform a search for the Bluetooth ® device (Peripheral device).
- Select “Mazda” from the device list searched by the device.
- (Device with Bluetooth ® version 2.0)
Input the displayed 4-digit pairing code
into the device.
(Device with Bluetooth ® version 2.1 or higher) Make sure the displayed 6-digit code on the audio is also displayed on the device, and touch the
 .
.Connection permission and phonebook access permission for your mobile device may be required depending on the mobile device.
- If pairing is successful, the functions of the device connected to Bluetooth ® are displayed.
- (Devices compatible with Mazda Email / SMS function) SMS (Short Message Service) messages, and E-mail for the device are downloaded automatically. A download permission operation for your device may be required depending on the device.
NOTE
When Call history and messages are downloaded automatically, each automatic download setting must be on.
Refer to Communication Settings on page 5-130 .
After a device is registered, the system automatically identifi es the device. By activating Bluetooth ® Hands-Free again, or by activating Bluetooth ® Hands-Free fi rst after switching the ignition from OFF to ACC, the device connection condition is indicated in the centre display.
IMPORTANT note about pairing and automatic reconnection:
- If pairing is redone on the same mobile phone device, fi rst clear “Mazda” displayed on the Bluetooth ® setting screen of the mobile device.
- When the OS of the device is updated,
the pairing information may be deleted.
If this happens, reprogramme the pairing information to the Bluetooth ® unit.
- Before you pair your device, make sure that Bluetooth ® is “ON”, both on your phone and on the vehicle.
Device selection
If several devices have been paired, the Bluetooth® unit links the device last paired. If you would like to link a different paired device, it is necessary to change the link. The order of device priority after the link has been changed is maintained even when the ignition is switched off.
Connecting other devices
- Select the
 icon on the
home screen and display the Settings screen. - Select the
 tab.
tab. - Select

- Turn the Bluetooth ® setting on.
- Select the name of the device you would like to connect.
 selection
Connects both devices as hands-free and Bluetooth ® audio.
 selection
Connects as a hands-free device.
 selection
Connects as Bluetooth ® audio.
NOTE
The following functions can be used for the Hands-free or audio.
- Hands-free: Phone calls and E-mail/ SMS
- Audio: Bluetooth ® audio, Aha™, Stitcher™ radio
Disconnecting a device
- Select the
 icon on the home
screen and display the Settings screen. - Select the
 tab.
tab. - Select

- Turn the Bluetooth ® setting on.
- Select the device name which is currently connected.
- Select

Deleting a device
Selecting and deleting devices
- Select
 the icon on the home
screen and display the Settings screen. - Select the
 tab.
tab. - Select

- Turn the Bluetooth ® setting on.
- Select the device name which you would like to delete.
- Select

- Select

Deleting all devices
- Select the
 icon on the
home screen and display the Settings screen. - Select the
 tab.
tab. - Select

- Select

- Select

- Select

Changing PIN code
PIN code (4 digits) can be changed.
- Select the
 icon on the
home screen and display the Settings screen. - Select the
 tab.
tab. - Select

- Select

- Select

- Input the new PIN code to be set.
- Select
 .
.
Available Language (Type C/Type D)*
The language can be changed.
Refer to Settings on page 5-67 .
NOTE
Depending on the language, it may only be available for the screen display, but not for the voice recognition.
Voice Recognition (Type C/Type D)
In this section, the basic operation of the voice recognition is explained.
Activating Voice Recognition
Press the talk button.
Ending Voice Recognition
Use one of the following methods:
- Press the hang-up button.
- Say, “Cancel”.
- Operate the commander switch or the centre display (only when vehicle is stopped).
Skipping Voice Guidance (for faster operation)
Press and release the talk button.
Troubleshooting for Voice Recognition
If you do not understand an operation method while in the voice recognition mode, say “Tutorial” or “Help”.
Commands useable anytime during voice recognition
“Go Back” and “Cancel” are commands which can be used at anytime during voice recognition.
Returning to previous operation
To return to the previous operation, say, “Go Back” while in voice recognition mode.
Cancel
To put the Bluetooth ® Hands-Free system in standby mode, say, “Cancel” while in voice recognition mode.
To prevent a deterioration in the voice recognition rate and voice quality, the following points should be observed:
- The voice recognition cannot be performed while voice guidance or the beep sound is operating. Wait until the voice guidance or the beep sound is fi nished before saying your commands.
- Phone related commands are available only when your phone is connected via Bluetooth® . Make sure your phone is connected via Bluetooth ® before you operate phone related voice commands.
- Music play commands, such as Play Artist and Play Album can be used only in USB audio mode.
- Do not speak too slowly or loudly (no loud voice).
- Speak clearly, without pausing between words or numbers.
- Dialects or different wording other than hands-free prompts cannot be recognised by voice recognition. Speak in the wording specifi ed by the voice commands.
- It is not necessary to face the microphone or approach it. Speak the voice commands while maintaining a safe driving position.
- Close the windows to reduce loud noises from outside the vehicle, or turn down the airfl ow of the air-conditioning system while Bluetooth ® Hands-Free is being used.
- Make sure the vents are not directing air up towards the microphone.
NOTE
If the voice recognition performance is not satisfactory.
Refer to Troubleshooting on page 5-145 .
Audio Operation Using Voice Recognition (Type C/Type D)
Main audio operation
The below commands are examples of the available commands.
When the talk button is pressed and the following command is spoken out, the audio can be operated. The commands in the () can be omitted. The specifi ed name and number are put into the {}.
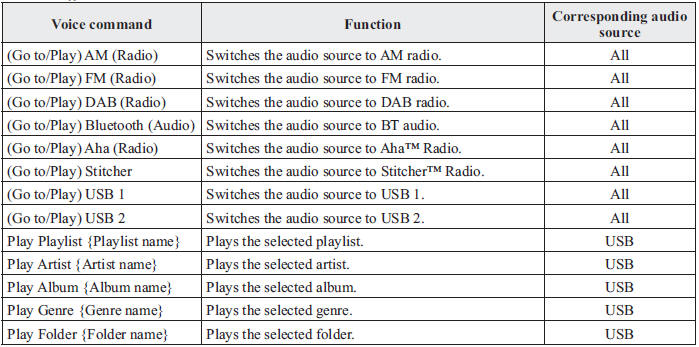
NOTE
- Some commands cannot be used depending on devices and use conditions.
- If the Bluetooth ® device, USB, or AUX is not connected, the related commands cannot be used.
- Bluetooth® Hands-Free (Type A/Type B)
- Bluetooth® Hands-Free (Type C/Type D)
- Bluetooth® Audio (Type A/Type B)
- Bluetooth® Audio (Type C/Type D)
- Troubleshooting

