Mazda 2: Crankshaft Position (CKP) Sensor
CRANKSHAFT POSITION (CKP) SENSOR REMOVAL/INSTALLATION
CAUTION:
- When replacing the CKP sensor, make sure there is no foreign material on it such as metal shavings. If it is installed with foreign material, the sensor output signal will malfunction resulting from fluctuation in magnetic flux and cause a deterioration in engine control.
1. Disconnect the negative battery cable.
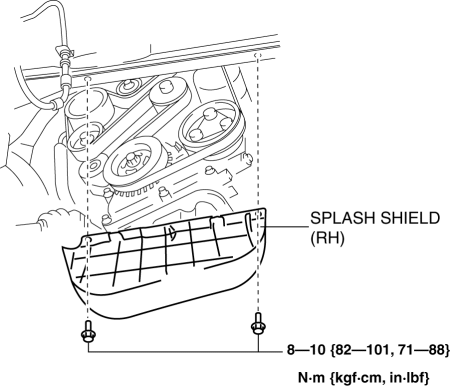
2. Remove the splash shield.
3. Remove the drive belt. (See DRIVE BELT REMOVAL/INSTALLATION).
4. Disconnect the CKP sensor connector.
5. Remove the CKP sensor.
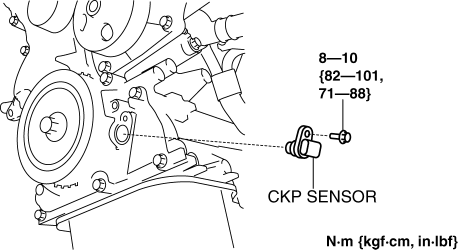
6. Install in the reverse order of removal.
CRANKSHAFT POSITION (CKP) SENSOR INSPECTION
Visual Inspection
1. Remove the CKP sensor. (See CRANKSHAFT POSITION (CKP) SENSOR REMOVAL/INSTALLATION).
2. Verify that there are no metal shavings on the sensor.
- If there is a malfunction, replace the CKP sensor. (See CRANKSHAFT POSITION (CKP) SENSOR REMOVAL/INSTALLATION).
3. Install the CKP sensor. (See CRANKSHAFT POSITION (CKP) SENSOR REMOVAL/INSTALLATION).
Air Gap Inspection
1. Verify that the CKP sensor is securely installed.
2. Using a thickness gauge, measure the air gap between the plate projections at the back of crankshaft pulley and the CKP sensor.
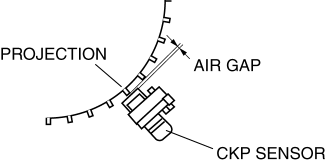
- If not within the specification, inspect the plate projections for
cracks or
bending.
- If not within the specification, replace the crankshaft pully.
(See FRONT OIL SEAL REPLACEMENT).
- If not within the specification, replace the crankshaft pully.
Air gap
- 0.5-1.5 mm {0.02-0.05 in}
Voltage Inspection
CAUTION:
- Water penetrating the connector will cause sensor malfunction. To prevent this, be careful not to damage the wiring harnesses or the waterproof connector so as to cause water penetration.
1. Idle the engine.
2. Measure the crankshaft position signal and verify that rectangular waves are produced.
(See PCM INSPECTION).
3. If not as specified, replace the CKP sensor. (See CRANKSHAFT POSITION (CKP) SENSOR REMOVAL/INSTALLATION).

