Mazda 2: Foreword [Radio]
Mazda 2 2007-2014 Service Manual / Body and Accessories / Foreword [Radio]
NOTE:
- If the location, time, and broadcasting station etc. can be specified through interview with the customer, there is the possibility that the signal reception environment is the cause of the problem.
- Perform confirmation of symptom and evaluate under the conditions that customer reported (location, time, broadcasting station etc).. If this is not possible, confirm problem using similar conditions.
- Before inspection or repair, record the broadcasting stations that customer has preset and reset them accordingly after the inspection or repair. Adjust the clock also.
Troubleshooting Index
![Mazda 2. FOREWORD [RADIO]](images/books/1059/mazda_2_foreword_radio__3079.png)
Quick Diagnostic Chart (Radio)
![Mazda 2. FOREWORD [RADIO]](images/books/1059/mazda_2_foreword_radio__3080.png)
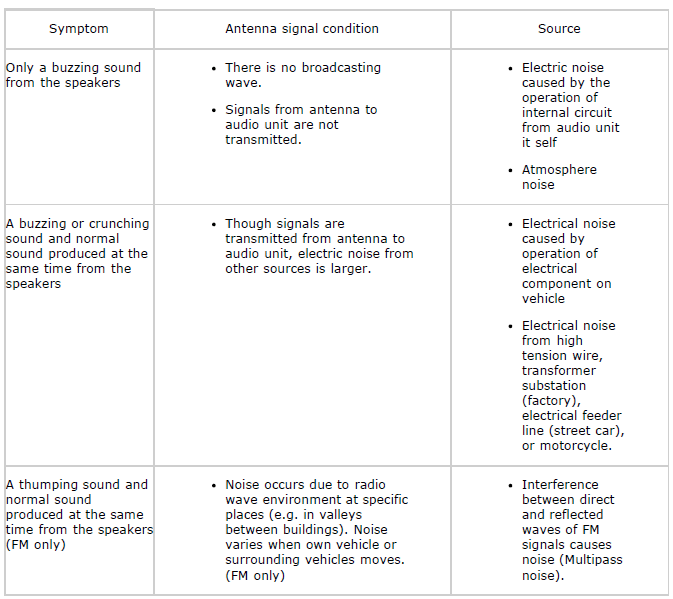
CONFIRMATION STEP 1: RECEPTION CONDITION SYMPTOM (EXAMPLE)
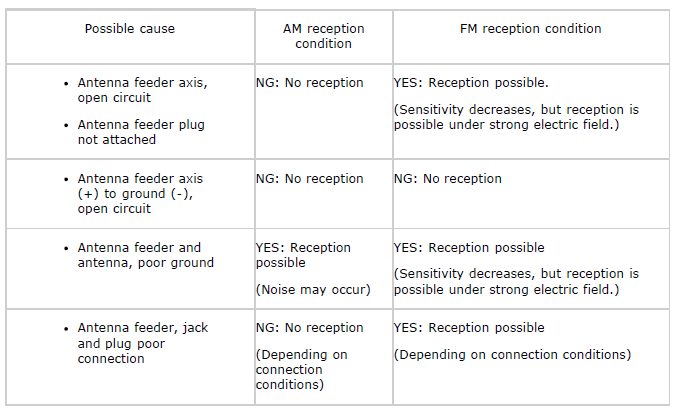
CONFIRMATION STEP 2: ANTENNA SYSTEM SYMPTOM (EXAMPLE)
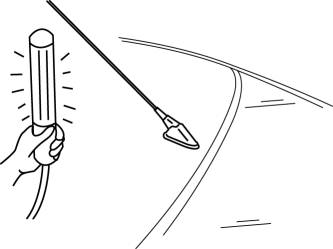
CONFIRMATION STEP 3: ANTENNA SYSTEM SIMPLE INSPECTION
- Because the antenna system is equipped with a capacitor, the continuity
cannot be
checked. Therefore proceed to the following simple inspection.
- Turn the AM radio on.
- Tune to the frequency with no broadcast and listen for a buzzing sound.
- Turn a hand-held light on and shake it around the antenna rod (around 10-20 mm {0.40-0.78 in})
- If a whirring sound from the speaker synchronized to the work light movement is confirmed, the antenna system is normal.
NOTE:
- Use a fluorescent light type for the inspection.
Accurate diagnostic cannot be done with an incandescent light.
NO.1 NO RADIO RECEPTION (AM/FM)/NO OR LOW VOLUME
![Mazda 2. FOREWORD [RADIO]](images/books/1059/mazda_2_foreword_radio__3084.png)
Diagnostic procedure
![Mazda 2. FOREWORD [RADIO]](images/books/1059/mazda_2_foreword_radio__3085.png)
![Mazda 2. FOREWORD [RADIO]](images/books/1059/mazda_2_foreword_radio__3086.png)
![Mazda 2. FOREWORD [RADIO]](images/books/1059/mazda_2_foreword_radio__3087.png)
NO.2 NOISE FROM RADIO (AM ONLY)
![Mazda 2. FOREWORD [RADIO]](images/books/1059/mazda_2_foreword_radio__3088.png)
Diagnostic procedure
![Mazda 2. FOREWORD [RADIO]](images/books/1059/mazda_2_foreword_radio__3089.png)
![Mazda 2. FOREWORD [RADIO]](images/books/1059/mazda_2_foreword_radio__3090.png)
![Mazda 2. FOREWORD [RADIO]](images/books/1059/mazda_2_foreword_radio__3091.png)
![Mazda 2. FOREWORD [RADIO]](images/books/1059/mazda_2_foreword_radio__3092.png)
NO.3 NOISE FROM RADIO (FM ONLY)
![Mazda 2. FOREWORD [RADIO]](images/books/1059/mazda_2_foreword_radio__3093.png)
Diagnostic procedure
![Mazda 2. FOREWORD [RADIO]](images/books/1059/mazda_2_foreword_radio__3094.png)
![Mazda 2. FOREWORD [RADIO]](images/books/1059/mazda_2_foreword_radio__3095.png)
![Mazda 2. FOREWORD [RADIO]](images/books/1059/mazda_2_foreword_radio__3096.png)
NO.4 CANNOT TUNE (SEEK DOES NOT STOP)
![Mazda 2. FOREWORD [RADIO]](images/books/1059/mazda_2_foreword_radio__3097.png)
Diagnostic procedure
![Mazda 2. FOREWORD [RADIO]](images/books/1059/mazda_2_foreword_radio__3098.png)
![Mazda 2. FOREWORD [RADIO]](images/books/1059/mazda_2_foreword_radio__3099.png)
NO.5 CANNOT PRESET (PRESET FUNCTION DOES NOT OPERATE)
![Mazda 2. FOREWORD [RADIO]](images/books/1059/mazda_2_foreword_radio__3100.png)
Diagnostic procedure
![Mazda 2. FOREWORD [RADIO]](images/books/1059/mazda_2_foreword_radio__3101.png)
NO.6 RECEPTION FREQUENCY OF RADIO SLIPS
![Mazda 2. FOREWORD [RADIO]](images/books/1059/mazda_2_foreword_radio__3102.png)
Diagnostic procedure
![Mazda 2. FOREWORD [RADIO]](images/books/1059/mazda_2_foreword_radio__3103.png)

