Mazda 2: Fuel Injector
FUEL INJECTOR REMOVAL/INSTALLATION
WARNING:
- Fuel line spills and leakage are dangerous. Fuel can ignite and cause serious injuries or death. Fuel can also irritate skin and eyes. To prevent this, always complete the "BEFORE SERVICE PRECAUTION".
CAUTION:
- Disconnecting/connecting the quick release connector without cleaning it may possibly cause damage to the fuel pipe and quick release connector. Always clean the quick release connector joint area before disconnecting/connecting using a cloth or soft brush, and make sure that it is free of foreign material.
1. Complete the "BEFORE SERVICE PRECAUTION". (See BEFORE SERVICE PRECAUTION).
2. Disconnect the negative battery cable. (See BATTERY REMOVAL/INSTALLATION).
3. Remove the fresh-air duct and the air cleaner as a single unit. (See INTAKE-AIR SYSTEM REMOVAL/INSTALLATION).
4. Disconnect the fuel injector connector.
5. Remove in the order indicated in the table.
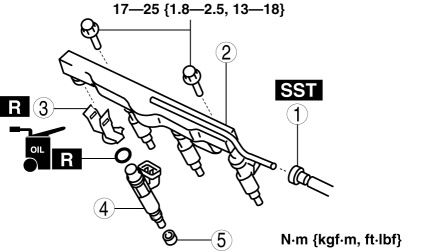
- Quick release connector
- Fuel distributor
- Fuel injector clip
- Fuel injector
- Insulator
6. Install in the reverse order of removal.
7. Complete the "AFTER SERVICE PRECAUTION". (See AFTER SERVICE PRECAUTION).
Fuel Injector Clip Removal Note
CAUTION:
- If the fuel injector port flange or fuel distributor coated part is damaged, it might cause fuel leakage. To prevent damage, carefully remove the fuel injector clip.
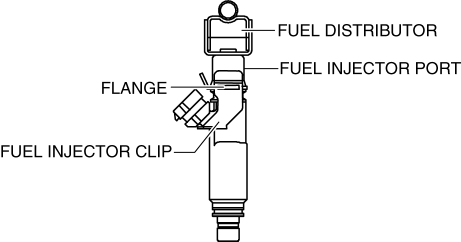
- Use of a deformed fuel injector clip will cause the fuel injector to be connected incorrectly and could result in fuel leakage. Make sure to replace with a new fuel injector clip after removing it.
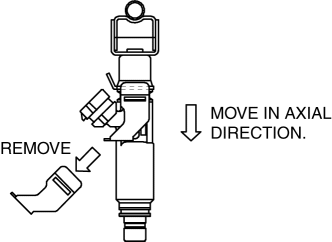
1. Detach one side of the fuel injector clip from the fuel injector port flange.
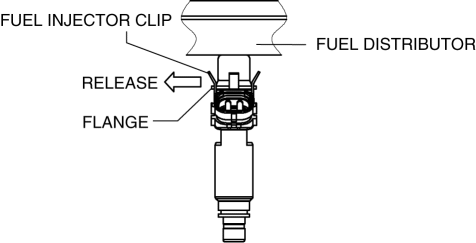
2. While holding one side of the fuel injector clip removed in Step 1 to prevent it shifting, release the other side of fuel injector clip.
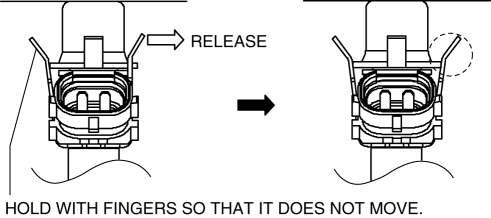
3. Detach the fuel injector clip by sliding it in the axial direction of the fuel injector.
Fuel Injector Installation Note
1. Apply a small amount of clean oil to a new O-ring.
CAUTION:
- A damaged O-ring could cause fuel leakage. Be careful not to damage the O-ring when installing the fuel injector.
- If there is foreign material on the fuel injector connecting part, it might damage the fuel injector and fuel distributor. To prevent this, clean the connecting part before connecting the fuel injector.
2. Install the fuel injector straight to the fuel injector port.
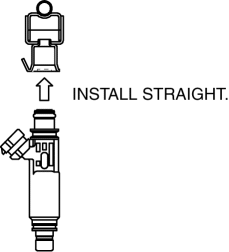
3. Verify that the fuel injector rotates smoothly.
- If it does not rotate smoothly, reinstall the fuel injector.
Fuel Injector Clip Installation Note
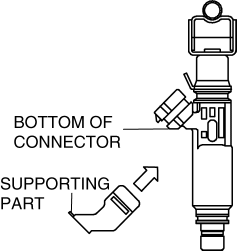
1. Install a new fuel injector clip to the fuel injector and insert the supporting part completely to the lower part of the fuel injector connector.
2. Insert the fuel injector port flange into the fuel injector clip groove, sliding the fuel injector clip along the fuel injector with the fuel injector clip groove parallel to the fuel injector port flange.
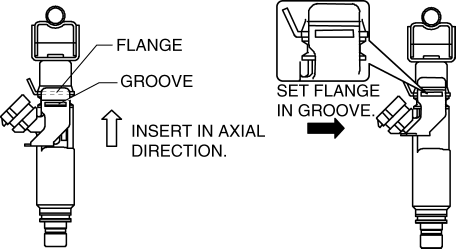
3. Verify that the fuel injector port flange is completely inserted into the groove.
FUEL INJECTOR INSPECTION
Resistance Inspection
1. Disconnect the negative battery cable. (See BATTERY REMOVAL/INSTALLATION).
2. Disconnect the fuel injector connector.
3. Inspect the resistance between fuel injector terminals A and B using a tester.
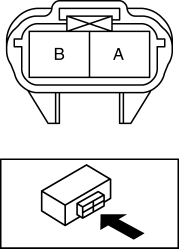
Fuel injector resistance
- Approx. 12.0 ohms [20

