Mazda 2: Glass/Windows/Mirrors
GLASS/WINDOWS/MIRRORS LOCATION INDEX
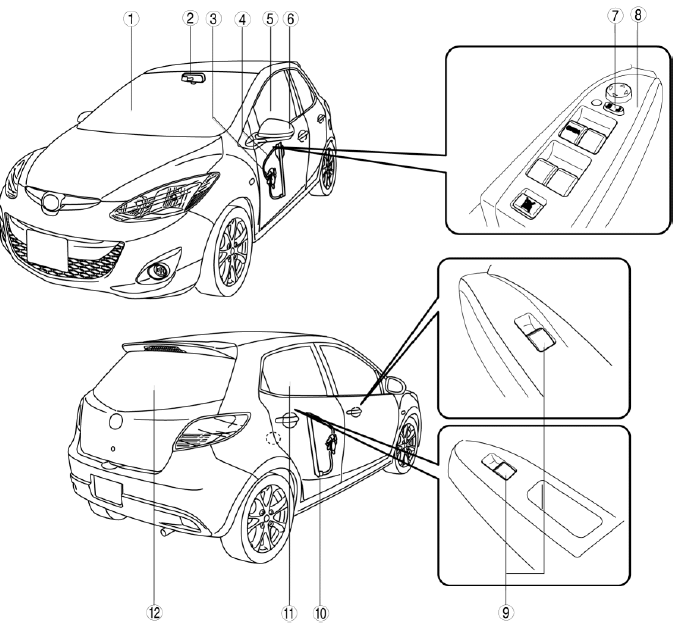
- Windshield
- Rearview mirror
- Power window motor
- Front power window regulator
- Front door glass
- Power outer mirror
- Power outer mirror switch
- Power window main switch
- Power window subswitch
- Rear power window regulator
- Rear door glass
- Rear window glass
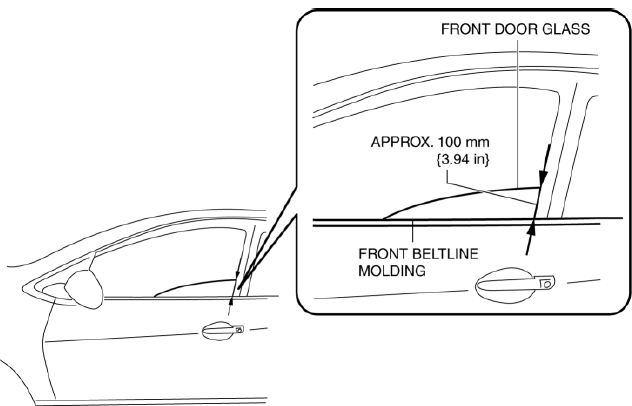
FRONT DOOR GLASS REMOVAL/INSTALLATION
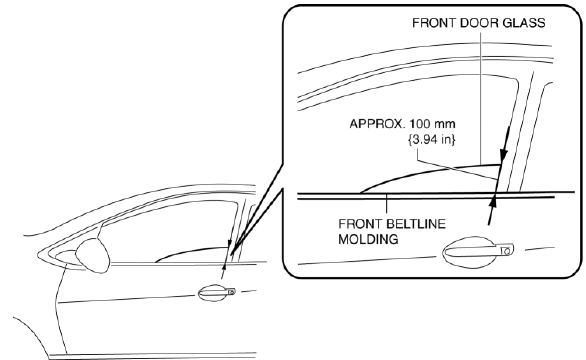
1. To access the glass installation bolt, adjust the position of the front door glass so that the height of the front door glass towards the rear is approx. 100 mm {3.94 in}.
2. Disconnect the negative battery cable.
3. Remove the inner garnish. (See INNER GARNISH REMOVAL/INSTALLATION).
4. Remove the front door trim. (See FRONT DOOR TRIM REMOVAL/INSTALLATION).
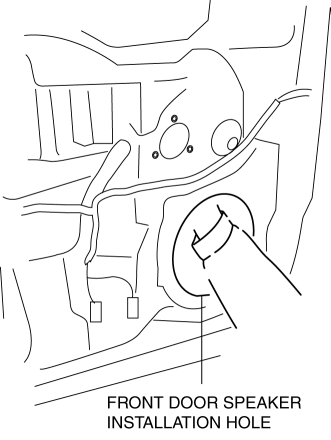
5. Remove the front door speaker. (See FRONT DOOR SPEAKER REMOVAL/INSTALLATION).
6. Remove the hole cover.
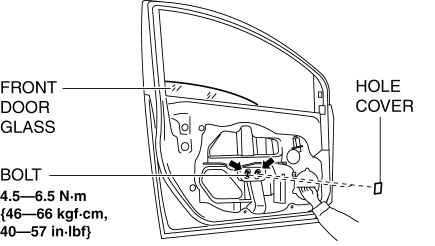
7. Remove the bolts.
CAUTION:
- If the bolts are removed without supporting the front door glass, the front door glass may fall off and be damaged. Remove the bolts while inserting your hand into the front door speaker installation hole to support the front door glass.
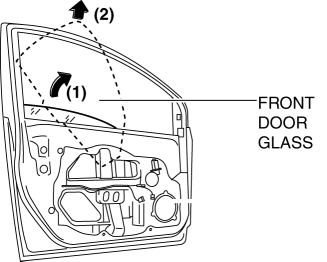
8. Lift up the front door glass, tilt it in the direction of arrow (1) shown in the figure, then remove it in the direction of arrow (2).
9. Install in the reverse order of removal.
CAUTION:
- If the bolts are installed without supporting the front door glass, the front door glass may fall off and be damaged. When installing the front door glass, align the glass edge with the front door glass guide by hand through the speaker installation hole, and then install the bolts.
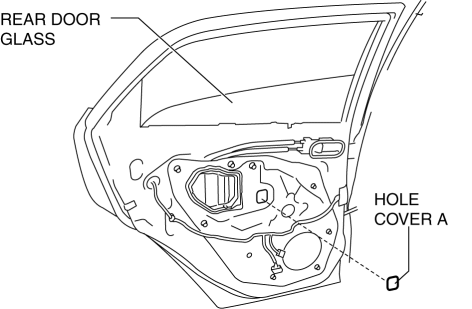
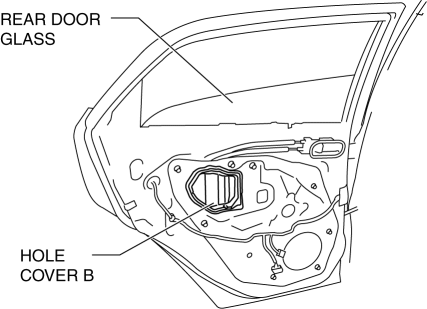
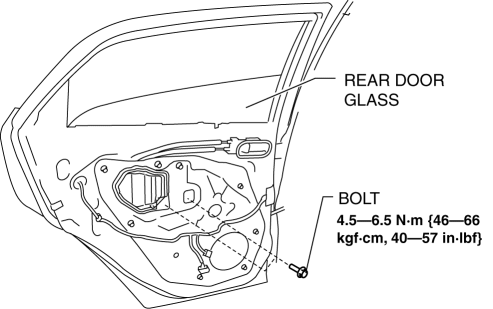
REAR DOOR GLASS REMOVAL/INSTALLATION
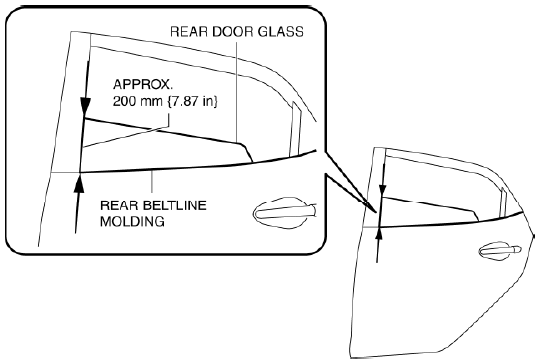
1. To access the glass installation bolt, adjust the position of the rear door glass that the height of the rear door glass towards the front is approx. 200 mm {7.87 in}.

2. Disconnect the negative battery cable.
3. Remove the sail inner garnish. (See SAIL INNER GARNISH REMOVAL/INSTALLATION).
4. Remove the rear door garnish. (See REAR DOOR GARNISH REMOVAL/INSTALLATION).
5. Remove the rear door trim. (See REAR DOOR TRIM REMOVAL/INSTALLATION).
6. Remove the rear door speaker. (See REAR DOOR SPEAKER REMOVAL/INSTALLATION).
7. Remove the rear door glass guide and glass run channel as a single unit. (See Rear Door Glass Guide Removal Note).
8. Remove the hole cover A
9. Slightly bend back the hole cover B.
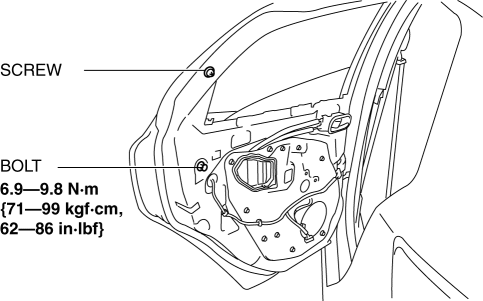
10. Remove the bolts.
CAUTION:
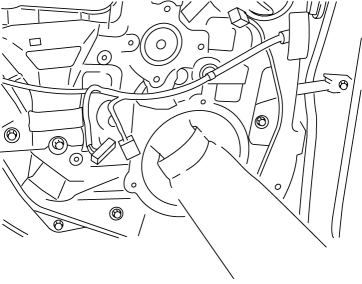
- If the bolts are removed without supporting the rear door glass, the rear door glass may fall off and be damaged. Remove the bolts while inserting your hand into the service hole to support the rear door glass.
11. Lift up the rear door glass, tilt it in the direction of arrow (1) shown in the figure, then remove it in the direction of arrow (2).

12. Install in the reverse order of removal.
CAUTION:
- If the bolts are removed without supporting the rear door glass, the rear door glass may fall off and be damaged. Remove the bolts while inserting your hand into the rear door speaker installation hole to support the rear door glass.
Rear Door Glass Guide Removal Note
1. Pull up the rear door weatherstrip and remove the screw.
2. Remove the bolt.
3. Slide the rear door glass guide in the direction of the arrow shown in the figure.
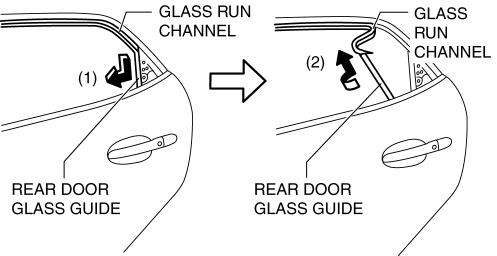
4. While rotating the rear door glass guide in the direction of the arrow shown in the figure, pull out the rear door glass guide and the glass run channel as a single unit from the rear door.
WINDSHIELD REMOVAL
1. Disconnect the negative battery cable.
2. Remove the following parts:
- Windshield wiper arm and blade (See WINDSHIELD WIPER ARM AND BLADE REMOVAL/INSTALLATION).
- Cowl grille (See COWL GRILLE REMOVAL/INSTALLATION).
- Cowl panel (See COWL PANEL REMOVAL/INSTALLATION).
- Rain sensor (vehicles with rain sensor) (See RAIN SENSOR REMOVAL/INSTALLATION).
- Rear view mirror (See REARVIEW MIRROR REMOVAL).
- A-pillar trim (See A-PILLAR TRIM REMOVAL/INSTALLATION).
- Sunvisor (See SUNVISOR REMOVAL/INSTALLATION).
- Assist handle (See ASSIST HANDLE REMOVAL/INSTALLATION).
- Interior light (See INTERIOR LIGHT REMOVAL/INSTALLATION).
3. Set the headliner out of the way.
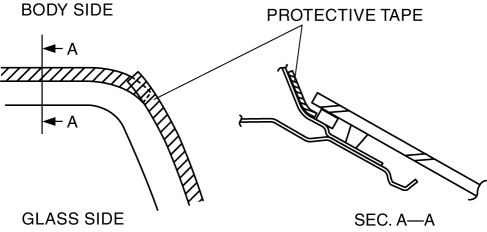
4. Apply protective tape along the edge of the body.
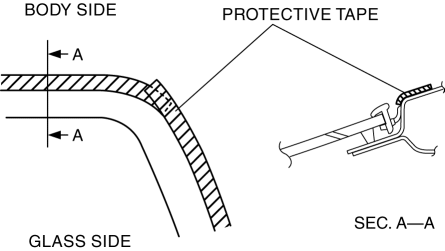
NOTE:
- Overlap and adhere the protective tape to the corners to prevent damage.
5. Remove the windshield molding by pulling it outward.
NOTE:
- If the windshield molding is difficult to remove, warm the windshield molding using a hot air blower.
- The windshield molding is a replacement part.
Not Reusing Windshield
NOTE:
- If it is difficult to cut sealant, use piano wire and follow the procedure under "Reusing Windshield".
WARNING:
- Using piano wire with bare hands can cause injury. Always wear gloves when using piano wire.
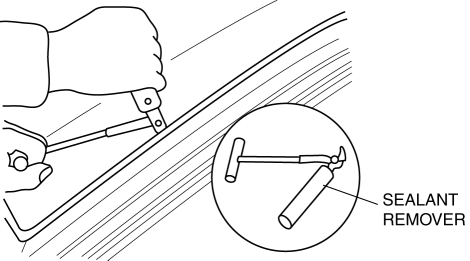
1. Cut out the sealant all around the glass using a sealant remover.
2. Remove the windshield.
Reusing Windshield
WARNING:
- Using piano wire with bare hands can cause injury. Always wear gloves when using piano wire.
CAUTION:
- Because the lens for rainfall/illumination level detection is integrated with the windshield, the auto wiper/auto light systems may not operate correctly if the lens is damaged. When removing the windshield, be careful not to damage the lens. If the lens is damaged, replace the windshield.
NOTE:
- Before removing the windshield from the body, mark the position of the windshield by affixing tape to the windshield and body panel.
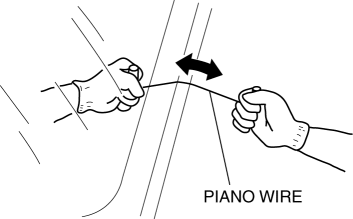
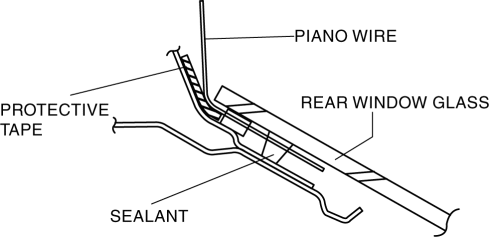
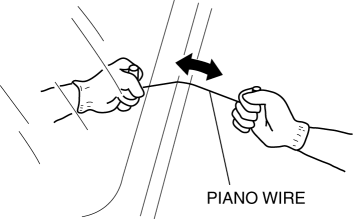
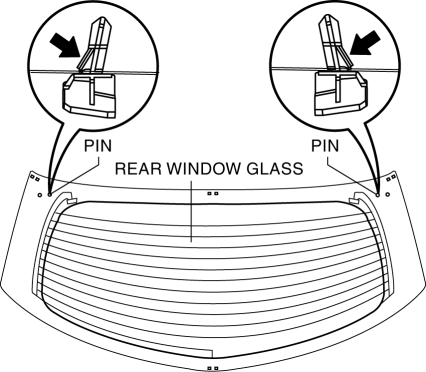
1. Avoiding the pin on the inside of the vehicle, insert piano wire which has been cut to sufficient length.
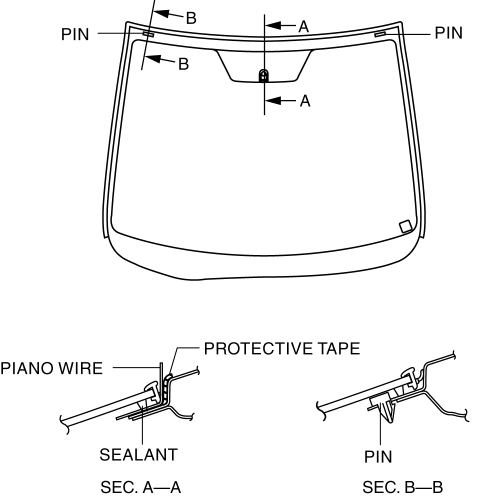
2. Wind each end of piano wire around a bar.
NOTE:
- Use a long sawing action to spread the work over the whole length of piano wire to prevent it from breaking due to localized heating.
3. Secure one end of piano wire, and while pulling the other end, cut the sealant around the windshield.
4. Pinch the pin from the inside of the vehicle and detach it.
5. Remove the windshield.
6. If the pin is damaged, remove the pin.
NOTE:
- Before removing the pin from the windshield glass, place an alignment mark on the windshield.
WINDSHIELD INSTALLATION
WARNING:
- Using a utility knife with bare hands can cause injury. Always wear gloves when using a utility knife.
CAUTION:
- If a door is opened or closed when all the window glass is closed, the resulting change in air pressure could cause the sealant to crack preventing the proper installation of the windshield. Keep the door glass opened until the windshield installation is completed.
- If the rain sensor is replaced with a new one, the reflection rate when
the switch the ignition to ON the first time is memorized
as a condition that no rainfall is on the windshield. Therefore, remove
water and dirt from the windshield before switch the
ignition to ON. Perform the rain sensor initial setting in the following
cases: (See RAIN SENSOR INITIAL SETTING).
- The windshield is replaced and the rain sensor is reused.
- The auto wiper system does not operate correctly after the windshield is installed.
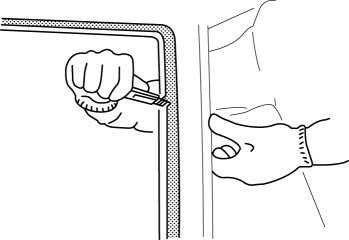
1. Remove the sealant along the perimeter of the glass using a utility knife. (When reusing the glass)
2. Clean and degrease an approx. 50 mm {2.0 in} wide strip along the perimeter of the windshield.
3. Inspect the glass for cracks. If it is cracked, chamfer it using sandpaper.
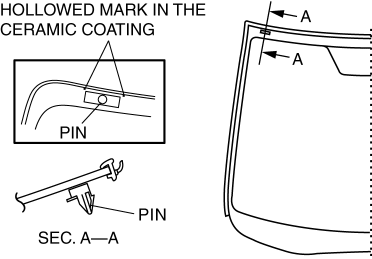
4. Align the alignment marks made before removal and install the pin to the windshield referring to the figure. (Reusing glass, pin removed)
5. Install the windshield molding.
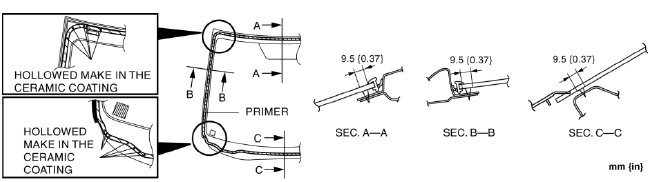
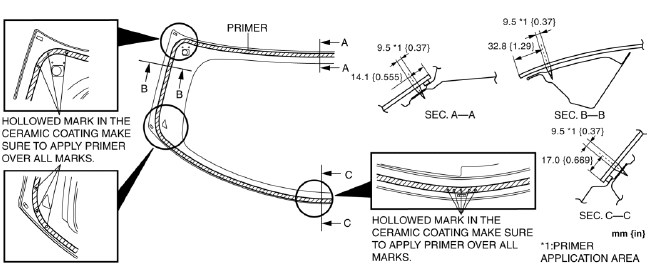
6. Apply glass primer on the glass as shown in the figure, then allow it to dry for approx. 30 min.
CAUTION:
- To prevent weakening of the primer adhesion, keep the bonding surface free of dirt, moisture, and grease. Do not touch the surface with your hand.
NOTE:
- Apply primer to the hollowed marks in the ceramic coating.
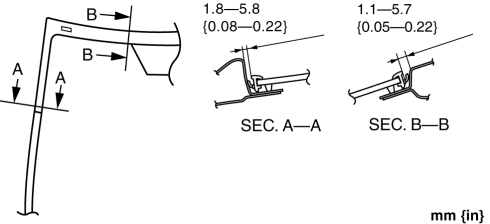
7. Cut away the old sealant using a utility knife so that 1-2 mm {0.04-0.07 in} thickness of sealant remains along the perimeter of the frame.
8. If the sealant has come off completely in any one place, apply some primer after degreasing, and allow it approx. 30 min to dry.
Then apply 2 mm {0.08 in} thickness of new sealant.
CAUTION:
- To prevent weakening of the primer adhesion, keep the bonding surface free of dirt, moisture, and grease. Do not touch the surface with your hand.
9. Clean and degrease along the perimeter of the bonding area on the body.
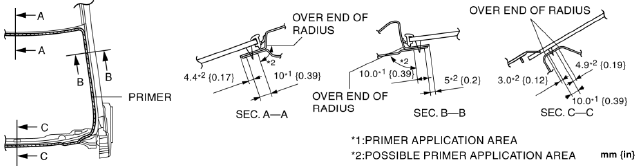
10. Apply body primer on the body as shown in the figure, then allow it to dry for approx. 30 min.
CAUTION:
- To prevent weakening of the primer adhesion, keep the bonding surface free of dirt, moisture, and grease. Do not touch the surface with your hand.
NOTE:
- Apply primer to the hollowed marks in the ceramic coating.
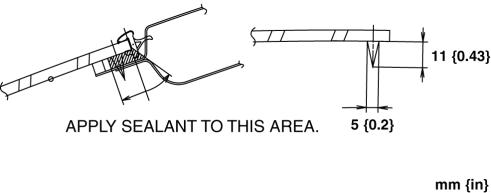
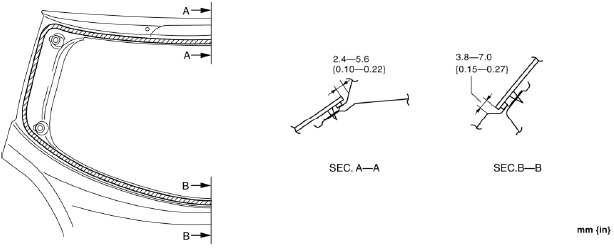
11. Apply sealant to the area of the glass surface as shown in the figure.
12. Insert the positioning pins to the body and install the windshield.
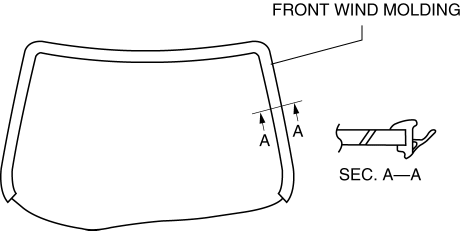
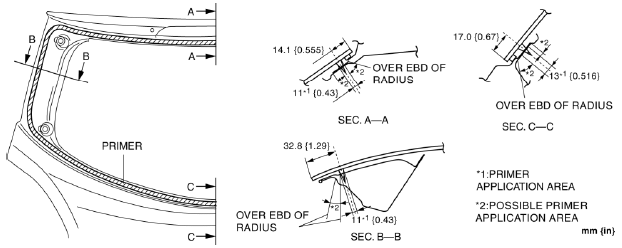
13. Verify that the clearance between the A-pillar and the roof is within the range shown in the figure, and press along the perimeter of the glass.
14. Install the headliner.
15. Install the following parts:
- Interior light (See INTERIOR LIGHT REMOVAL/INSTALLATION).
- Assist handle (See ASSIST HANDLE REMOVAL/INSTALLATION).
- Sunvisor (See SUNVISOR REMOVAL/INSTALLATION).
- A-pillar trim (See A-PILLAR TRIM REMOVAL/INSTALLATION).
- Rearview mirror (See REARVIEW MIRROR INSTALLATION).
- Rain sensor (vehicles with rain sensor) (See RAIN SENSOR REMOVAL/INSTALLATION).
- Cowl panel (See COWL PANEL REMOVAL/INSTALLATION).
- Cowl grille (See COWL GRILLE REMOVAL/INSTALLATION).
- Windshield wiper arm and blade (See WINDSHIELD WIPER ARM AND BLADE REMOVAL/INSTALLATION).
16. Allow the sealant to harden completely. Sealant hardening time: 24 h
REAR WINDOW GLASS REMOVAL
1. Disconnect the negative battery cable.
2. Remove the following parts:
- Rear wiper arm and blade (See REAR WIPER ARM AND BLADE REMOVAL/INSTALLATION).
- Liftgate lower trim (See LIFTGATE LOWER TRIM REMOVAL/INSTALLATION).
- Rear spoiler (See REAR SPOILER REMOVAL).
- High-mount brake light (See HIGH MOUNT BRAKE LIGHT REMOVAL/INSTALLATION).
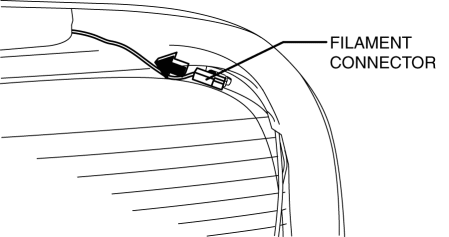
3. Disconnect the filament connector.
4. Apply protective tape along the edge of the body.
NOTE:
- Overlap and adhere the protective tape to the corners to prevent damage.
5. Avoiding the pin on the inside of the vehicle, insert piano wire which has been cut to sufficient length.
WARNING:
- Using piano wire with bare hands can cause injury. Always wear gloves when using piano wire.
NOTE:
- Before removing the rear window glass from the body, mark the position of the glass by affixing tape to the glass and body panel.
6. Wind each end of piano wire around a bar.
NOTE:
- Use a long sawing action to spread the work over the whole length of piano wire to prevent it from breaking due to localized heating.
7. Secure one end of piano wire, and while pulling the other end, cut the sealant around the rear window glass.
8. Pinch the pin from the inside of the vehicle and detach it.
9. Remove the rear window glass.
REAR WINDOW GLASS INSTALLATION
WARNING:
- Using a utility knife with bare hands can cause injury. Always wear gloves when using a utility knife.
CAUTION:
- Proper installation of the glass may be difficult if sealant is cracked or the glass is pushed out by air pressure when a door is opened/closed with all the window glass closed. Keep the door glass open until the rear window glass installation is completed.
1. Remove sealant along the perimeter of the glass using a utility knife or scraper. (When reusing the glass) 2. Clean and degrease an approx. 50 mm {2.0 in} wide strip along the perimeter of the glass.
3. Inspect the glass for cracks. If it is cracked, chamfer it using sandpaper.
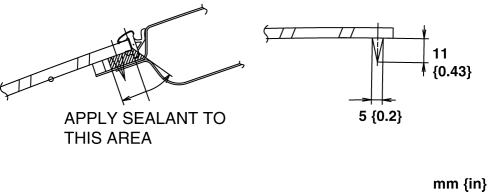
4. Install the spacers, fasteners, and pins to the glass as shown in the figure.
- When reusing the glass, align it with the alignment mark placed before the glass was removed.
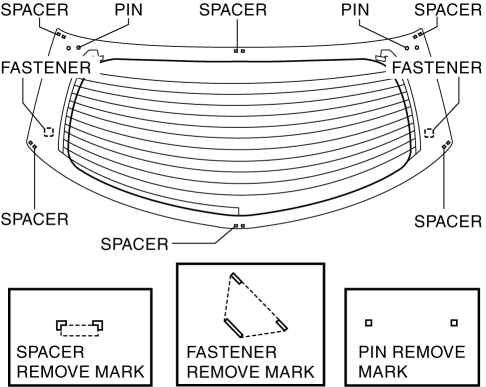
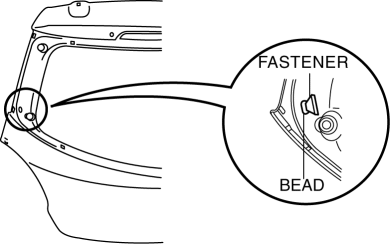
5. Install the fastener to the bead on the body side.
6. Apply glass primer on the glass as shown in the figure then allow it to dry for approx. 30 min.
CAUTION:
- To prevent weakening of the primer adhesion, keep the bonding surface free of dirt, moisture, and grease. Do not touch the surface with your hand.
NOTE:
- Apply primer to the hollowed marks in the ceramic coating.
7. Cut away the old sealant using a utility knife or scraper so that 1-2 mm {0.04-0.07 in} thickness of sealant remains along the perimeter of the frame.

8. Clean and degrease along the perimeter of the bonding area on the body.
9. If the sealant has come off completely in any one place, apply some primer, and allow it to dry for approx. 30 min.
CAUTION:
- To prevent weakening of the primer adhesion, keep the bonding surface free of dirt, moisture, and grease. Do not touch the surface with your hand.
10. Apply body primer on the body as shown in the figure, then allow it to dry for approx. 30 min.
CAUTION:
- To prevent weakening of the primer adhesion, keep the bonding surface free of dirt, moisture, and grease. Do not touch the surface with your hand.
NOTE:
- Apply primer to the hollowed marks in the ceramic coating.
11. Apply sealant to the area of the glass surface as shown in the figure.
12. Install the rear window glass.
13. Verify that the gap at the upper and lower parts of the glass is within the specification shown in the figure, then press along the perimeter of the glass.
14. Connect the filament connector.
15. Install the following parts:
- High-mount brake light (See HIGH MOUNT BRAKE LIGHT REMOVAL/INSTALLATION).
- Rear spoiler (See REAR SPOILER INSTALLATION).
- Liftgate lower trim (See LIFTGATE LOWER TRIM REMOVAL/INSTALLATION).
- Rear wiper arm and blade (See REAR WIPER ARM AND BLADE REMOVAL/INSTALLATION).
16. Allow the sealant to harden completely. Sealant hardening time: 24 h
FRONT POWER WINDOW REGULATOR REMOVAL/INSTALLATION
1. To access the glass installation bolt, adjust the position of the front door glass so that the height of the front door glass towards the rear is approx. 100 mm {3.94 in}.
2. Disconnect the negative battery cable.
3. Remove the following parts:
- Inner garnish (See INNER GARNISH REMOVAL/INSTALLATION).
- Front door trim (See FRONT DOOR TRIM REMOVAL/INSTALLATION).
- Front door speaker (See FRONT DOOR SPEAKER REMOVAL/INSTALLATION).
- Front door glass (See FRONT DOOR GLASS REMOVAL/INSTALLATION).
- Front power window motor (See POWER WINDOW MOTOR REMOVAL/INSTALLATION).
4. Remove the nuts.

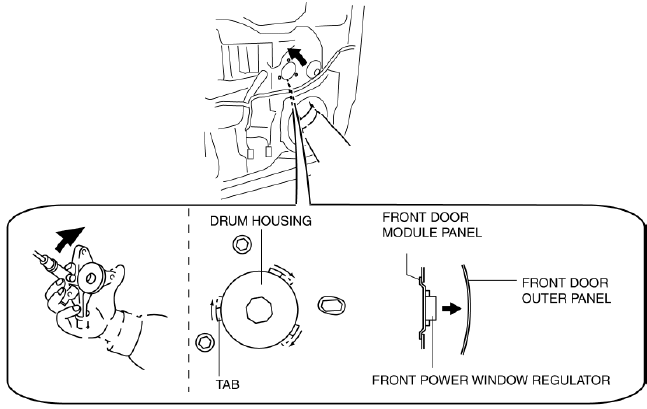
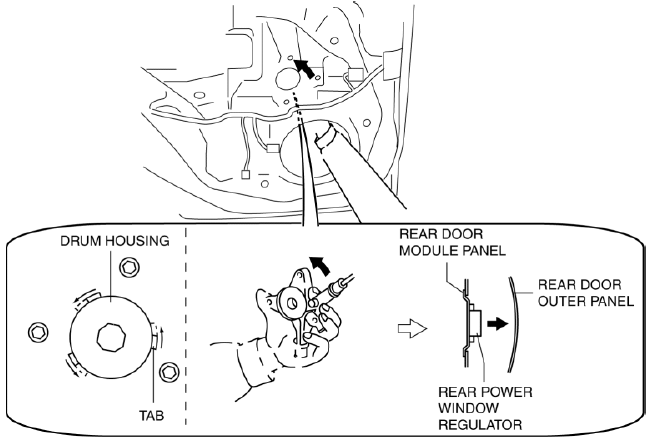
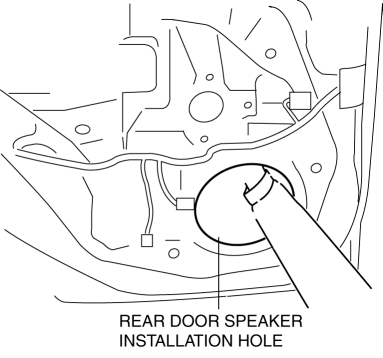
5. Insert a hand through the front door speaker installation hole and rotate the drum housing in the direction of the arrow shown in the figure to detach the tabs from the front door module panel.
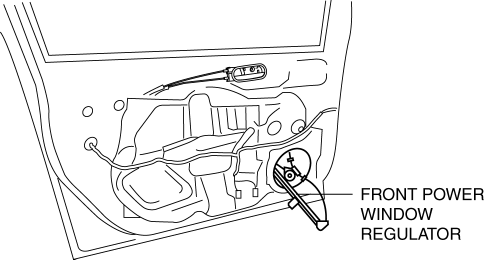
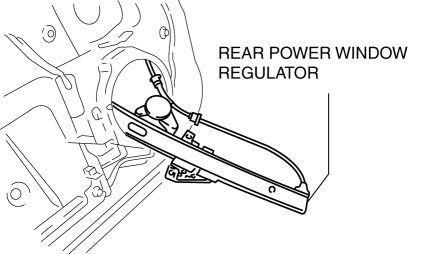
6. Remove the front power window regulator from the speaker installation hole.
7. Install in the reverse order of removal.
CAUTION:
- When installing, do not allow the cable to come out from the drum housing.
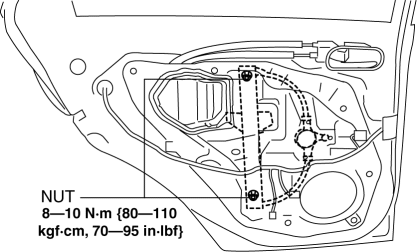
REAR POWER WINDOW REGULATOR REMOVAL/INSTALLATION
1. To access the glass installation bolt, adjust the position of the rear door glass that the height of the rear door glass towards the front is approx. 200 mm {7.87 in}.
2. Disconnect the negative battery cable.
3. Remove the following parts:
- Sail inner garnish (See SAIL INNER GARNISH REMOVAL/INSTALLATION).
- Rear door garnish (See REAR DOOR GARNISH REMOVAL/INSTALLATION).
- Rear door trim (See REAR DOOR TRIM REMOVAL/INSTALLATION).
- Rear door speaker (See REAR DOOR SPEAKER REMOVAL/INSTALLATION).
- Rear door glass (See REAR DOOR GLASS REMOVAL/INSTALLATION).
4. Remove the nuts.
5. Insert your hand through the rear door speaker installation hole, rotate the drum housing in the direction shown in the figure and disengage the tabs from the rear door module panel.
6. Remove the rear power window regulator from the rear speaker installation hole.
7. Install in the reverse order of removal.
CAUTION:
- When installing, do not allow the cable to come out from the drum housing.
POWER WINDOW MOTOR REMOVAL/INSTALLATION
Front Power Window Motor
1. Fully lower the front door glass.
2. Disconnect the negative battery cable.
3. Remove the inner garnish (See INNER GARNISH REMOVAL/INSTALLATION).
4. Remove the front door trim (See FRONT DOOR TRIM REMOVAL/INSTALLATION).
CAUTION:
- If the bolts are removed without supporting the front door glass, the front door glass may fall off and be damaged. Remove the bolts while inserting your hand into the front door speaker installation hole to support the front door glass.
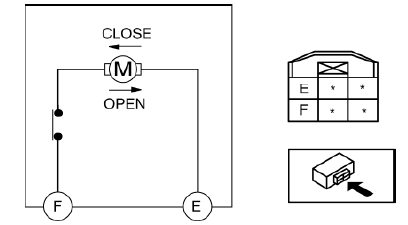
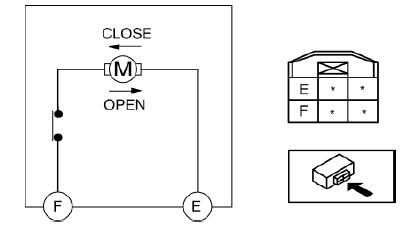
5. Disconnect the front power window motor connector, remove the bolt, then remove the front power window motor from the front power window regulator drum in the direction of the arrow shown in the figure.
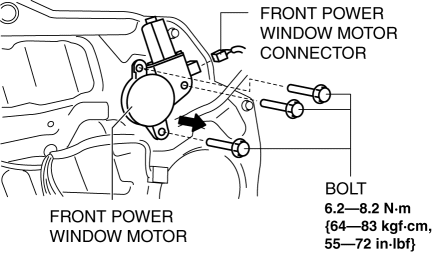
6. Install in the reverse order of removal.
NOTE:
- When installing the front power window motor to the front power window regulator drum, the drum housing hooks may detach from the door module panel. If this happens, remove the front door speaker, insert your hand in the speaker installation hole, connect the drum housing hooks, and while supporting the drum housing, install the front power window motor to the drum.
Rear Power Window Motor
1. Fully lower the rear door glass.
2. Disconnect the negative battery cable.
3. Remove the sail inner garnish. (See SAIL INNER GARNISH REMOVAL/INSTALLATION).
4. Remove the rear door trim. (See REAR DOOR TRIM REMOVAL/INSTALLATION).
CAUTION:
- If the bolts are removed without supporting the rear door glass, the rear door glass may fall off and be damaged. Remove the bolts while inserting your hand into the rear door speaker installation hole to support the rear door glass.
5. Disconnect the rear power window motor connector, remove the bolt, then remove the power window motor from the power window regulator drum.
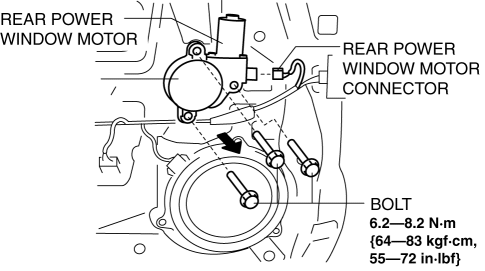
6. Install in the reverse order of removal.
NOTE:
- When installing the rear power window motor to the rear power window regulator drum, the drum housing hooks may detach from the door module panel. If this happens, remove the door speaker, insert your hand in the speaker installation hole, connect the drum housing hooks, and while supporting the drum housing, install the rear power window motor to the drum.
POWER WINDOW MOTOR INSPECTION
Driver's Side
1. Disconnect the negative battery cable.
2. Remove the inner garnish. (See INNER GARNISH REMOVAL/INSTALLATION).
3. Remove the front door trim. (See FRONT DOOR TRIM REMOVAL/INSTALLATION).
4. Disconnect the power window motor connector.
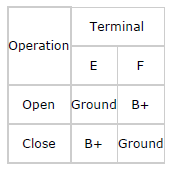
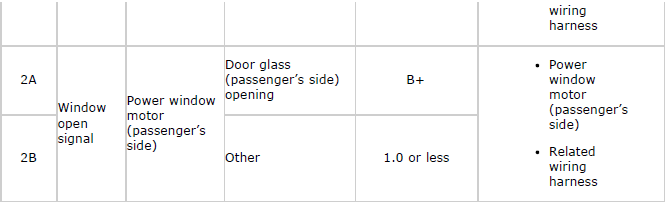
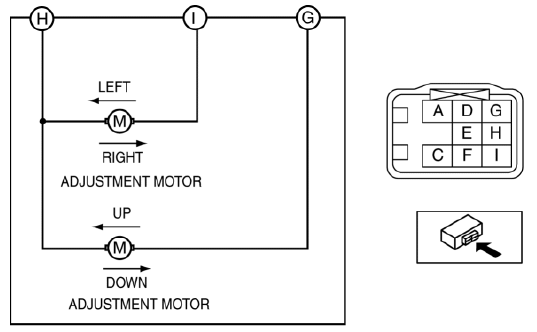
5. Apply battery positive voltage and connect the ground to power window motor terminals E and F, and then inspect the power window motor operation.
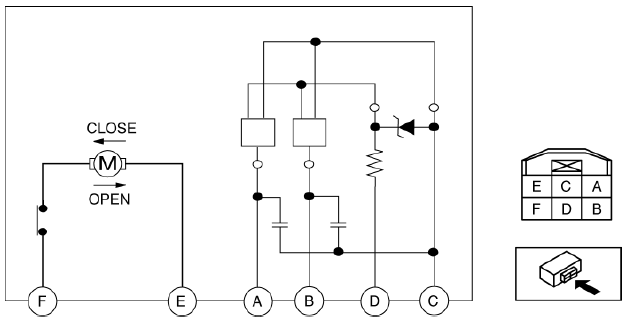
- If the power window motor does not operate as indicated in the table, replace it.
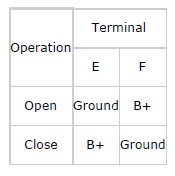
6. Connect the battery positive voltage to power window motor terminal D and connect terminal C to ground.
7. Operate the power window motor and measure the voltage at terminals A and B.
- If there is any malfunction, replace the power window motor.
Voltage
- Pulse: max. 5 V/min. 0 V
Passenger's Side
1. Disconnect the negative battery cable.
2. Remove the inner garnish. (See INNER GARNISH REMOVAL/INSTALLATION).
3. Remove the front door trim. (See FRONT DOOR TRIM REMOVAL/INSTALLATION).
4. Disconnect the power window motor connector.
5. Apply battery positive voltage and connect the ground to the power window motor terminals, and then inspect the power window motor operation.
- If the power window motor does not operate as indicated in the table, replace it.
Rear Side
1. Disconnect the negative battery cable.
2. Remove the sail inner garnish. (See SAIL INNER GARNISH REMOVAL/INSTALLATION).
3. Remove the Rear door trim. (See REAR DOOR TRIM REMOVAL/INSTALLATION).
4. Disconnect the power window motor connector.
5. Apply battery positive voltage and connect the ground to the power window motor terminals, and then inspect the power window motor operation.
- If the power window motor does not operate as indicated in the table, replace it.
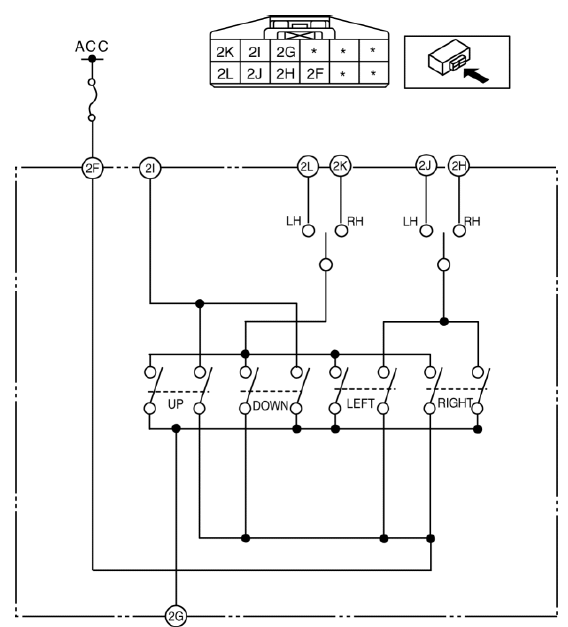
POWER WINDOW MAIN SWITCH REMOVAL/INSTALLATION
1. Disconnect the negative battery cable.
2. Remove the inner garnish. (See INNER GARNISH REMOVAL/INSTALLATION).
3. Remove the driver's side front door trim. (See FRONT DOOR TRIM REMOVAL/INSTALLATION).
4. Remove the power window main switch. (See FRONT DOOR TRIM DISASSEMBLY/ASSEMBLY).
5. Install in the reverse order of removal.
POWER WINDOW MAIN SWITCH INSPECTION
1. Switch the ignition to ON.
2. Verify that the door glass (driver's side) can be operated forapprox. 43 s after the ignition switched to off.
- If the door glass (driver's side) cannot be operated forapprox. 43 s after the after the ignition switched to off, of if the door glass (driver's side) can still be operated afterapprox. 43 s, replace the power window main switch.
3. Disconnect the negative battery cable.
4. Remove the inner garnish. (See INNER GARNISH REMOVAL/INSTALLATION).
5. Remove the front door trim. (See FRONT DOOR TRIM REMOVAL/INSTALLATION).
6. Remove the switch panel. (See FRONT DOOR TRIM DISASSEMBLY/ASSEMBLY).
7. Connect the power window main switch connector.
8. Connect the negative battery cable.
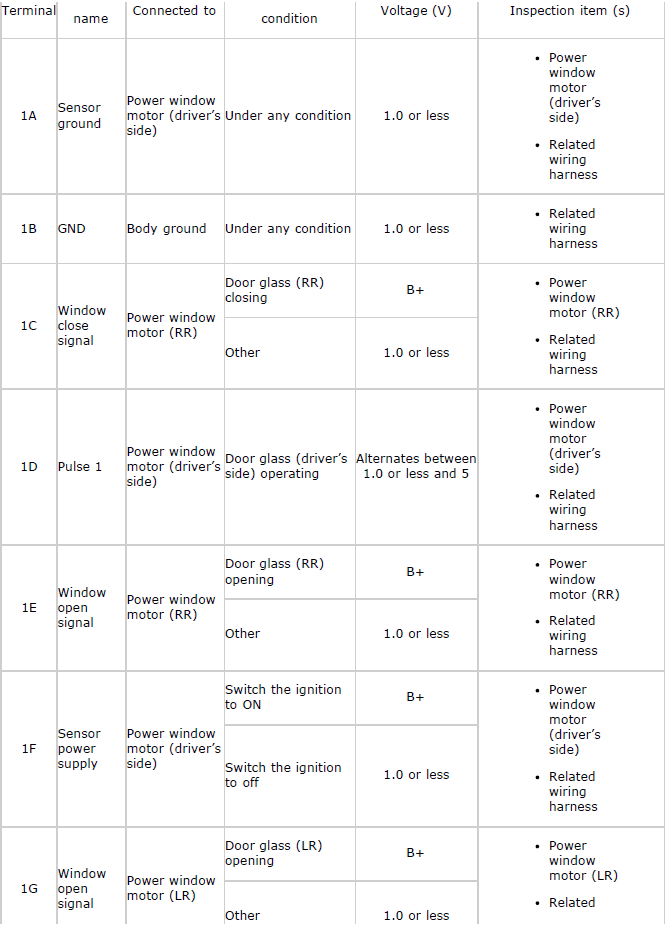
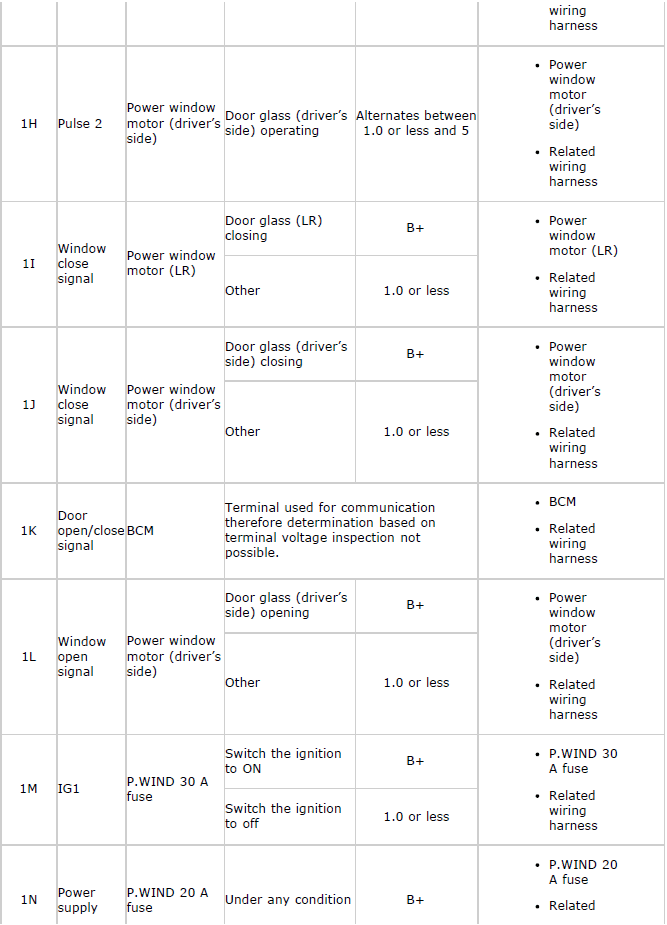
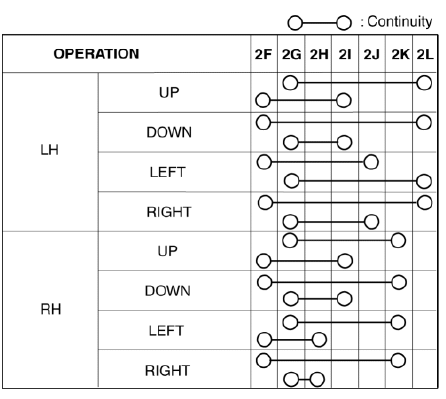
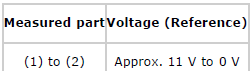
9. Measure the voltage at each terminal.
- If the voltage is not as specified in the terminal voltage table, inspect the parts under Inspection item(s) and related wiring harnesses.
10. If the system does not work normally even though the inspection items or related wiring harnesses do not have any malfunction, replace the power window main switch.
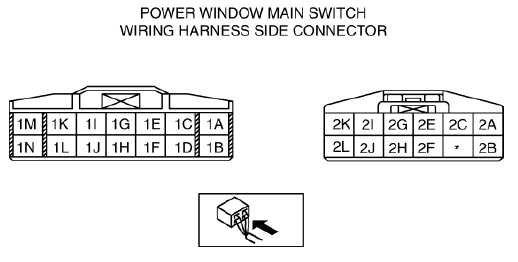
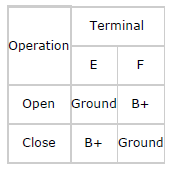
Terminal Voltage Table (Reference)

POWER WINDOW SUBSWITCH REMOVAL/INSTALLATION
Passenger's Side
1. Disconnect the negative battery cable.
2. Remove the inner garnish. (See INNER GARNISH REMOVAL/INSTALLATION).
3. Remove the front door trim. (See FRONT DOOR TRIM REMOVAL/INSTALLATION).
4. Remove the power window subswitch. (See FRONT DOOR TRIM DISASSEMBLY/ASSEMBLY).
5. Install in the reverse order of removal.
Rear
1. Disconnect the negative battery cable.
2. Remove the sail garnish. (See SAIL GARNISH REMOVAL/INSTALLATION).
3. Remove the rear door garnish. (See REAR DOOR GARNISH REMOVAL/INSTALLATION).
4. Remove the rear door trim. (See REAR DOOR TRIM REMOVAL/INSTALLATION).
5. Remove the power window subswitch. (See REAR DOOR TRIM DISASSEMBLY/ASSEMBLY).
6. Install in the reverse order of removal.
POWER WINDOW SUBSWITCH INSPECTION
Passenger's Side
1. Disconnect the negative battery cable.
2. Remove the inner garnish. (See INNER GARNISH REMOVAL/INSTALLATION).
3. Remove the front door trim. (See FRONT DOOR TRIM REMOVAL/INSTALLATION).
4. Remove the power window subswitch. (See FRONT DOOR TRIM DISASSEMBLY/ASSEMBLY).
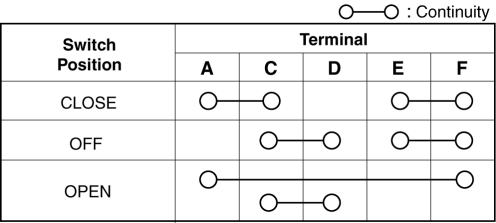
5. Verify that the continuity is as indicated in the table using a tester.
- If not as indicated in the table, replace the power window subswitch.

Rear
1. Disconnect the negative battery cable.
2. Remove the sail garnish. (See SAIL GARNISH REMOVAL/INSTALLATION).
3. Remove the rear door garnish. (See REAR DOOR GARNISH REMOVAL/INSTALLATION).
4. Remove the rear door trim. (See REAR DOOR TRIM REMOVAL/INSTALLATION).
5. Remove the power window subswitch. (See REAR DOOR TRIM DISASSEMBLY/ASSEMBLY).
6. Verify that the continuity is as indicated in the table using a tester.

- If not as indicated in the table, replace the power window subswitch.
POWER OUTER MIRROR REMOVAL/INSTALLATION
1. Disconnect the negative battery cable.
2. Remove the inner garnish. (See INNER GARNISH REMOVAL/INSTALLATION).
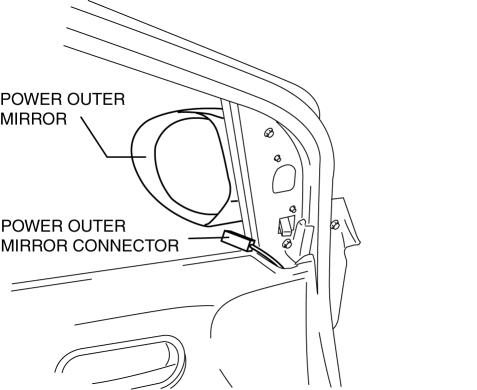
3. Disconnect the power outer mirror connector.
4. Remove the bolts.
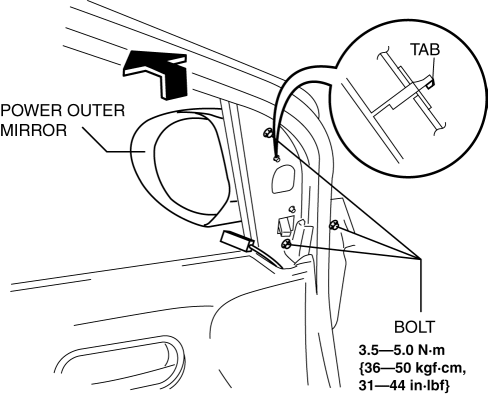
5. Remove the power outer mirror by pulling it in the direction of the arrow shown in the figure to release the tab.
6. Install in the reverse order of removal.
POWER OUTER MIRROR INSPECTION
Mirror glass adjustment
1. Disconnect the negative battery cable.
2. Remove the inner garnish. (See INNER GARNISH REMOVAL/INSTALLATION).
3. Remove the front door trim. (See FRONT DOOR TRIM REMOVAL/INSTALLATION).
4. Remove the power outer mirror. (See POWER OUTER MIRROR REMOVAL/INSTALLATION).
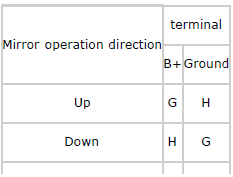
5. Apply battery positive voltage to the power outer mirror terminals and inspect the operation of the power outer mirror.
- If not as specified, replace the power outer mirror.

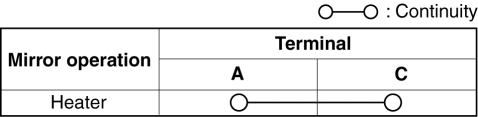
Heated outer mirror
1. Disconnect the negative battery cable.
2. Remove the inner garnish. (See INNER GARNISH REMOVAL/INSTALLATION).
3. Remove the front door trim. (See FRONT DOOR TRIM REMOVAL/INSTALLATION).
4. Remove the power outer mirror. (See POWER OUTER MIRROR REMOVAL/INSTALLATION).
5. Verify that the continuity is as indicated in the table using a circuit tester.
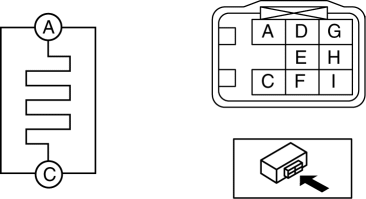
- If not as indicated in the table, or if the resistance is not within the specification, replace the power outer mirror.
OUTER MIRROR GLASS REMOVAL
1. Disconnect the negative battery cable.
2. Press area A of the outer mirror glass so that area B moves outward.
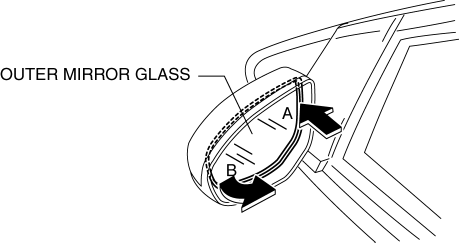
3. Detach pin A while lifting up the inside of the mirror glass holder.

4. Pull the outer mirror glass and remove pins B.
5. Disconnect the connector. (Vehicles with heated outer mirror)
6. Remove the outer mirror glass.
OUTER MIRROR GLASS INSTALLATION
1. Connect the connector to the outer mirror glass. (Vehicles with heated outer mirror)
2. Press part A on the outer mirror glass and install pin A.
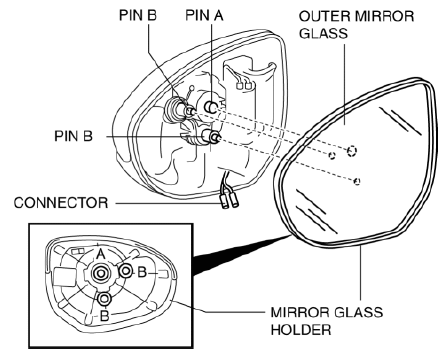
3. Press part B on the outer mirror glass and install pins B.
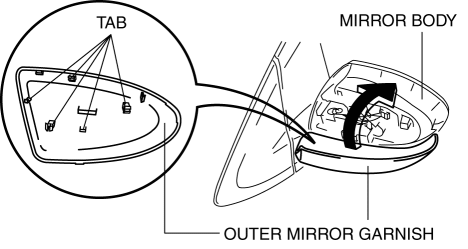
OUTER MIRROR GARNISH REMOVAL
1. Disconnect the negative battery cable.
2. Remove the outer mirror glass from the power outer mirror. (See OUTER MIRROR GLASS REMOVAL).
3. Pinch the end of the tab which is visible, and release the tab by pressing it toward the vehicle front (4 locations).
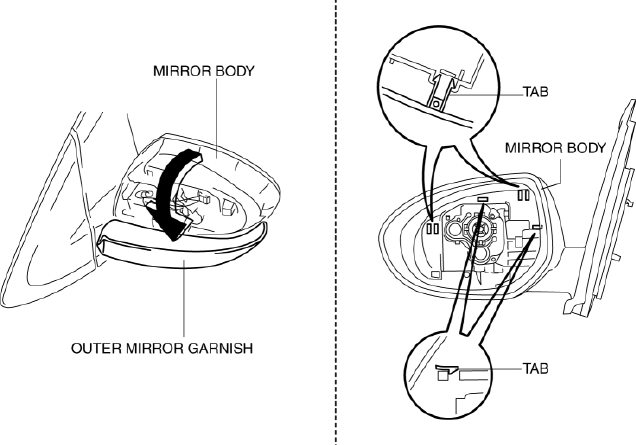
4. Grasp the upper side of the outer mirror garnish and remove it by pulling it in the direction of the arrow.
OUTER MIRROR GARNISH INSTALLATION
1. Position the outer mirror garnish against the mirror body in the direction of the arrow shown in the figure, and insert the outer mirror garnish tabs (5 locations) into the mirror body.
2. Install the outer mirror garnish so that there are no gaps around the component.
3. Install the outer mirror glass. (See OUTER MIRROR GLASS INSTALLATION).
POWER OUTER MIRROR SWITCH REMOVAL/INSTALLATION
NOTE:
- The power outer mirror switch is integrated with the power window main switch.
1. Disconnect the negative battery cable.
2. Remove the inner garnish. (See INNER GARNISH REMOVAL/INSTALLATION).
3. Remove the front door trim. (driver-side) (See FRONT DOOR TRIM REMOVAL/INSTALLATION).
4. Remove the power outer mirror switch. (See FRONT DOOR TRIM DISASSEMBLY/ASSEMBLY).
5. Install in the reverse order of removal.
POWER OUTER MIRROR SWITCH INSPECTION
1. Disconnect the negative battery cable.
2. Remove the inner garnish. (See INNER GARNISH REMOVAL/INSTALLATION).
3. Remove the front door trim. (See FRONT DOOR TRIM REMOVAL/INSTALLATION).
4. Remove the switch panel. (See FRONT DOOR TRIM DISASSEMBLY/ASSEMBLY).
5. Using a tester, verify that the continuity between the power outer mirror switch terminals is as indicated in the table.
- If not as indicated in the table, replace the power outer mirror switch.
FILAMENT INSPECTION
1. Switch the ignition to ON.
2. Turn the rear window defroster switch ON.
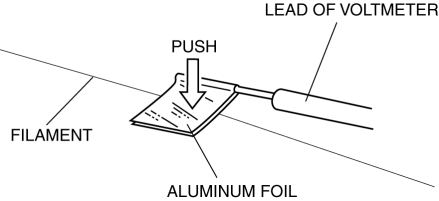
CAUTION:
- Directly touching the rear window defroster filament with the lead of the tester could damage it. Wrap aluminum foil around the end of the lead and inspect the filament by touching it with the foil.
3. Connect the positive lead of the tester to the positive side of each filament and the negative lead to ground.
4. Gradually slide the positive lead from the positive side to the negative side and verify that the voltage decreases accordingly.
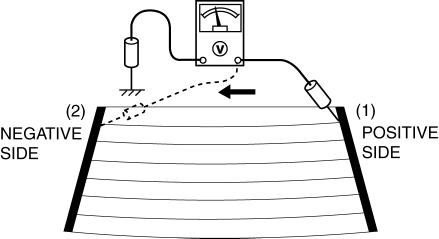
- If the voltage changes rapidly, the filament has a malfunction. Repair the filament.
FILAMENT REPAIR
1. Clean the filaments using isopropyl alcohol.
2. Affix tape along both sides of the filament to be repaired.
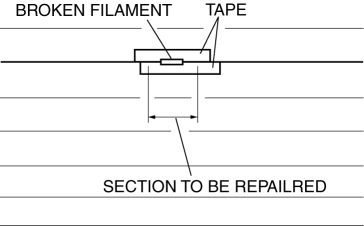
3. Apply commercially available silver paint using a fine-tipped tool such as a small brush or a drawing pen.
4. After 2-3 min, peel off the tape being careful not to damage the painted area.
CAUTION:
- Do not operate the rear window defroster until the repaired area is completely dried to prevent a malfunction.
5. Completely dry the repaired area referring the followings:
- If the room temperature is 25

