Mazda 2: Heat Duct Component
HEAT DUCT COMPONENT REMOVAL/INSTALLATION
Heat Duct (LH)
1. Disconnect the negative battery cable.
2. Remove the following parts:
- Rear console (See REAR CONSOLE REMOVAL/INSTALLATION).
- Shift lever knob (MTX) (See MANUAL TRANSAXLE SHIFT MECHANISM REMOVAL/INSTALLATION).
- Side wall (See SIDE WALL REMOVAL/INSTALLATION).
- Front console component (See FRONT CONSOLE COMPONENT REMOVAL/INSTALLATION).
- Front scuff plate (LH) (See FRONT SCUFF PLATE REMOVAL/INSTALLATION).
- Front side trim (LH) (See FRONT SIDE TRIM REMOVAL/INSTALLATION).
- Hood release lever (See HOOD LATCH AND RELEASE LEVER REMOVAL/INSTALLATION).
- Driver's side lower panel (See LOWER PANEL REMOVAL/INSTALLATION).
- Knee bolster (See KNEE BOLSTER REMOVAL/INSTALLATION).
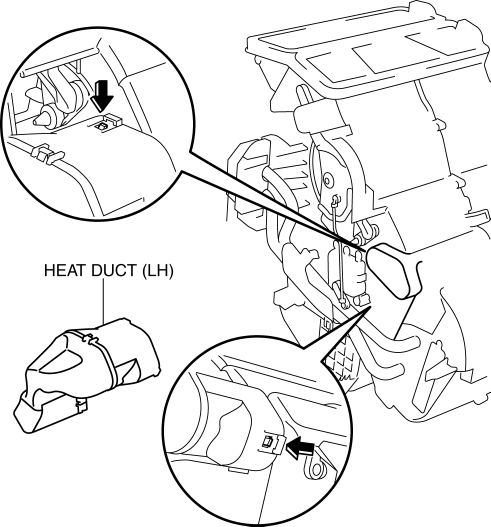
3. Using a flathead screwdriver, unhook the heat duct (LH) hooks and remove the heat duct (LH).

4. Install in the reverse order of removal.
Heat Duct (RH) No.1
1. Disconnect the negative battery cable.
2. Remove the following parts:
- Glove compartment (See GLOVE COMPARTMENT REMOVAL/INSTALLATION).
- Dashboard under cover (See DASHBOARD UNDER COVER REMOVAL/INSTALLATION).
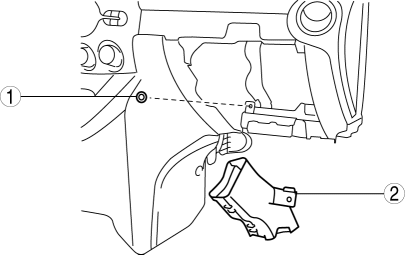
3. Remove in the order indicated in the table.

- Fastener
- Heat duct (RH) No.1
4. Install in the reverse order of removal.
Heat Duct (RH) No.2
1. Disconnect the negative battery cable.
2. Remove the following parts:
- Glove compartment (See GLOVE COMPARTMENT REMOVAL/INSTALLATION).
- Dashboard under cover (See DASHBOARD UNDER COVER REMOVAL/INSTALLATION).
- Heat duct (RH) No.1
- Rear console (See REAR CONSOLE REMOVAL/INSTALLATION).
- Shift lever knob (MTX) (See MANUAL TRANSAXLE SHIFT MECHANISM REMOVAL/INSTALLATION).
- Side wall (See SIDE WALL REMOVAL/INSTALLATION).
- Front console component (See FRONT CONSOLE COMPONENT REMOVAL/INSTALLATION).
- Front scuff plate (RH) (See FRONT SCUFF PLATE REMOVAL/INSTALLATION).
- Front side trim (RH) (See FRONT SIDE TRIM REMOVAL/INSTALLATION).
- Passenger's side lower panel (See LOWER PANEL REMOVAL/INSTALLATION).
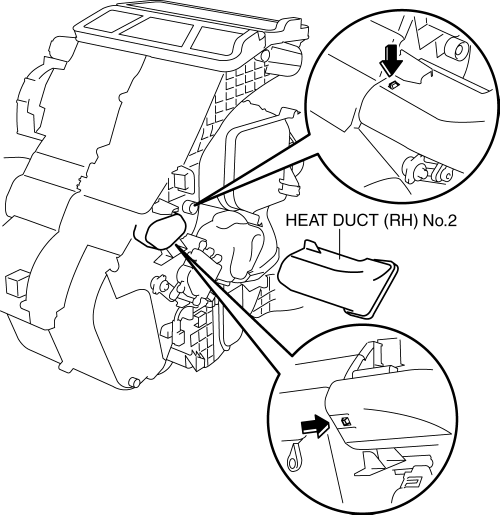
3. Using a flathead screwdriver, unhook the heat duct (RH) hooks and remove the heat duct (RH) No.2.

4. Install in the reverse order of removal.

