Mazda 2: Lubrication System
LUBRICATION SYSTEM LOCATION INDEX
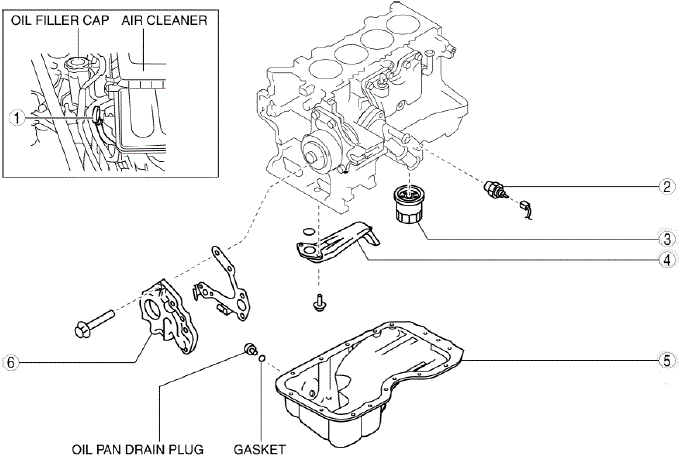
- Dipstick
- (See ENGINE OIL LEVEL INSPECTION)
- (See ENGINE OIL REPLACEMENT)
- Oil pressure switch
- (See OIL PRESSURE INSPECTION)
- Oil filter
- (See OIL FILTER REPLACEMENT)
- Oil strainer
- (See OIL PAN REMOVAL/INSTALLATION)
- Oil pan
- (See OIL PAN REMOVAL/INSTALLATION)
- Oil pump
- (See OIL PUMP REMOVAL/INSTALLATION)
- (See OIL PUMP DISASSEMBLY/ASSEMBLY)
- (See OIL PUMP INSPECTION)
ENGINE OIL LEVEL INSPECTION
1. Position the vehicle on level ground.
2. Warm up the engine.
3. Stop the engine and allow at least 5 min before continuing.
4. Remove the dipstick, wipe it cleanly, and reinstall it fully.
5. Remove the dipstick and verify that the oil level is between the F and L marks on the dipstick.
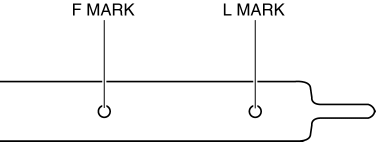
- If the oil level is below the L mark, add engine oil.
ENGINE OIL REPLACEMENT
WARNING:
- Hot engines and engine oil can cause severe burns. Turn off the engine and wait until it and the engine oil have cooled.
- A vehicle that is lifted but not securely supported on safety stands is dangerous. It can slip or fall, causing death or serious injury. Never work around or under a lifted vehicle if it is not securely supported on safety stands.
- Continuous exposure to USED engine oil has caused skin cancer in
laboratory mice.
Protect your skin by washing with soap and water immediately after working with engine oil.
CAUTION:
- If engine oil is spilled on the exhaust system, wipe it off completely. If you fail to wipe the spilled engine oil, it will produce fumes because of the heat.
1. Position the vehicle on level ground.
2. Remove the oil filler cap.
3. Remove the oil pan drain plug.
4. Drain the engine oil into a container.
5. Install the oil pan drain plug with a new gasket.
Oil pan drain plug tightening torque
- 30-41 N*m {3.1-4.1 kgf*m, 23-30 ft*lbf}
NOTE:
- The amount of residual oil in the engine can vary according to factors such as the replacement method and oil temperature. Verify the oil level after /engine oil replacement.
6. Refill with the following type and amount of the engine oil. Engine oil specification
Engine oil grade :
Engine oil viscosity : 0W-20
Engine oil capacity (approx. quantity)
- Oil replacement: 3.7 L {3.9 US qt, 3.3 Imp qt}
- Oil and oil filter replacement: 3.9 L {4.1 US qt, 3.4 Imp qt}
- Total (dry engine): 4.2 L {4.4 US qt, 3.7 Imp qt}
7. Install the oil filler cap.
8. Start the engine and confirm that there is no oil leakage.
If there is oil leakage, repair or replace the applicable part.
9. Inspect the oil level. (See ENGINE OIL LEVEL INSPECTION).
OIL FILTER REPLACEMENT
WARNING:
- Hot engines and engine oil can cause severe burns. Turn off the engine and wait until it and the engine oil have cooled.
- A vehicle that is lifted but not securely supported on safety stands is dangerous. It can slip or fall, causing death or serious injury. Never work around or under a lifted vehicle if it is not securely supported on safety stands.
- Continuous exposure to USED engine oil has caused skin cancer in
laboratory mice.
Protect your skin by washing with soap and water immediately after working with engine oil.
CAUTION:
- If engine oil is spilled on the exhaust system, wipe it off completely. If you fail to wipe the spilled engine oil, it will produce fumes because of the heat.
1. Remove the oil filter using the SST or commercially available, cup-type oil filter wrench (67 mm {2.6 in} diameter, 14 sided).

2. Use a clean rag to wipe off the mounting surface on the cylinder block.
3. Apply clean engine oil to the O-ring of a new oil filter.
4. If the oil filter joint is loose, tighten it to the following torque.
Tightening torque
- 30-40 N*m {3.1-4.0 kgf*m, 23-29 ft*lbf}
5. Tighten the oil filter according to the instruction on the package or side of the oil filter.
NOTE:
Tightening torque
- 12-15 N*m {123-152 kgf*cm, 107-132 in*lbf}
Angle tightening
When the O-ring contacts the oil filter installation surface, turn the filter another one rotation.
6. Start the engine and confirm that there is no oil leakage.
- If there is oil leakage, repair or replace the applicable part.
7. Inspect the oil level. (See ENGINE OIL LEVEL INSPECTION).
OIL PRESSURE INSPECTION
WARNING:
- Hot engines and engine oil can cause severe burns. Turn off the engine and wait until it and the engine oil have cooled.
- A vehicle that is lifted but not securely supported on safety stands is dangerous. It can slip or fall, causing death or serious injury. Never work around or under a lifted vehicle if it is not securely supported on safety stands.
- Continuous exposure to USED engine oil has caused skin cancer in
laboratory mice.
Protect your skin by washing with soap and water immediately after working with engine oil.
1. Disconnect the negative battery cable.
2. Remove the oil pressure switch.
NOTE:
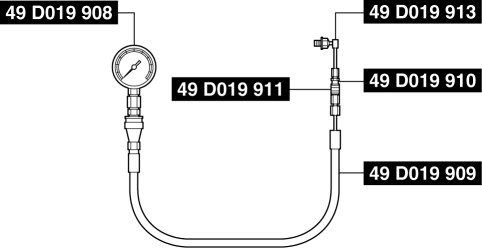
- This inspection can be performed using a SST 49 0187 280A (oil pressure gauge), or using the following combination of the SSTs.
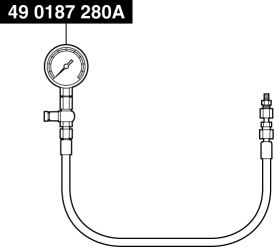
- 49 D019 908 (gauge), 49 D019 909 (hose), 49 D019 910 (adapter), 49 D019 911 (adapter), and 49 D019 913 (adapter)
3. Install the SSTs to the oil pressure switch installation hole using the following procedure.
Using SST 49 0187 280A
- Install SST 49 0187 280A to the oil pressure switch installation hole.
Using SSTs 49 D019 908, 49 D019 909, 49 D019 910, 49 D019 911, and 49 D019 913
- Assemble SSTs 49 D019 910 and 49 D019 913 outside of the engine compartment beforehand.
- Assemble SSTs 49 D019 908, 49 D019 909 and 49 D019 911 outside of the engine compartment beforehand.
- Install SST 49 D019 913 to the oil pressure switch installation hole.
- Install SST 49 D019 911 to the SST 49 D019 910.
4. Connect the negative battery cable.
5. Warm up the engine to normal operating temperature.
6. Run the engine at the specified speed, and note the gauge readings.
- If not within the specification, inspect for the cause and repair or replace if necessary.
NOTE:
- The oil pressure can vary with oil viscosity and temperature.
Oil pressure (reference value) [oil temperature: 100
READ NEXT:
COOLING SYSTEM LOCATION INDEX Cooling system cap (See COOLING SYSTEM CAP INSPECTION) Cooling fan motor (See COOLING FAN MOTOR REMOVAL/INSTALLATION) (See COOLING FAN MOTOR INSPECTION)
Cooling System
INTAKE-AIR SYSTEM LOCATION INDEX Air cleaner (See INTAKE-AIR SYSTEM REMOVAL/INSTALLATION) (SeeAIR CLEANER ELEMENT INSPECTION) Variable tumble shutter valve actuator (See VARIABLE TUMBLE
FUEL SYSTEM LOCATION INDEX Engine Compartment Side Fuel distributor (See FUEL INJECTOR REMOVAL/INSTALLATION) Quick release connector (See QUICK RELEASE CONNECTOR REMOVAL/INSTALLATION)
