Mazda 2: Cooling System
COOLING SYSTEM LOCATION INDEX
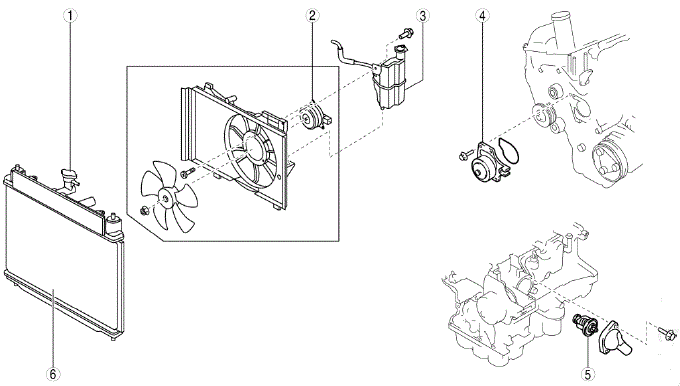
- Cooling system cap
- (See COOLING SYSTEM CAP INSPECTION)
- Cooling fan motor
- (See COOLING FAN MOTOR REMOVAL/INSTALLATION)
- (See COOLING FAN MOTOR INSPECTION)
- Coolant reserve tank
- (See ENGINE COOLANT LEVEL INSPECTION)
- (See COOLANT RESERVE TANK REMOVAL/INSTALLATION)
- Water pump
- (See WATER PUMP REMOVAL/INSTALLATION)
- Thermostat
- (See THERMOSTAT REMOVAL/INSTALLATION)
- (See THERMOSTAT INSPECTION)
- Radiator
- (See ENGINE COOLANT PROTECTION INSPECTION)
- (See ENGINE COOLANT REPLACEMENT)
- (See ENGINE COOLANT LEAKAGE INSPECTION)
- (See RADIATOR REMOVAL/INSTALLATION)
COOLING SYSTEM SERVICE WARNINGS
WARNING:
- Never remove the cooling system cap or loosen the radiator drain plug while the engine is running, or when the engine and radiator are hot. Scalding engine coolant and steam may shoot out and cause serious injury. It may also damage the engine and cooling system.
- Turn off the engine and wait until it is cool. Even then, be very careful when removing the cap. Wrap a thick cloth around it and slowly turn it counterclockwise to the first stop. Step back while the pressure escapes.
- When you are sure all the pressure is gone, press down on the cap using the cloth, turn it, and remove it.
- Depending on the vehicle, the cooling fan may operate suddenly even when
the ignition
is off. Therefore, keep hands and tools away from the cooling fan even if
the cooling
fan is not operating to prevent injury to personnel or damage to the cooling
fan.
Always disconnect the negative battery cable when servicing the cooling fan or parts near the cooling fan.
ENGINE COOLANT LEVEL INSPECTION
WARNING:
- Never remove the cooling system cap or loosen the radiator drain plug while the engine is running, or when the engine and radiator are hot. Scalding engine coolant and steam may shoot out and cause serious injury. It may also damage the engine and cooling system.
- Turn off the engine and wait until it is cool. Even then, be very careful when removing the cap. Wrap a thick cloth around it and slowly turn it counterclockwise to the first stop. Step back while the pressure escapes.
- When you are sure all the pressure is gone, press down on the cap using the cloth, turn it, and remove it.
NOTE:
- If the "FL22" mark is shown on or near the cooling system cap, use Mazda Genuine FL22 engine coolant.

- FL22 type engine coolant is shipped as a diluted solution. Use the solution as is when replacing coolant.
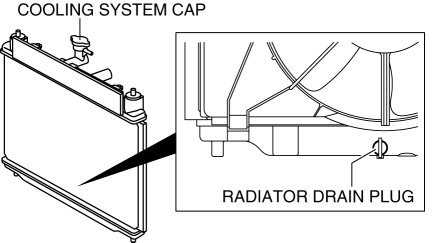
1. Remove the cooling system cap.
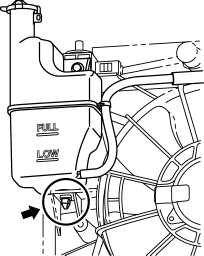
2. Verify that the engine coolant is filled close to the top of the radiator filler neck.
- If the engine coolant level is low, add engine coolant.
3. Verify that the engine coolant level in the coolant reserve tank is between the FULL and LOW marks.

- If the engine coolant level is below the LOW mark, add engine coolant.
ENGINE COOLANT REPLACEMENT
WARNING:
- Never remove the cooling system cap or loosen the radiator drain plug while the engine is running, or when the engine and radiator are hot. Scalding engine coolant and steam may shoot out and cause serious injury. It may also damage the engine and cooling system.
- Turn off the engine and wait until it is cool. Even then, be very careful when removing the cap. Wrap a thick cloth around it and slowly turn it counterclockwise to the first stop. Step back while the pressure escapes.
- When you are sure all the pressure is gone, press down on the cap using the cloth, turn it, and remove it.
CAUTION:
1. Use engine coolant at a concentration that meets the environmental conditions in which the vehicle is driven, otherwise engine damage could occur.
2. The engine has aluminum parts and must be protected by an ethylene-glycol-based coolant to prevent corrosion and freezing.
3. Do not use coolants containing Alcohol, Methanol, Borate or Silicate. These coolants could damage the cooling system.
4. Use only soft (demineralized) water in the coolant mixture. Water that contains minerals will cut down on the coolant's effectiveness.
5. Engine coolant damages paint. If engine coolant does get on a painted surface, rinse it off quickly.
NOTE:
- If the "FL22" mark is shown on or near the cooling system cap, use Mazda Genuine FL22 engine coolant.

- FL22 type engine coolant is shipped as a diluted solution. Use the solution as is when replacing coolant.
Engine coolant capacity (approx. quantity)
- MTX: 5.1 L {5.4 US qt, 4.5 Imp qt}
- ATX: 5.4 L {5.7 US qt, 4.8 Imp qt}
1. Remove the cooling system cap.
2. Loosen the radiator drain plug and drain the engine coolant into a container.
3. Flush the cooling system with water until all traces of color are gone.
4. Let the system drain completely.
5. Tighten the radiator drain plug.
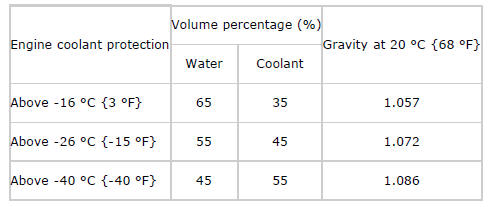
6. Referring to the following chart, select the correct volume percentage of the water and engine coolant. Antifreeze solution mixture percentage (Except FL22 type engine coolant)
7. Remove the battery to facilitate the removal/installation of the blind cap for air bleeding.
(See BATTERY REMOVAL/INSTALLATION).
8. Remove the blind cap installed to the water pipe of the EGR valve bracket.

CAUTION:
- Cover the area around the blind cap with a cloth so that engine coolant leaking from the blind cap area does not get on exhaust system-related parts.
9. Refill the engine coolant to the radiator from the radiator filler neck until engine coolant begins to leak from the blind cap area.
10. Install the blind cap.
11. Install the battery. (See BATTERY REMOVAL/INSTALLATION).
12. Refill the engine coolant from the radiator filler neck until it is close to the top of the radiator filler neck.
13. Refill the engine coolant into the coolant reserve tank up to the FULL mark on the tank.
14. Install the cooling system cap.
CAUTION:
- If the high engine coolant temperature warning light flashes, stop the engine to lower the engine coolant temperature and prevent overheating. Then, verify the malfunctioning part and repair or replace it.
15. Start the engine and warm up the engine by idling.
16. After the engine warms up, perform the following steps. At this time, be careful of the engine coolant temperature to prevent overheating.
NOTE:
- If the accelerator pedal is depressed continuously for a certain period of time, the engine speed may decrease to the idle speed. This is because the fuel cut control operation prevents overheating, but it does not indicate a malfunction. The engine speed returns to normal control when the accelerator pedal is released.
- Run the engine at 2,500 rpm for 5 min.
- Maintain the engine speed at approx. 3,000 rpm for 5 s, and then idle.
Repeat this procedure four or five times.
17. Stop the engine, and inspect the engine coolant level after the engine coolant temperature decreases. If it is low, repeat steps 12-16.
18. Inspect for engine coolant leakage. (See ENGINE COOLANT LEAKAGE INSPECTION).
ENGINE COOLANT PROTECTION INSPECTION
1. Measure the engine coolant temperature and specific gravity using a thermometer and a hydrometer.
CAUTION:
- Use engine coolant at a concentration that meets the environmental conditions in which the vehicle is driven, otherwise engine damage could occur.
- The engine has aluminum parts and must be protected by an ethyleneglycol-based coolant to prevent corrosion and freezing.
- Do not use coolants containing Alcohol, Methanol, Borate or Silicate. These coolants could damage the cooling system.
- Use only soft (demineralized) water in the coolant mixture. Water that contains minerals will cut down on the coolant's effectiveness.
- Engine coolant damages paint. If engine coolant does get on a painted surface, rinse it off quickly.
NOTE:
- If the "FL22" mark is shown on or near the cooling system cap, use Mazda Genuine FL22 engine coolant.
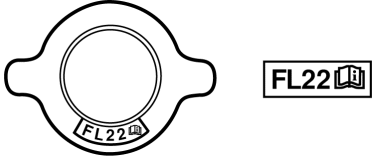
- FL22 type engine coolant is shipped as a diluted solution. Use the solution as is when replacing coolant.
2. Determine the engine coolant protection level by referring to the graph shown in the figure.
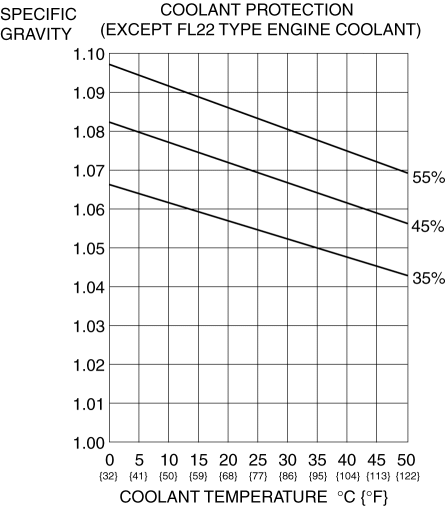
- If the engine coolant protection level is not correct, add water or engine coolant.
ENGINE COOLANT LEAKAGE INSPECTION
WARNING:
- Never remove the cooling system cap or loosen the radiator drain plug while the engine is running, or when the engine and radiator are hot. Scalding engine coolant and steam may shoot out and cause serious injury. It may also damage the engine and cooling system.
- Turn off the engine and wait until it is cool. Even then, be very careful when removing the cap. Wrap a thick cloth around it and slowly turn it counterclockwise to the first stop. Step back while the pressure escapes.
- When you are sure all the pressure is gone, press down on the cap using the cloth, turn it, and remove it.
1. Inspect the engine coolant level. (See ENGINE COOLANT LEVEL INSPECTION).
2. Remove the cooling system cap.
3. Install the SST and a radiator cap tester to the radiator filler neck.
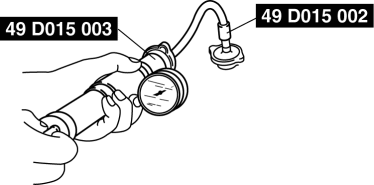
4. Apply pressure using the radiator cap tester.
CAUTION:
- Applying more than 122.6 kPa {1.250 kgf/cm2, 17.78 psi} can damage the hoses, fittings, and other components, and cause leakage.
Engine coolant leakage inspection pressure
- 122.6 kPa {1.250 kgf/cm2, 17.78 psi} [1 min]
5. When pressurizing the cooling system, verify that the pressure is maintained.
- If the gauge needle drops, it may indicate water leakage. Repair or replace the applicable part.
COOLING SYSTEM CAP INSPECTION
WARNING:
- Never remove the cooling system cap or loosen the radiator drain plug while the engine is running, or when the engine and radiator are hot. Scalding engine coolant and steam may shoot out and cause serious injury. It may also damage the engine and cooling system.
- Turn off the engine and wait until it is cool. Even then, be very careful when removing the cap. Wrap a thick cloth around it and slowly turn it counterclockwise to the first stop. Step back while the pressure escapes.
- When you are sure all the pressure is gone, press down on the cap using the cloth, turn it, and remove it.
1. Clean the cooling system cap and the sealed part.
2. Inspect the cooling system cap for cracks or everted seal.
- If there is any malfunction, replace the cooling system cap.
3. Attach the cooling system cap to the SST and a radiator cap tester.

4. Hold the cooling system cap downward and apply pressure gradually. Verify that the pressure is held stable for 10 s.
- If the pressure is not held stable, replace the cooling system cap.
Cooling system cap valve opening pressure
- 93.2-122.6 kPa {0.951-1.250 kgf/cm2, 13.6-17.7 psi}
COOLANT RESERVE TANK REMOVAL/INSTALLATION
WARNING:
- Never remove the cooling system cap or loosen the radiator drain plug while the engine is running, or when the engine and radiator are hot. Scalding engine coolant and steam may shoot out and cause serious injury. It may also damage the engine and cooling system.
- Turn off the engine and wait until it is cool. Even then, be very careful when removing the cap. Wrap a thick cloth around it and slowly turn it counterclockwise to the first stop. Step back while the pressure escapes.
- When you are sure all the pressure is gone, press down on the cap using the cloth, turn it, and remove it.
1. Remove in the order indicated in the table.
2. Install in the reverse order of removal.
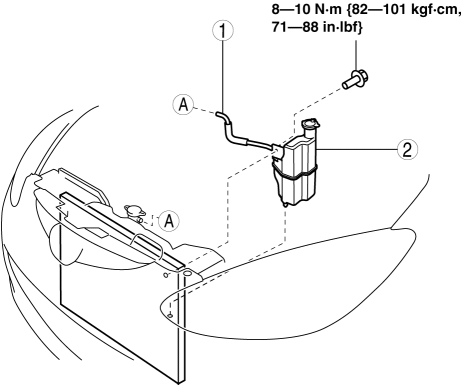
- Hose
- Coolant reserve tank
Coolant Reserve Tank Installation Note
1. Insert the projection on the lower side of the coolant reserve tank into the insertion hole of the radiator cowling, then tighten the coolant reserve tank installation bolt.
RADIATOR REMOVAL/INSTALLATION
WARNING:
- Never remove the cooling system cap or loosen the radiator drain plug while the engine is running, or when the engine and radiator are hot. Scalding engine coolant and steam may shoot out and cause serious injury. It may also damage the engine and cooling system.
- Turn off the engine and wait until it is cool. Even then, be very careful when removing the cap. Wrap a thick cloth around it and slowly turn it counterclockwise to the first stop. Step back while the pressure escapes.
- When you are sure all the pressure is gone, press down on the cap using the cloth, turn it, and remove it.
1. Disconnect the negative battery cable.
2. Drain the engine coolant. (See ENGINE COOLANT REPLACEMENT).
3. Remove the coolant reserve tank. (See COOLANT RESERVE TANK REMOVAL/INSTALLATION).
4. Remove the cooling fan component. (See COOLING FAN MOTOR REMOVAL/INSTALLATION).
5. Remove in the order indicated in the table.
6. Install in the reverse order of the removal.
7. Refill the engine coolant. (See ENGINE COOLANT REPLACEMENT).
8. Inspect for engine coolant leakage. (See ENGINE COOLANT LEAKAGE INSPECTION).
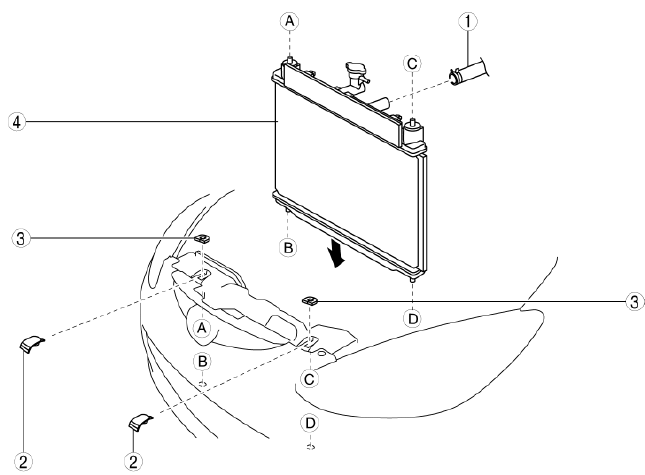
- Upper radiator hose
- Upper mount rubber bracket
- Upper mount rubber
- Radiator
Upper Mount Rubber Bracket Removal Note
1. Remove the front bumper fitting bolt as shown in the figure.
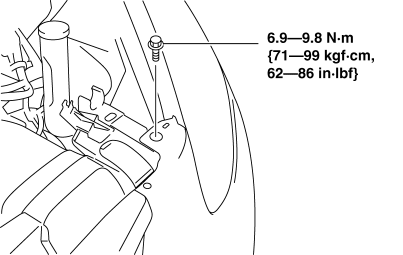
CAUTION:
- To prevent damage to the upper mount rubber bracket tab, do not apply excessive force.
NOTE:
- The upper mount rubber bracket can be easily removed by pressing down the upper mount rubber bracket tab using one hand and pressing the tab area downward using the other hand.
2. While pressing down the upper mount rubber bracket tab lightly in the direction of the arrow shown in the figure, press the upper mount rubber bracket toward the front of the vehicle.

3. Remove the upper mount rubber bracket.
Radiator Removal Note
1. Remove the radiator from below the engine compartment.
THERMOSTAT REMOVAL/INSTALLATION
WARNING:
- Never remove the cooling system cap or loosen the radiator drain plug while the engine is running, or when the engine and radiator are hot. Scalding engine coolant and steam may shoot out and cause serious injury. It may also damage the engine and cooling system.
- Turn off the engine and wait until it is cool. Even then, be very careful when removing the cap. Wrap a thick cloth around it and slowly turn it counterclockwise to the first stop. Step back while the pressure escapes.
- When you are sure all the pressure is gone, press down on the cap using the cloth, turn it, and remove it.
1. Disconnect the negative battery cable.
2. Drain the engine coolant. (See ENGINE COOLANT REPLACEMENT).
3. Remove the drive belt. (See DRIVE BELT REMOVAL/INSTALLATION).
4. Remove the A/C compressor with hose and pipe still connected. Position the A/C compressor out of the way. (See A/C COMPRESSOR REMOVAL/INSTALLATION).
5. Remove in the order indicated in the table.
6. Install in the reverse order of removal.
7. Refill the engine coolant. (See ENGINE COOLANT REPLACEMENT).
8. Inspect for engine coolant leakage. (See ENGINE COOLANT LEAKAGE INSPECTION).
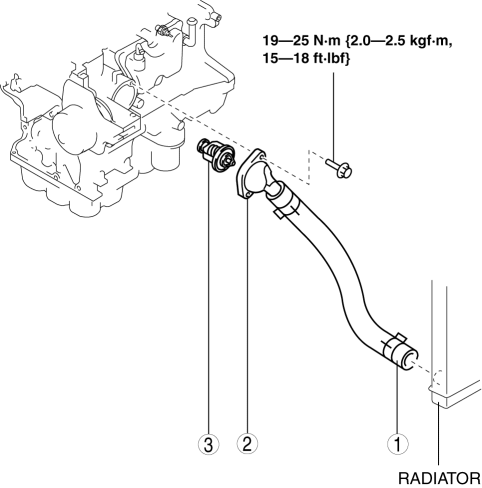
- Lower radiator hose (radiator side)
- Thermostat cover
- Thermostat
Thermostat Installation Note
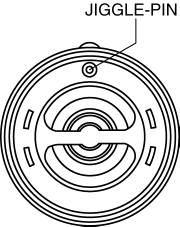
1. Install the thermostat with the jiggle-pin at the top.
THERMOSTAT INSPECTION
1. Remove the thermostat. (See THERMOSTAT REMOVAL/INSTALLATION).
2. Visually check that the thermostat valve is closed.
3. Place the thermostat in water.
WARNING:
- During inspection, the thermostat and water are extremely hot and can cause severe burns. Do not touch the thermostat and water.
4. Heat the water and check the following.
- Opening temperature and valve lift
- If there is a malfunction, replace the thermostat. (See THERMOSTAT REMOVAL/INSTALLATION).
Thermostat initial-opening temperature
- 80-84

