Mazda 2: Mechanical System Test
Mazda 2 2007-2014 Service Manual / Transmission & Transaxle / Automatic Transaxle / Mechanical System Test
Mechanical System Test Preparation
1. Engage the parking brake and use wheel chocks at the front and rear of the wheels.
2. Inspect the engine coolant. (See ENGINE COOLANT LEVEL INSPECTION).
3. Inspect the engine oil. (See ENGINE OIL LEVEL INSPECTION).
4. Inspect the ATF. (See AUTOMATIC TRANSAXLE FLUID (ATF) INSPECTION).
5. Inspect the idle speed. (See ENGINE TUNE-UP).
6. Inspect the ignition timing. (See ENGINE TUNE-UP).
7. Verify that no DTCs recorded. (See ON-BOARD DIAGNOSTIC SYSTEM DTC INSPECTION).
Line Pressure Test
1. Perform "Mechanical System Test Preparation". (See Mechanical System Test Preparation).
WARNING:
- Removing the square-head plug when the ATF is hot can be dangerous. Hot ATF can come out of the opening and badly burn you. Before removing the square-head plug, allow the ATF to cool.
NOTE:
- Use a suitable oil pressure gauge that corresponds to the line pressure because the maximum scale value differs depending on the oil pressure gauge.
2. Perform the line pressure test at the engine idle speed for the D position.
- Remove the square-head plug from the line pressure inspection port.
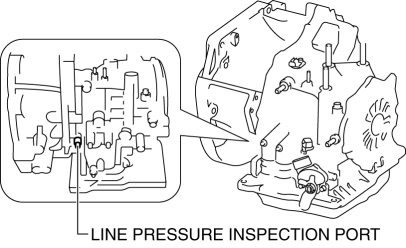
- Connect the SSTs as following:
- When using the oil pressure gauge set (49 0378 400C), connect the SSTs (49 H019 002, 49 0378 400C, 49 B019 901B) to the line pressure inspection port as shown in the figure.
- When using the oil pressure gauge set (49 D019 9A2), connect the SSTs (49 D019 910, 49 D019 911, 49 D019 913, 49 D019 909, 49 D019 908) to the line pressure inspection port as shown in the figure.

- Start the engine.
- Warm-up the transaxle until the ATF temperature reaches 60-70
READ NEXT:
WARNING: When performing a road test, be aware of other vehicles, people, impediments, etc. to avoid an accident. NOTE: When the legal speed limit must be exceeded, use a chassis dynamometer. Road Test
AUTOMATIC TRANSAXLE FLUID (ATF) INSPECTION Automatic transaxle Fluid (ATF) Condition Inspection 1. Remove the dipstick. 2. One way of determining whether the transaxle should be disassembled is by n Automatic Transaxle Fluid (ATF)
TRANSAXLE RANGE (TR) SWITCH INSPECTION CAUTION: Water or foreign objects entering the connector can cause a poor connection or corrosion. Be sure not to drop water or foreign objects on the conne Transaxle Range (TR) Switch
