Mazda 2: SAS Control Module
SAS CONTROL MODULE REMOVAL/INSTALLATION
WARNING:
- Handling the SAS control module improperly can accidentally deploy the air bag modules and pre-tensioner seat belt, which may seriously injure you. Read the air bag system service warnings and cautions before handling the air bag module. (See AIR BAG SYSTEM SERVICE WARNINGS). (See AIR BAG SYSTEM SERVICE CAUTIONS).
- If the connector is connected and the ignition switch is turned to the ON position with the SAS control module not secured completely using the installation nuts, the SAS control module may detect a degree of impact even when something contacts it lightly, deploying the air bag module and pre-tensioner seat belt accidentally.
CAUTION:
- When replacing the SAS control module, always perform the configuration procedure before removing the SAS control module. If the configuration is not performed and the SAS control module is removed, DTC U2100:00 will be displayed.
- If for any reason the configuration is not completed normally, DTC U0300:00 will be displayed in addition to DTC U2100:00.
1. Perform SAS control module configuration when replacing it. (See SAS CONTROL MODULE CONFIGURATION).
2. Switch the ignition to off.
3. Disconnect the negative battery cable and wait for 1 min or more.
4. Remove the rear console. (See REAR CONSOLE REMOVAL/INSTALLATION).
5. Flip over the floor covering and disconnect the connectors.
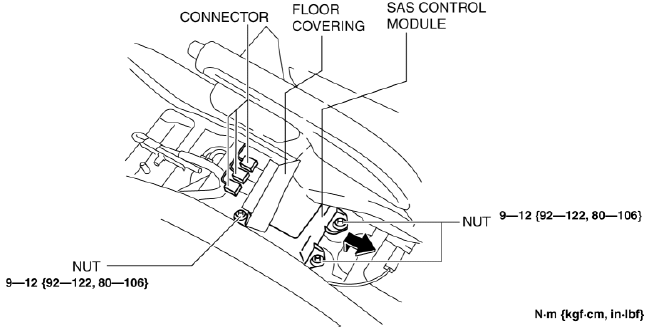
6. Remove the nuts.
7. Remove the SAS control module in the direction of the arrow shown in the figure.
8. Install in the reverse order of removal.
9. Switch the ignition to ON.
10. Verify that the air bag system warning light illuminates for approx. 6 s and goes out.
- If the air bag system warning light does not operate normally, refer to
the on-board
diagnostic system (air bag system) and perform inspection of the system.
(See FLOWCHART).
SAS CONTROL MODULE CONFIGURATION
1. Connect the M-MDS (IDS) to the DLC-2.
2. After the vehicle is identified, select the following items from the initial screen of the M-MDS.
- When using the IDS (laptop PC)
- Select the "Module Programming".
- Select the "Programmable Module Installation".
- Select the "RCM".
3. Perform the configuration according to the directions on the screen.
4. Retrieve DTCs by the M-MDS, then verify that there is no DTC present.
- If a DTC (s) is detected, perform the applicable DTC inspection. (See DTC TABLE).
SEAT TRACK POSITION SENSOR REMOVAL/INSTALLATION
1. Switch the ignition to off.
2. Disconnect the negative battery cable and wait for 1min or more.
3. Remove the front driver's seat (See FRONT SEAT REMOVAL/INSTALLATION).

4. Remove the connector.
5. Remove the bolts.
6. Remove the seat track position sensor.
7. Install in the reverse order of removal.
8. Switch the ignition to ON.
9. Verify that the air bag system warning light illuminates for approx. 6 s and goes out.
- If the air bag system warning light does not operate normally, refer to the on-board diagnostic system (air bag system) and perform inspection of the system. (See FLOWCHART).
SEAT WEIGHT SENSOR CONTROL MODULE REMOVAL/INSTALLATION
CAUTION:
- When the seat weight sensor control module is replaced with a new one, perform the seat weight sensor calibration using the M-MDS. (See SEAT WEIGHT SENSOR CALIBRATION).
1. Switch the ignition to off.
2. Disconnect the negative battery cable and wait for 1 min or more.
3. Remove the connector.
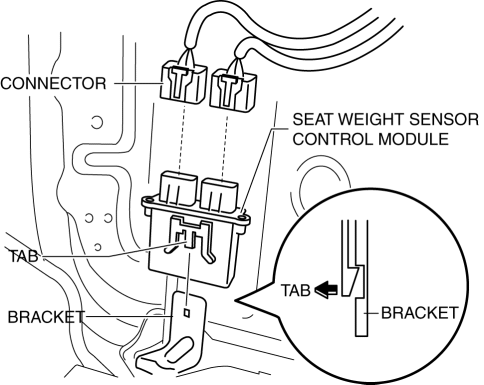
4. Remove the seat weight sensor control module from the bracket by lifting the tab in the direction of the arrow.
5. Install in the reverse order of removal.
6. Switch the ignition to ON.
7. Verify that the air bag system warning light illuminates for approx. 6 s and goes out.
- If the air bag system warning light does not operate normally, refer to the on-board diagnostic system (air bag system) and perform inspection of the system. (See FLOWCHART).
SEAT WEIGHT SENSOR CALIBRATION
CAUTION:
- If any of the following work is performed, perform the seat weight
sensor calibration
using the M-MDS.
- Replacement with a new seat weight sensor
- Replacement with a new seat weight sensor control module
- Replacement with new passenger-side seat parts
- Disassembly of the passenger-side seat
- If any of the following work is performed, perform the seat weight
sensor inspection
using the M-MDS. (See SEAT WEIGHT SENSOR INSPECTION).
- Removal of the passenger-side seat
- Loosening and retightening of passenger's seat fixing bolts
- Or, the vehicle is involved in a collision
1. Have two 20 kg {44 lb} weights ready to use.
2. Connect the M-MDS (IDS) to the DLC-2.
3. After the vehicle is identified, select the following items from the initialization screen of the M-MDS.
- When using the IDS (laptop PC)
- Select the "Body".
- Select the "Restraints".
4. Then, select item from the screen menu in the following order.
- Select the "PassengerSeatWeightSensorRezero".
5. Then, select item from the SWS Calibration screen menu in the following order.
- Select the "(1)-When you have replaced any SWS or SWS module, and/or any seat part except SWS."
6. Perform calibration following the procedures on the M-MDS screen.
SEAT WEIGHT SENSOR INSPECTION
CAUTION:
- If any of the following work is performed, perform the seat weight
sensor inspection
using the M-MDS.
- Removal of the passenger-side seat
- Loosening and retightening of passenger's seat fixing bolts
- Or, the vehicle is involved in a collision
- If any of the following work is performed, perform the seat weight
sensor calibration
using the M-MDS. (See SEAT WEIGHT SENSOR CALIBRATION).
- Replacement with a new seat weight sensor
- Replacement with a new seat weight sensor control module
- Replacement with new passenger-side seat parts
- Disassembly of the passenger-side seat
1. Connect the M-MDS (IDS) to the DLC-2.
2. After the vehicle is identified, select the following items from the initialization screen of the M-MDS.
- When using the IDS (laptop PC)
- Select the "Body".
- Select the "Restraints".
3. Then, select item from the screen menu in the following order.
Select the "PassengerSeatWeightSensorRezero".
4. Then, select item from the SWS Calibration screen menu in the following order.
Select the "(2)-When the passenger seat was removed and reinstalled."
5. Perform inspection following the procedures on the M-MDS screen.
SIDE AIR BAG SENSOR REMOVAL/INSTALLATION
WARNING:
- Handling the side air bag sensor improperly can accidentally operate (deploy) the air bag module, which may seriously injure you. Read the air bag system service warnings and cautions before handling the side air bag sensor. (See AIR BAG SYSTEM SERVICE WARNINGS). (See AIR BAG SYSTEM SERVICE CAUTIONS).
1. Switch the ignition to off.
2. Disconnect the negative battery cable and wait for 1 min or more.
3. Remove the following parts:
- Front scuff plate (See FRONT SCUFF PLATE REMOVAL/INSTALLATION).
- Rear scuff plate (See REAR SCUFF PLATE REMOVAL/INSTALLATION).
- B-pillar lower trim (See B-PILLAR LOWER TRIM REMOVAL/INSTALLATION).
- Front seat belt (See FRONT SEAT BELT REMOVAL/INSTALLATION).
4. Remove the nut.
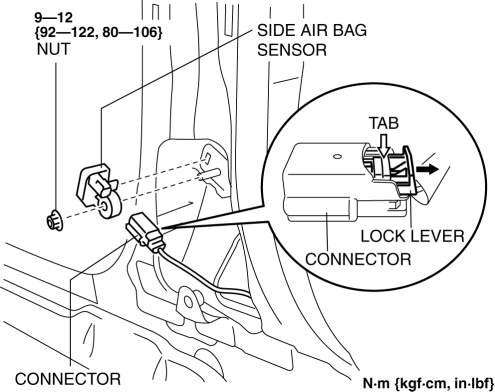
5. Remove the side air bag sensor.
6. Disconnect the connector from the side air bag sensor by pressing the connector tab and pulling out the lock lever in the direction of the arrow.
7. Install in the reverse order of removal.
8. Switch the ignition to ON.
9. Verify that the air bag system warning light illuminates for approx. 6 s and goes out.
- If the air bag system warning light does not operate normally, refer to the on-board diagnostic system (air bag system) and perform inspection of the system. (See FLOWCHART).

