Mazda 2: Inspection of SST (Deployment Tool)
1. Before using the SST (49 H066 002), inspect its operation.
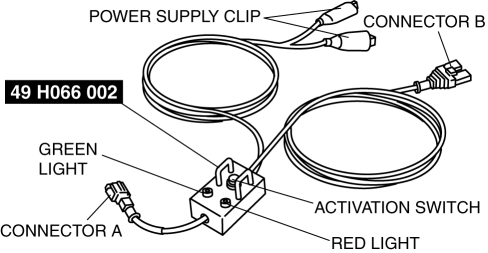
Inspection Procedure
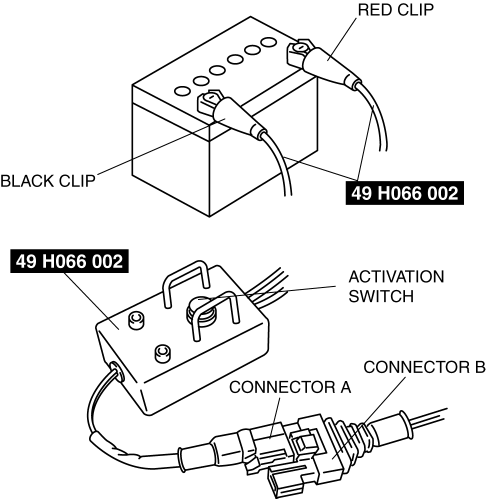
1. Follow the steps below to inspect the SST (49 H066 002).
- If not as indicated in the table, replace the SST (49 H066 002) because it has a malfunction.
WARNING:
- Do not use a malfunctioning SST (49 H066 002), otherwise it could cause the air bag module or pre-tensioner seat belt to accidentally operate (deploy).
CAUTION:
- Because the permissible voltage for the SST (49 H066 002) is 12 V, do not connect a 24 V power source because it will damage the SST. Always connect only a 12 V power source.


LOCATION INDEX
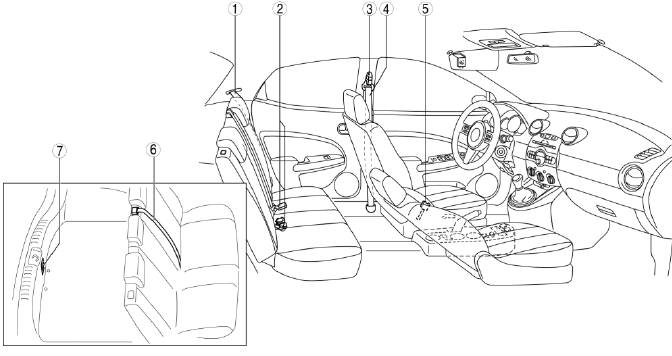
- Rear seat belt
- (See REAR SEAT BELT REMOVAL/INSTALLATION.)
- (See SEAT BELT INSPECTION.)
- Rear buckle
- (See REAR BUCKLE REMOVAL/INSTALLATION.)
- Adjuster anchor
- (See ADJUSTER ANCHOR REMOVAL/INSTALLATION.)
- Front seat belt
- (See FRONT SEAT BELT REMOVAL/INSTALLATION.)
- (See SEAT BELT INSPECTION.)
- Front buckle
- (See FRONT BUCKLE REMOVAL/INSTALLATION.)
- (See BUCKLE SWITCH INSPECTION.)
- Rear center seat belt
- (See REAR CENTER SEAT BELT REMOVAL/INSTALLATION.)
- Child-restraint seat anchor
- (See CHILD-RESTRAINT SEAT ANCHOR REMOVAL/INSTALLATION.)
FRONT SEAT BELT REMOVAL/INSTALLATION
WARNING:
- Handling the front seat belt (pre-tensioner seat belt) improperly can accidentally deploy the pre-tensioner seat belt, which may seriously injure you. Read the air bag system service warnings and cautions before handling the front seat belt. (See AIR BAG SYSTEM SERVICE WARNINGS). (See AIR BAG SYSTEM SERVICE CAUTIONS).
WARNING:
- The side air bag sensor is attached to the lower part of the B-pillar. When working around the B-pillar, disconnect the negative battery cable avoiding excessive impact to the lower part of the B-pillar.
CAUTION:
- The ELR (emergency locking retractor) has a spring that will unwind if the retractor cover is removed. The spring cannot be rewound by hand. If this occurs, the ELR will not work properly. Therefore, do not disassemble the retractor.
1. Switch the ignition to off.
2. Disconnect the negative battery cable and wait for 1min or more.
3. Remove the front scuff plate. (See FRONT SCUFF PLATE REMOVAL/INSTALLATION).
4. Remove the rear scuff plate. (See REAR SCUFF PLATE REMOVAL/INSTALLATION).
5. Partially peel back the seaming welt.
6. Remove the B-pillar lower trim. (See B-PILLAR LOWER TRIM REMOVAL/INSTALLATION).
7. Remove the cover.
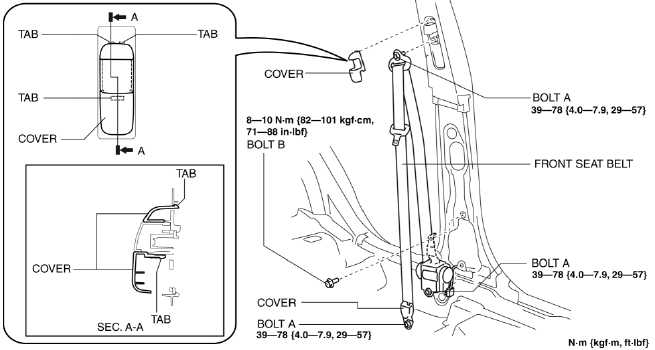
8. Remove the bolt A.
9. Remove the bolt B.
10. Remove the front seat belt.
11. Using a flathead screwdriver, lift the locking device carefully, however do not remove it.
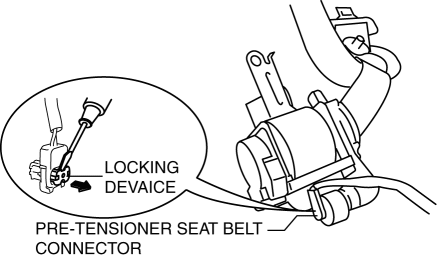
12. Disconnect the pre-tensioner seat belt connector.
13. Install in the reverse order of removal.
14. Switch the ignition to ON.
15. Verify that the air bag system warning light illuminates for approx. 6 s and goes out.
- If the air bag system warning light dose not operate, refer to the on-board diagnostic system (air bag system) and perform inspection of the system. (See FLOWCHART).
ADJUSTER ANCHOR REMOVAL/INSTALLATION
WARNING:
- The side air bag sensor is attached to the lower part of the B-pillar. When working around the B-pillar, disconnect the negative battery cable or work carefully, avoiding excessive impact to the lower part of the B-pillar.
1. Switch the ignition to off.
2. Disconnect the negative battery cable.
3. Remove the following parts:
- Front scuff plate (See FRONT SCUFF PLATE REMOVAL/INSTALLATION).
- Rear scuff plate (See REAR SCUFF PLATE REMOVAL/INSTALLATION).
- B-pillar lower trim (See B-PILLAR LOWER TRIM REMOVAL/INSTALLATION).
- Front seat belt upper anchor installation bolt (See FRONT SEAT BELT REMOVAL/INSTALLATION).
- B-pillar upper trim (See B-PILLAR UPPER TRIM REMOVAL/INSTALLATION).
4. Remove bolt.
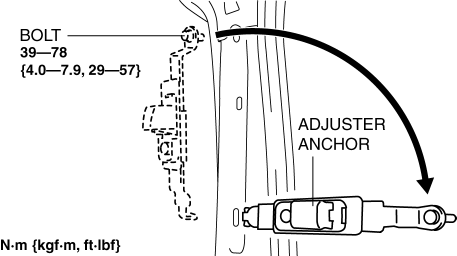
5. Rotate and remove the adjuster anchor as shown in the figure.
6. Install in the reverse order of removal.
REAR SEAT BELT REMOVAL/INSTALLATION
1. Remove the following parts:
- Rear scuff plate (See REAR SCUFF PLATE REMOVAL/INSTALLATION).
- Trunk end trim (See TRUNK END TRIM REMOVAL/INSTALLATION).
- Rear seat back (See REAR SEAT BACK REMOVAL/INSTALLATION).
- Rear seat cushion (See REAR SEAT CUSHION REMOVAL/INSTALLATION).
2. Remove the rear seat belt lower anchor installation bolt.
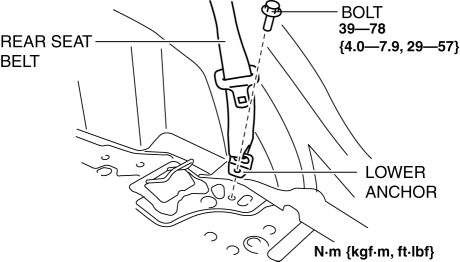
3. Remove the trunk side trim. (See TRUNK SIDE TRIM REMOVAL/INSTALLATION).
4. Remove the C-pillar trim. (See C-PILLAR TRIM REMOVAL/INSTALLATION).
5. Remove the bolts.
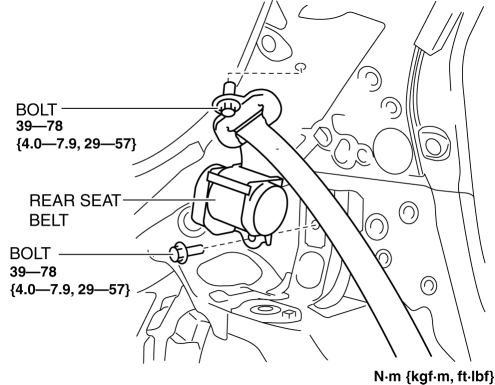
6. Remove the rear seat belt.
7. Install in the reverse order of removal.
REAR CENTER SEAT BELT REMOVAL/INSTALLATION
- (See REAR SEAT BACK FRAME REMOVAL/INSTALLATION).
SEAT BELT INSPECTION
Belt
1. Verify that the belt is installed properly with no twists or kinks.
2. Verify that there is no damage to the seat belt and no deformation of the metal fittings.
- If there is any malfunction, replace the seat belt.
ELR
1. Verify that the belt can be pulled out smoothly, and that it retracts smoothly.
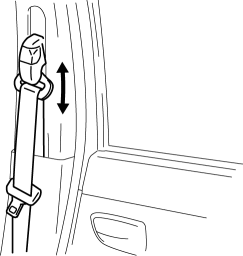
- If there is any malfunction, replace the seat belt.
2. Verify that the retractor locks when the belt is pulled quickly.
- If there is any malfunction, replace the seat belt.
3. Remove the retractor.
4. While pulling the seat belt out, make sure that the seat belt does not lock when the retractor is tilted slowly up to 15

