Mazda 2: Body Panels
BODY PANELS LOCATION INDEX
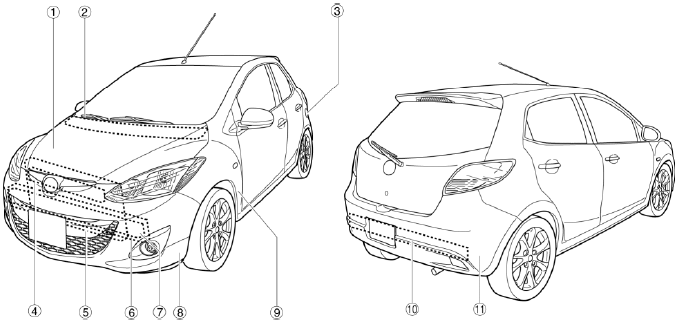
- Hood
- (See HOOD REMOVAL/INSTALLATION.)
- (See HOOD ADJUSTMENT.)
- Cowl panel
- (See COWL PANEL REMOVAL/INSTALLATION.)
- Fuel-filler lid
- (See FUEL-FILLER LID REMOVAL/INSTALLATION.)
- (See FUEL-FILLER LID ADJUSTMENT.)
- Seal board upper
- (See SEAL BOARD UPPER REMOVAL/INSTALLATION.)
- Shroud panel
- (See SHROUD PANEL REMOVAL/INSTALLATION.)
- Front bumper reinforcement
- (See BUMPER REINFORCEMENT REMOVAL/INSTALLATION.)
- Energy-absorbing form
- (See ENERGY-ABSORBING FORM REMOVAL/INSTALLATION.)
- Front bumper
- (See FRONT BUMPER REMOVAL/INSTALLATION.)
- (See FRONT BUMPER DISASSEMBLY/ASSEMBLY.)
- Front fender panel
- (See FRONT FENDER PANEL REMOVAL/INSTALLATION.)
- Rear bumper reinforcement
- (See BUMPER REINFORCEMENT REMOVAL/INSTALLATION.)
- Rear bumper
- (See REAR BUMPER REMOVAL/INSTALLATION.)
- (See REAR BUMPER DISASSEMBLY/ASSEMBLY.)
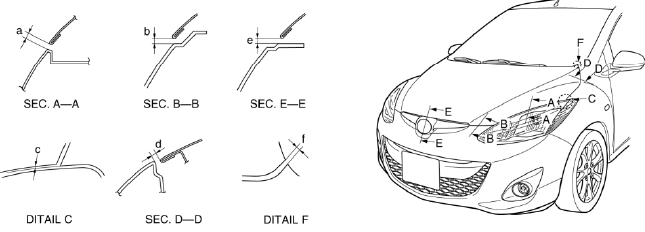
FUEL-FILLER LID REMOVAL/INSTALLATION
1. Remove the bolts.
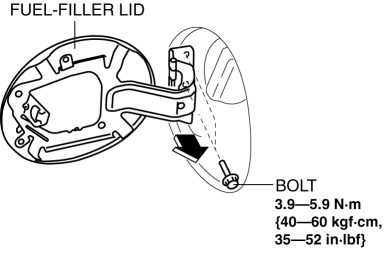
2. Remove the fuel filler lid in the direction of the arrow shown in the figure.
3. Install in the reverse order of removal.
4. Adjust the fuel-filler lid. (See FUEL-FILLER LID ADJUSTMENT).
FUEL-FILLER LID ADJUSTMENT
1. Measure the gap and height difference between the fuel-filler lid and the body.
2. Loosen the fuel-filler lid installation bolts and adjust the fuel-filler lid.
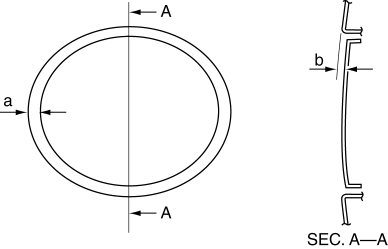
Standard clearance
- a: 1.7―3.7 mm {0.07―0.14 in}
- b: -0.5―1.5 mm {-0.01―0.05 in}
3. Tighten the bolts. (See FUEL-FILLER LID REMOVAL/INSTALLATION).
HOOD REMOVAL/INSTALLATION
WARNING:
- Removing the hood without supporting it could cause the hood to fall and cause serious injury. Always perform the procedure with at least another person to prevent the hood from falling.
1. After loosening bolt A and removing bolt B, remove the hood in the direction of the arrow shown in the figure.
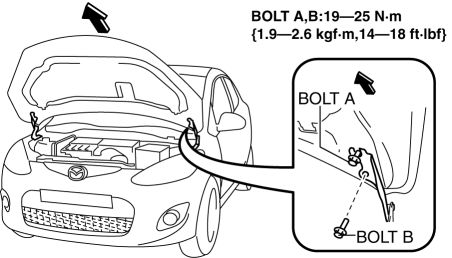
2. Remove bolt C, and remove the hood hinge in the direction of the arrow shown in the figure.

3. Install in the reverse order of removal.
4. When installing the hood, adjust the hood by moving the hood hinge. (See HOOD ADJUSTMENT).
HOOD ADJUSTMENT
Gap Adjustment
1. Measure the gap between the hood and body.
Standard clearance
- a:2.9―6.1 mm {0.12―0.24 in}
- b:3.0―6.0 mm {0.12―0.23 in}
- c:-1.0―1.0 mm {-0.039―0.039 in}
- d:2.5―4.5 mm {0.10―0.17 in}
- e:3.0―6.0 mm {0.12―0.23 in}
- f:-1.0―1.0 mm {-0.039―0.039 in}
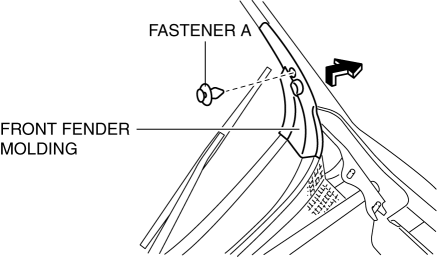
2. Remove the front fender molding. (See FRONT FENDER PANEL REMOVAL/INSTALLATION).
3. Loosen the hood hinge installation bolts and adjust the gap by moving the hood hinge back and forth, left and right.
4. Tighten the bolts. (See HOOD REMOVAL/INSTALLATION).
5. Install the front fender molding. (See FRONT FENDER PANEL REMOVAL/INSTALLATION).
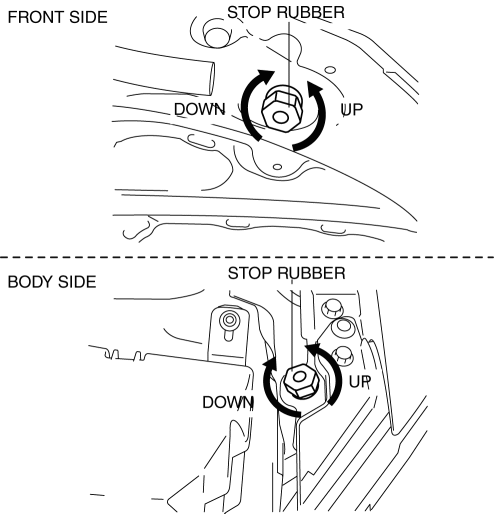
Height Difference Adjustment
1. Measure the height difference between the hood and body.
Standard clearance
- a:1.9―4.5mm {0.08―0.17 in}
- b:0.8―3.7mm {0.04―0.14 in}
- c:-1.0―0.5mm {-0.03―0.01 in}
2. Turn the stop rubber to adjust.
FRONT BUMPER REMOVAL/INSTALLATION
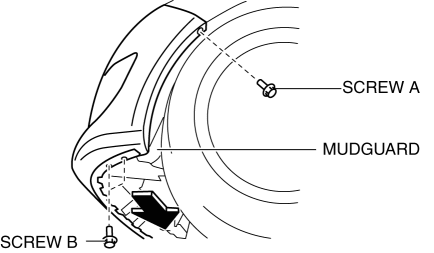
1. Disconnect the negative battery cable. (Vehicles with front fog lights) 2. Remove screw A and screws B, and set the mudguard out of the way in the direction of the arrow shown in the figure.
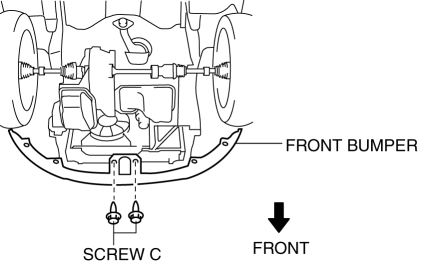
3. Remove screws C.
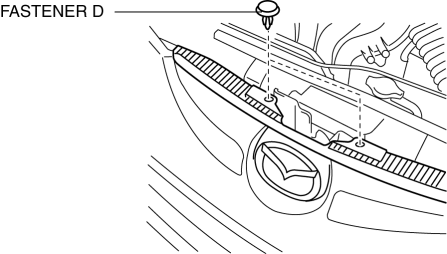
4. Remove the fastener D.
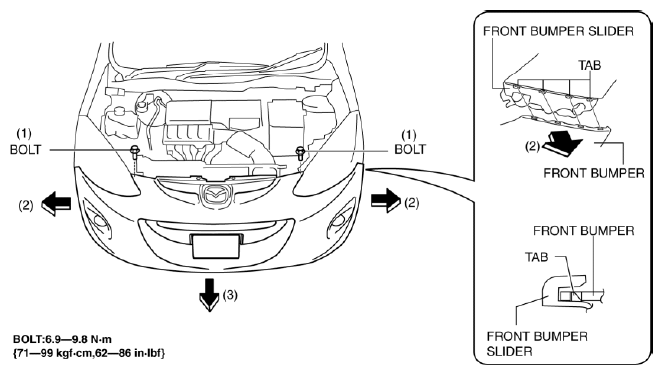
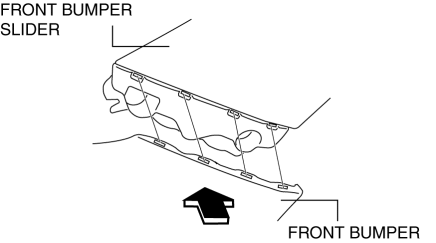
5. Remove the bolts from position (1) indicated in the figure, pull the front bumper in the direction of arrow (2) shown in the figure to disengage the both ends from the front bumper slider, then remove the front bumper in the direction of arrow (3).
CAUTION:
- The front bumper and front bumper slider are engaged firmly. If they are disengaged forcibly the bumper could fall and be damaged. Perform the servicing carefully when disengaging the front bumper from the front bumper slider.
- When disengaging the front bumper from the front bumper slider, the front bumper could fall and be damaged. Support the front bumper so that it does not fall.
6. Disconnect the front fog light connector. (Vehicles with front fog lights)
7. Install in the reverse order of removal.
8. Adjust the front fog light aiming for vehicles with front fog lights. (See FRONT FOG LIGHT AIMING)
Front Bumper Installation Note
1. Spread the front bumper ends apart.
2. Assemble the front bumper to the body.
3. Press the front bumper connecting area in the direction of the arrow shown in the figure to engage with the front bumper slider.
FRONT BUMPER DISASSEMBLY/ASSEMBLY
1. Remove the front fog light. (Vehicles with front fog light) (see FRONT FOG LIGHT REMOVAL/INSTALLATION)
2. Disassemble in the order indicated in the table.
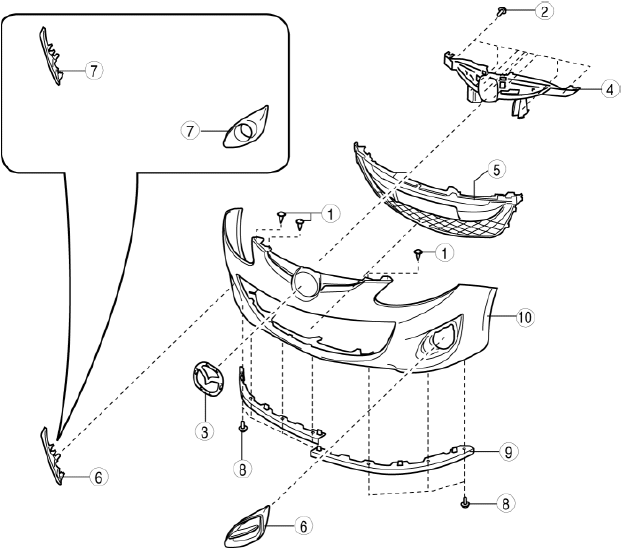
- Fastener A
- Screw B
- Ornament
- Radiator grille reinforcement
- Front bumper mesh
- Fog light hole cover (Vehicles without front fog light)
- Front fog light cover (Vehicles with front fog light)
- Rivet
- Airdam skirt
- Front bumper face
3. Assemble in the reverse order of disassembly.
ENERGY-ABSORBING FORM REMOVAL/INSTALLATION
1. Disconnect the negative battery cable.
2. Remove the front bumper. (See FRONT BUMPER REMOVAL/INSTALLATION).
3. Remove the fasteners.
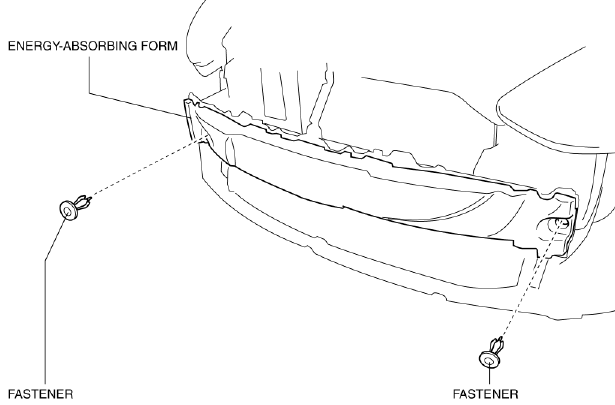
4. Remove the energy-absorbing form.
5. Install in the reverse order of removal.
BUMPER REINFORCEMENT REMOVAL/INSTALLATION
Front Bumper Reinforcement
CAUTION:
- Because the shroud panel is installed to the front bumper reinforcement, support the shroud panel using a jack before removing the front bumper reinforcement so as not to apply excessive force to the shroud panel.
- Since the servicing is performed with the hood open, secure the hood using a piece of wood to prevent it from falling.
1. Disconnect the negative battery cable.
2. Remove the front bumper. (See FRONT BUMPER REMOVAL/INSTALLATION)
3. Remove the front combination light. (See FRONT COMBINATION LIGHT REMOVAL/INSTALLATION)
4. Remove the horn. (See HORN REMOVAL/INSTALLATION)
5. Remove the washer tank. (See WASHER TANK REMOVAL/INSTALLATION)
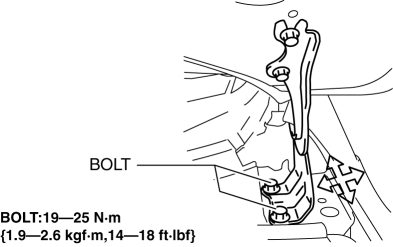
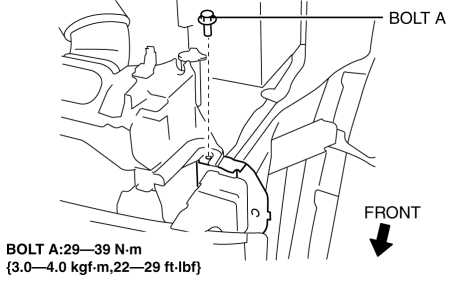
6. Remove bolt A.
7. Remove bolts B.
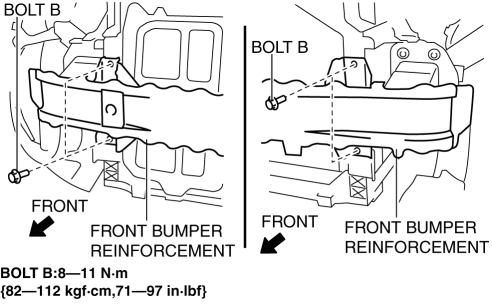
8. Remove bolts C and D then remove the front bumper reinforcement in the direction of the arrow shown in the figure.
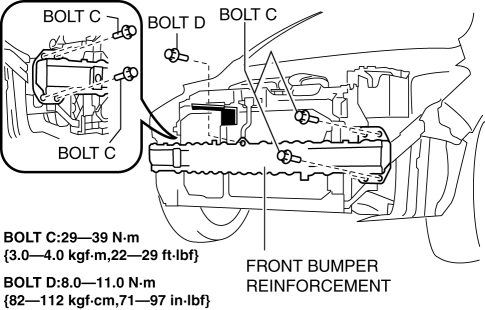
9. Remove the bracket in the direction shown of the arrow shown in the figure.

10. Install in the reverse order of removal.
Rear Bumper Reinforcement
1. Disconnect the negative battery cable.
2. Remove the following the parts:
- Splash shield (See SPLASH SHIELD REMOVAL/INSTALLATION).
- Rear combination light (See REAR COMBINATION LIGHT REMOVAL/INSTALLATION).
- Rear bumper (See REAR BUMPER REMOVAL/INSTALLATION).
3. Remove the nuts.
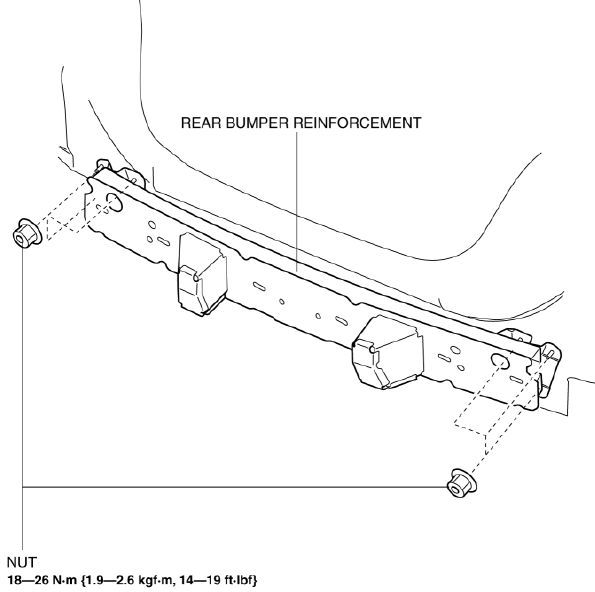
4. Remove the rear bumper reinforcement.
5. Install in the reverse order of removal.
SEAL BOARD UPPER REMOVAL/INSTALLATION
1. Disconnect the negative battery cable.
2. Remove the front bumper. (See FRONT BUMPER REMOVAL/INSTALLATION)
3. After removing fasteners A.
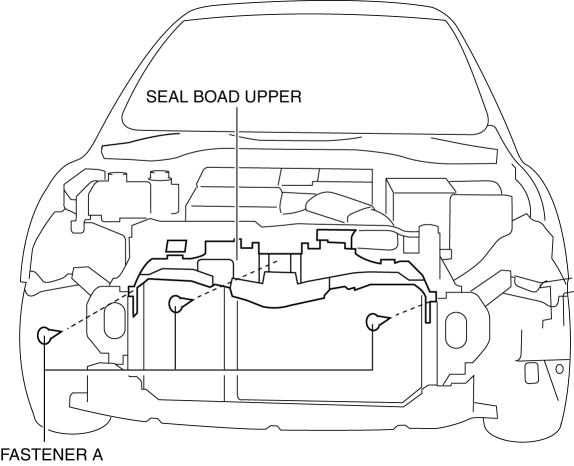
4. Detach hooks B, C and remove the seal board upper in the direction of the arrow shown in the figure.
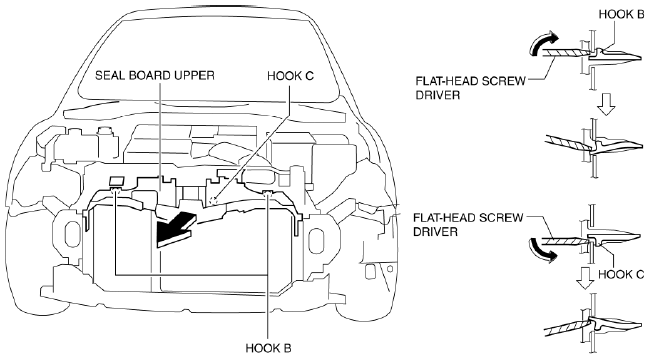
5. Install in the reverse order of removal.
FRONT FENDER PANEL REMOVAL/INSTALLATION
1. Disconnect the negative battery cable.
2. Removal the following parts:
- Sail garnish (See SAIL GARNISH REMOVAL/INSTALLATION)
- Side turn lights (See SIDE TURN LIGHT REMOVAL/INSTALLATION)
- Front bumper (See FRONT BUMPER REMOVAL/INSTALLATION)
- Front combination lights (See FRONT COMBINATION LIGHT REMOVAL/INSTALLATION)
- Side step molding (vehicles with side step molding) (See SIDE STEP MOLDING REMOVAL) (See SIDE STEP MOLDING INSTALLATION)
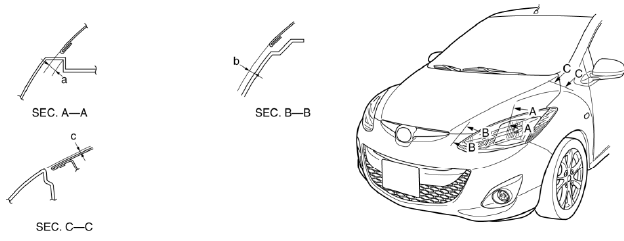
3. Remove fastener A, then remove the front fender molding in the direction of the arrow shown in the figure.
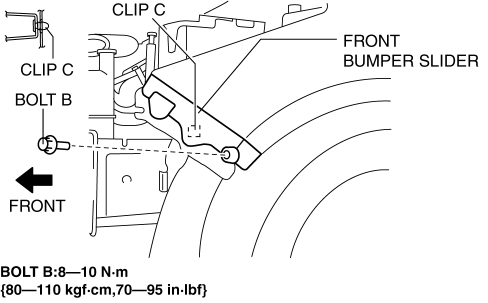
4. Remove bolt B and clip C, then remove the front bumper slider.
5. Remove bolts D, then remove the front fender panel in the direction of the arrow shown in the figure.

6. Install in the reverse order of removal.
7. Adjust the headlight aiming. (See HEADLIGHT AIMING)
SHROUD PANEL REMOVAL/INSTALLATION
CAUTION:
- Because the shroud panel is installed to the front bumper reinforcement, support the shroud panel using a jack before removing the front bumper reinforcement so as not to apply excessive force to the shroud panel.
- Since the servicing is performed with the hood open, secure the hood using a piece of wood to prevent it from falling.
1. Disconnect the negative battery cable.
2. Remove the following parts:
- Front bumper (See FRONT BUMPER REMOVAL/INSTALLATION)
- Front combination lights (See FRONT COMBINATION LIGHT REMOVAL/INSTALLATION)
- Horn (See HORN REMOVAL/INSTALLATION).
- Washer tank (See WASHER TANK REMOVAL/INSTALLATION)
- Front bumper reinforcement (See BUMPER REINFORCEMENT REMOVAL/INSTALLATION)
- Seal board upper (See SEAL BOARD UPPER REMOVAL/INSTALLATION)
- Hood latch (See HOOD LATCH AND RELEASE LEVER REMOVAL/INSTALLATION)
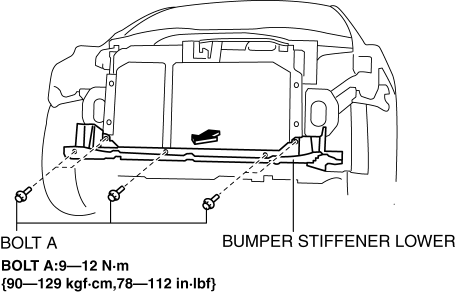
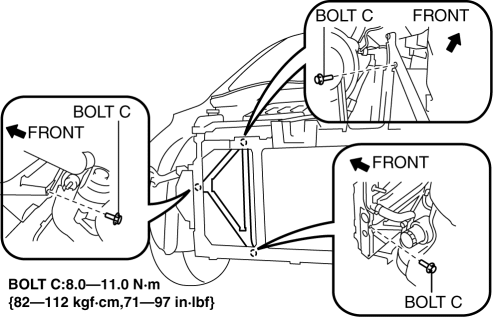
3. Remove bolts A, then remove the bumper stiffener lower in the direction of the arrow shown in the figure.
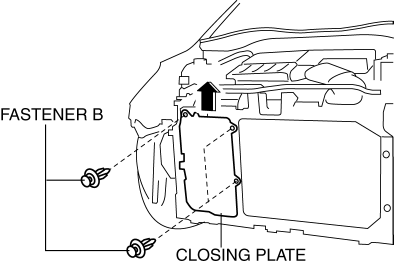
4. Remove fasteners B, then remove the closing plate in the direction of the arrow shown in the figure.
5. Remove bolts C, then set the shroud upper plate out of the way.
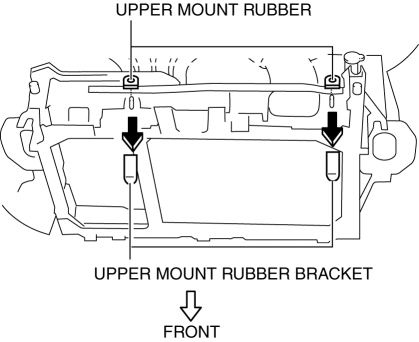
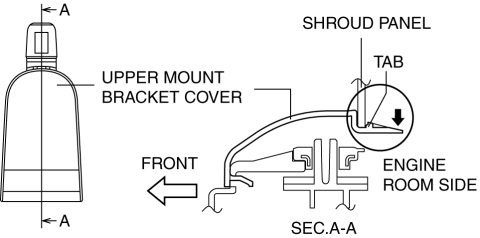
6. Remove the upper mount rubber bracket in the direction of the arrow in the figure, then remove the upper mount rubber. (See Upper Mount Rubber Removal Note)
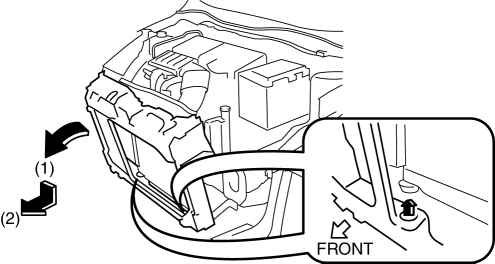
7. Pull the shroud panel in the direction of arrow (1) in the figure, and remove it in the direction of arrow (2).
CAUTION:
- Support the lower surface of the radiator with a floor jack to prevent the radiator from falling off after the shroud panel is removed.
8. Install in the reverse order of removal.
Upper Mount Rubber Removal Note
1. Remove the upper mount rubber bracket while pressing down the upper mount rubber bracket tab in the direction of the arrow in the figure.
COWL PANEL REMOVAL/INSTALLATION
1. Disconnect the negative battery cable.
2. Remove the following parts:
- Windshield wiper arm (See WINDSHIELD WIPER ARM AND BLADE REMOVAL/INSTALLATION)
- Front fender molding (See FRONT FENDER PANEL REMOVAL/INSTALLATION)
- Cowl grille (See COWL GRILLE REMOVAL/INSTALLATION)
- Windshield wiper motor (See WINDSHIELD WIPER MOTOR REMOVAL/INSTALLATION)
3. Remove the washer hose grommet from the cowl panel and disconnect the front washer hose.
4. Remove bolts, and remove the cowl panel in the direction of the arrow shown in the figure.

5. Install in the reverse order of removal.
REAR BUMPER REMOVAL/INSTALLATION
1. Disconnect the negative battery cable.
2. Remove the splash shield. (See SPLASH SHIELD REMOVAL/INSTALLATION).
3. Remove the rear combination light. (See REAR COMBINATION LIGHT REMOVAL/INSTALLATION).
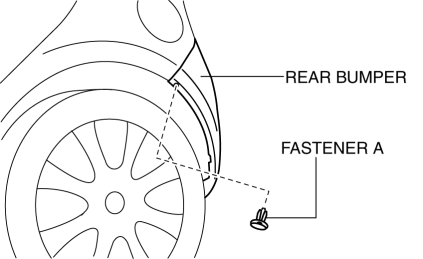
4. Remove the fastener A.
5. Remove the fasteners B.

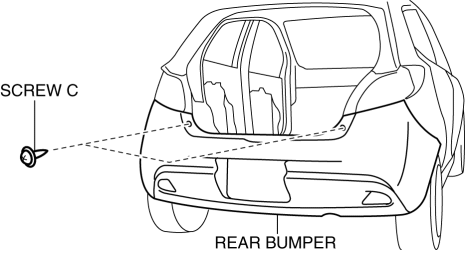
6. Remove the screws C.
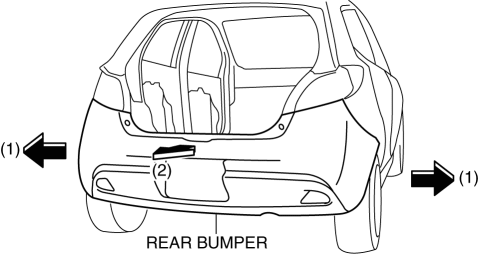
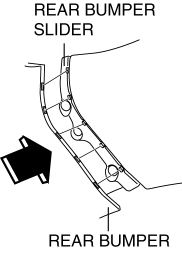
7. Pull the rear bumper in the direction of arrow (1) shown in the figure to disengage the bumper from the rear bumper slider, then remove the rear bumper in the direction of arrow (2).
CAUTION:
- When disengaging the rear bumper from the rear bumper slider, the rear bumper could fall and be damaged. Support the rear bumper so that it does not fall.
8. Remove lisence plate light socket. (See LICENSE PLATE LIGHT REMOVAL/INSTALLATION).
9. Disconnect the rear fog light connector. (Vehicles with rear fog light)
10. Install in the reverse order of removal.
Rear Bumper Installation Note
1. Spread the rear bumper ends apart.
2. Assemble the rear bumper to the body.
3. Press the rear bumper connecting area in the direction of the arrow shown in the figure to engage with the rear bumper slider.
REAR BUMPER DISASSEMBLY/ASSEMBLY
1. Remove in the order indicated in the table.
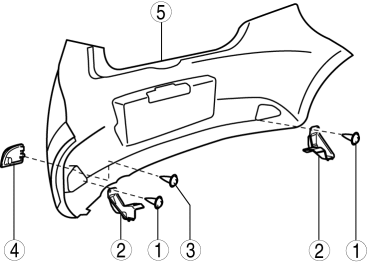
- Screw A
- Rear bumper guard
- Screw B
- Rear reflector (See Rear Reflector Removal Note).
- Rear bumper fascia
2. Assemble in the reverse order of disassembly.
Rear Reflector Removal Note
1. Push the tab A in the direction shown by the arrow (1).
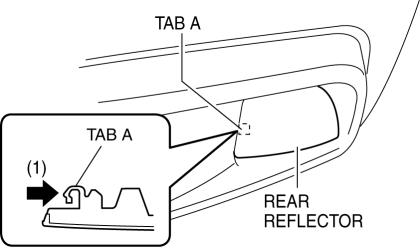
2. Pull off the rear reflector from the rear bumper in the direction shown by the arrow (2) and (3).
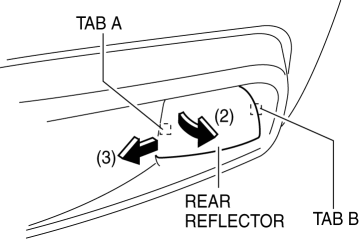
CAUTION:
- When pulling out the rear reflector, be careful not to damage the tab B.

