Mazda 2: Curtain Air Bag Module
CURTAIN AIR BAG MODULE REMOVAL/INSTALLATION
WARNING:
- Handling the air bag module improperly can accidentally deploy the air bag module, which may seriously injure you. Read the air bag system service warnings and cautions before handling the air bag module. (See AIR BAG SYSTEM SERVICE WARNINGS). (See AIR BAG SYSTEM SERVICE CAUTIONS).
1. Switch the ignition to off.
2. Disconnect the negative battery cable and wait for 1 min or more.
3. Remove the following parts:
- A-pillar trim (See A-PILLAR TRIM REMOVAL/INSTALLATION).
- Front scuff plate (See FRONT SCUFF PLATE REMOVAL/INSTALLATION).
- Rear scuff plate (See REAR SCUFF PLATE REMOVAL/INSTALLATION).
- B-pillar lower trim (See B-PILLAR LOWER TRIM REMOVAL/INSTALLATION).
- Front seat belt upper anchor installation bolt (See FRONT SEAT BELT REMOVAL/INSTALLATION).
- B-pillar upper trim (See B-PILLAR UPPER TRIM REMOVAL/INSTALLATION).
- Rear seat cushion (See REAR SEAT CUSHION REMOVAL/INSTALLATION).
- Rear seat back (See REAR SEAT BACK REMOVAL/INSTALLATION).
- Rear seat belt lower anchor installation bolt (See REAR SEAT BELT REMOVAL/INSTALLATION).
- Trunk end trim (See TRUNK END TRIM REMOVAL/INSTALLATION).
- Trunk side trim (See TRUNK SIDE TRIM REMOVAL/INSTALLATION).
- C-pillar trim (See C-PILLAR TRIM REMOVAL/INSTALLATION).
- Sunvisor (See SUNVISOR REMOVAL/INSTALLATION).
- Rain sensor cover (vehicles with auto light/wiper system) (See RAIN SENSOR REMOVAL/INSTALLATION).
- Assist handle (See ASSIST HANDLE REMOVAL/INSTALLATION).
- Headliner (See HEADLINER REMOVAL/INSTALLATION).
4. Using flathead screwdriver, lift the locking device carefully, however do not remove it.

5. Disconnect the connector.
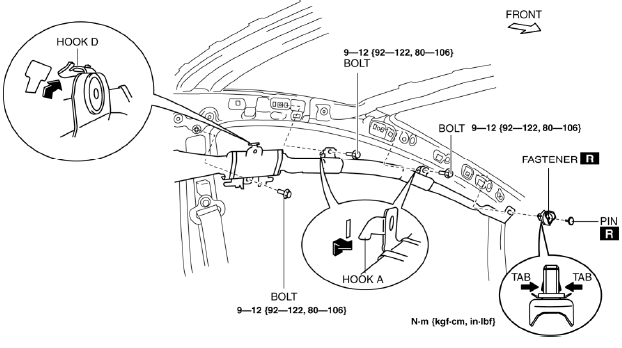
6. Remove the bolts.
7. Remove the front and back pins.
8. Remove the front and back fasteners, and the clips.
9. Pull hook A in the direction shown in the figure and remove it from the body.
10. Move hook B and C in the order of the arrows shown in the figure, and remove them from the body.
11. Pull hook D in the direction shown by the arrow and remove it from the body.
12. Remove the curtain air bag module.
13. Install in the reverse order of removal.
14. When the switch the ignition to ON verify that the air bag system warning light illuminates for approx. 6 s and goes out.
- If the air bag system warning light does not operate normally, refer to the on-board diagnostic system (air bag system) and perform inspection of the system. (See FLOWCHART).

