Mazda 2: Front Brake (Disc)
FRONT BRAKE (DISC) REMOVAL/INSTALLATION
1. Remove in the order indicated in the table.
2. Install in the reverse order of removal.
3. Add brake fluid, bleed the brakes, and inspect for leakage after the installation has been completed. (See BRAKE FLUID AIR BLEEDING).
4. After installation, pump the brake pedal a few times and verify that the brakes do not drag.
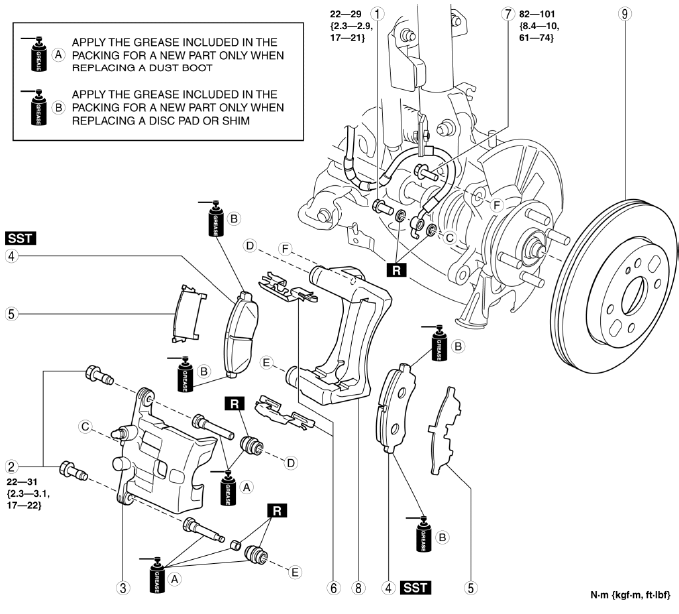
- Bolt
- Bolt
- Caliper
- Disc pad
- Shim
- Guide plate
- Bolt
- Mounting support
- Disc plate
Disc Pad Installation Note
NOTE:
- Press fit the piston before installing the disc pads to the mounting support.
1. Thoroughly clean the exposed area of the piston.
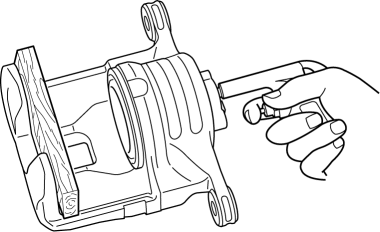
2. Set up the disc pads and SST.

3. Press fit the piston using the SST.
4. Use the grease included with the packaging only when replacing a disc pad or shim, and apply it to the areas in which the guide plate of the disc pad comes into contact.
5. Install the disc pads to the mounting support.
NOTE:
- Install the disc pad with the pad wear indicator to the inner side of the mounting support.
DISC PAD (FRONT) REPLACEMENT
1. Remove in the order indicated in the table.
2. Install in the reverse order of removal.
3. After installation, pump the brake pedal a few times and verify that the brakes do not drag.
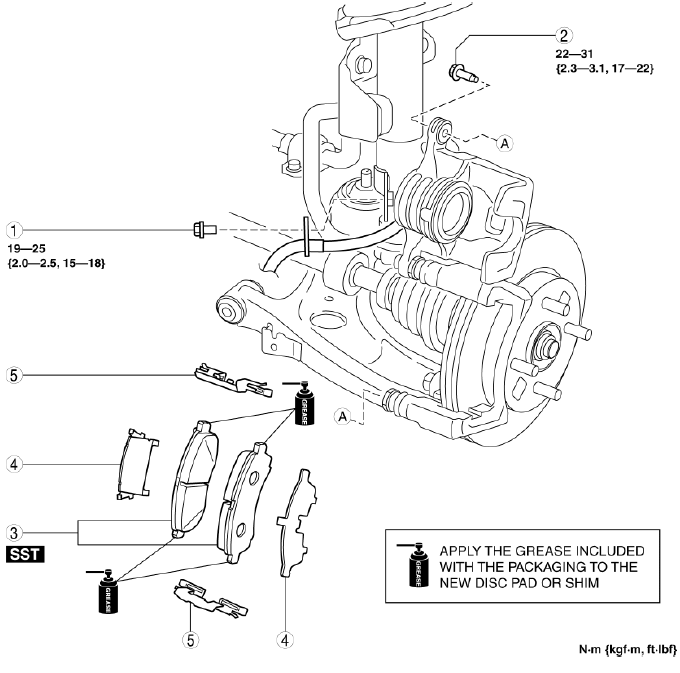
- Bolt
- Bolt
- Disc pad
- Shim
- Guide plate
Disc Pad Installation Note
NOTE:
- Press fit the piston before installing the disc pads to the mounting support.
1. Thoroughly clean the exposed area of the piston.
2. Set up the disc pads and the SST.

3. Press fit the piston using the SST.
4. Apply the grease included with the packaging for a new disc pad or shim to the areas in which the guide plate of the disc pad comes into contact.
5. Install the disc pads to the mounting support.
NOTE:
- Install the disc pad with the pad wear indicator to the inner side of the mounting support.
CALIPER (FRONT) DISASSEMBLY/ASSEMBLY
1. Disassemble in the order indicated in the table.
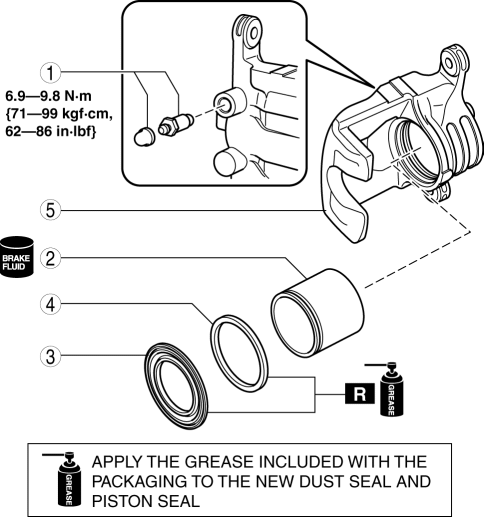
- Bleeder cap, bleeder screw
- Piston
- Dust seal
- Piston seal
- Caliper body
2. Assemble in the reverse order of disassembly.
Piston Disassembly Note
CAUTION:
- The piston could be damaged if it is blown out with great force. Blow compressed air slowly to prevent the piston from suddenly popping out.
1. Insert a piece of wood in the caliper and blow compressed air through the bleeder screw installation hole to remove the piston from the caliper.