Mazda 2: Mass Air Flow (MAF)/Intake Air Temperature (IAT) Sensor
MASS AIR FLOW (MAF)/INTAKE AIR TEMPERATURE (IAT) SENSOR REMOVAL/INSTALLATION
CAUTION:
- Neither the MAF nor the IAT sensor cannot be removed as a single unit. When replacing the MAF or IAT sensor, replace it together with the other sensor as a single unit.
1. Disconnect the negative battery cable.
2. Disconnect the MAF/IAT sensor connector.
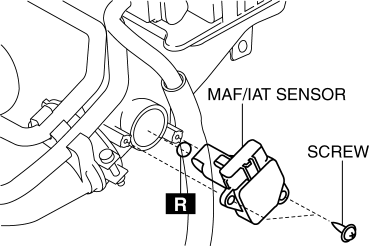
3. Remove the MAF/IAT sensor.
4. Install in the reverse order of removal.
MASS AIR FLOW (MAF) SENSOR INSPECTION
CAUTION:
- The MAF sensor cannot be removed as a single unit. When replacing the MAF sensor, replace it together with the IAT sensor as a single unit.
1. Verify the connection condition of the MAF sensor/IAT sensor connector.
- If a connector has poor contact, install it correctly and then go to the next step.
- If the connector connection is normal, go to the next step.
2. Verify the MAF sensor voltage under no airflow conditions using the following procedure:
- Connect the M-MDS to the DLC-2.
CAUTION:
- Do not create suction in the exhaust pipe by cranking the engine and causing air to flow through the exhaust duct. It could cause a measurement error because the MAF sensor voltage is measured under no airflow conditions.
- Switch the ignition to ON (engine off) and wait for 30 s.
- Verify that the MAF/IAT sensor output voltage (PID: MAF).
Specification
- 0.65 V
- If it is the specification or more, replace the MAF/IAT sensor. (See MASS AIR FLOW (MAF)/INTAKE AIR TEMPERATURE (IAT) SENSOR REMOVAL/INSTALLATION).
- If it is less than the specification, go to the next step.
3. Remove the MAF/IAT sensor. (See MASS AIR FLOW (MAF)/INTAKE AIR TEMPERATURE (IAT) SENSOR REMOVAL/INSTALLATION).
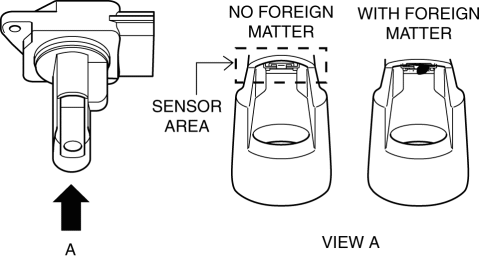
4. Verify that there is no foreign matter in the MAF/IAT sensor.
- Shine light on the sensor (Direction A in figure below) in the flow path and verify visually.
- If there is visible, large foreign matter, replace the MAF/IAT sensor. (See MASS AIR FLOW (MAF)/INTAKE AIR TEMPERATURE (IAT) SENSOR REMOVAL/INSTALLATION).
- If there is no foreign matter, go to the next step.
5. Verify that there is no damage, cracks, or dirt on the MAF sensor part of the MAD/IAT sensor.
- If a malfunction can be verified, repair or replace the MAF/IAT sensor. (See MASS AIR FLOW (MAF)/INTAKE AIR TEMPERATURE (IAT) SENSOR REMOVAL/INSTALLATION).
- If a malfunction cannot be verified, go to the next step (MAF sensor is normal).
NOTE:
- Install the removed MAF/IAT sensor because the MAF sensor is normal.
6. Install the MAF/IAT sensor. (See MASS AIR FLOW (MAF)/INTAKE AIR TEMPERATURE (IAT) SENSOR REMOVAL/INSTALLATION).
INTAKE AIR TEMPERATURE (IAT) SENSOR INSPECTION
CAUTION:
- The IAT sensor cannot be removed as a single unit. When replacing the IAT sensor, replace it together with the MAF sensor as a single unit.
1. Disconnect the negative battery cable.
2. Disconnect the MAF/IAT sensor connector.
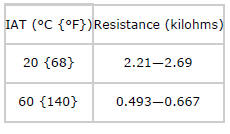
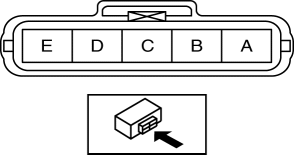
3. Verify that the resistance between terminals D and E is within the specification.
- If not within the specification, replace the MAF/IAT sensor. (See MASS AIR FLOW (MAF)/INTAKE AIR TEMPERATURE (IAT) SENSOR REMOVAL/INSTALLATION).
IAT sensor specification