Mazda 2: Rear Suspension
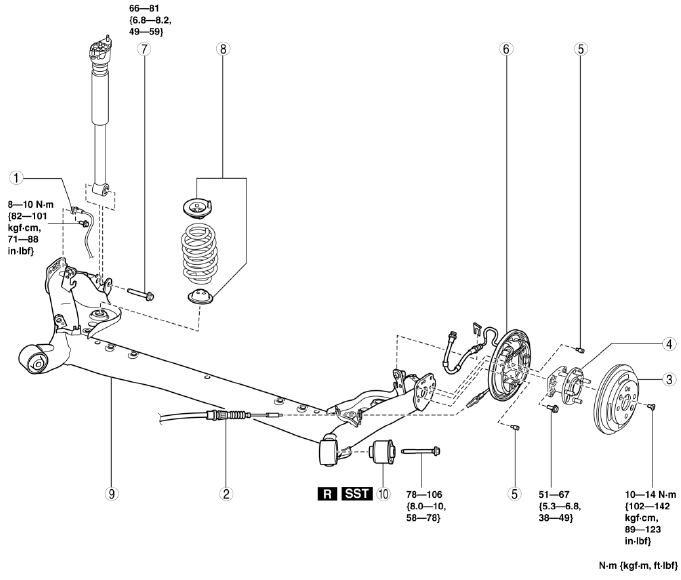
REAR SUSPENSION LOCATION INDEX
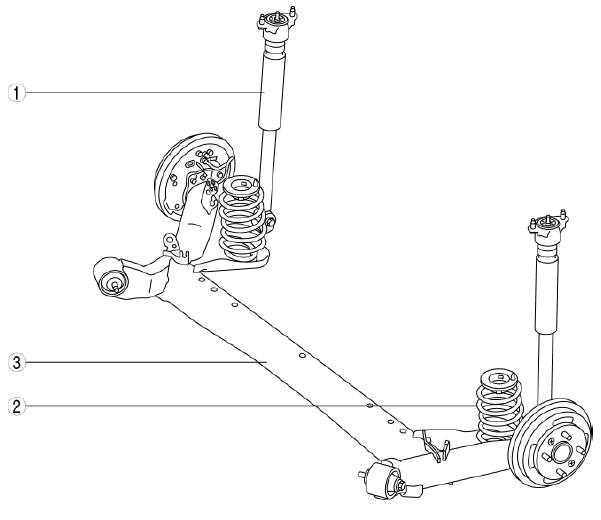
- Rear shock absorber
- (See REAR SHOCK ABSORBER REMOVAL/INSTALLATION.)
- (See REAR SHOCK ABSORBER INSPECTION.)
- (See REAR SHOCK ABSORBER DISPOSAL.)
- Rear coil spring
- (See REAR COIL SPRING REMOVAL/INSTALLATION.)
- Torsion beam axle
- (See TORSION BEAM AXLE REMOVAL/INSTALLATION.)
REAR SHOCK ABSORBER REMOVAL/INSTALLATION
1. Remove in the order indicated in the table.
2. Install in the reverse order of removal.
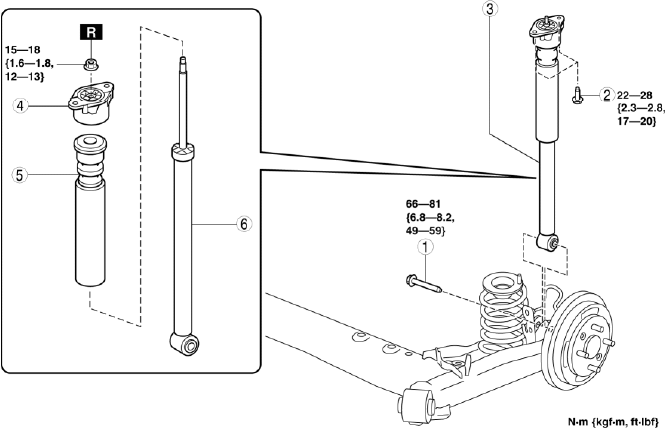
- Rear shock absorber component under bolt
- Rear shock absorber component upper bolt
- Rear shock absorber component
- Mounting rubber
- Bound stopper component
- Rear shock absorber
REAR SHOCK ABSORBER INSPECTION
1. Inspect in the same way as the front shock absorber.
(See FRONT SHOCK ABSORBER INSPECTION).
REAR SHOCK ABSORBER DISPOSAL
1. Place the shock absorber on a level surface or with the piston pointing downwards.
2. Drill a 2-3 mm {0.08-0.11 in} hole at a point 20 mm {0.79 in} from the bottom of the tube, so that the gas can escape.
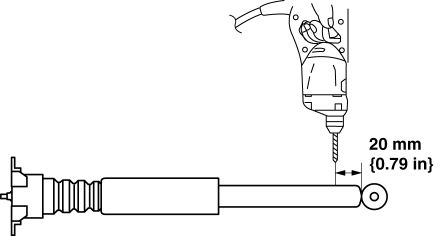
WARNING:
- Whenever drilling into a shock absorber, wear protective eye wear. The gas in the shock absorber is pressurized and could spray metal chips into the eyes and face.
3. Turn the hole downwards.
4. The oil can be collected by moving the piston rod several times up and down, and cut the tube at the end.
5. Dispose of waste oil according to local waste disposal lows.
REAR COIL SPRING REMOVAL/INSTALLATION
1. Remove in the order indicated in the table.
2. Install in the reverse order of removal.
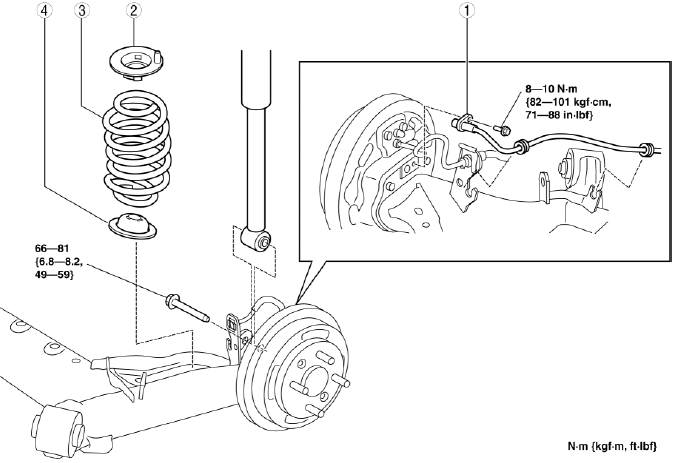
- ABS wheel-speed sensor
- Upper spring seat
- Rear coil spring
- Lower spring seat
Upper Spring Seat, Rear Coil Spring Removal Note
NOTE:
- Even when either left or right coil spring is replaced, remove both rear shock absorber lower bolts so that the rear side of the torsion beam axle can be lowered in order to assure a space for the coil spring removal.
1. Support the torsion beam axle using a jack.

2. Remove the bolt (rear shock absorber lower side).
3. Lower the jack slowly, remove the upper spring seat and rear coil spring.
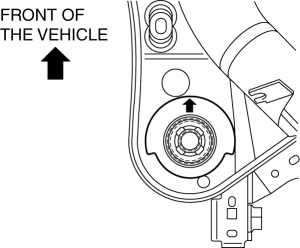
Lower Spring Seat Installation Note
1. Install the lower spring seat so that the arrow is facing to the front of the vehicle.
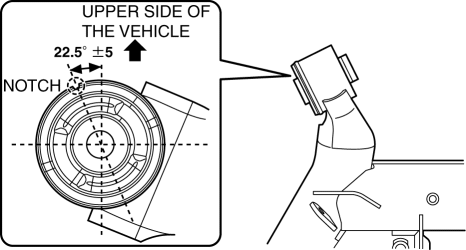
Upper Spring Seat Installation Note
1. Install the coil spring with the end of the coil spring seated on the step of the upper spring seat.
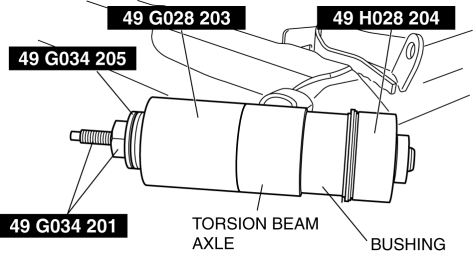
TORSION BEAM AXLE REMOVAL/INSTALLATION
1. Detach the rear brake hose from the torsion beam axle.
2. Remove in the order indicated in the table.
3. Install in the reverse order of removal.
- ABS wheel-speed sensor
- Parking brake cable
- Brake drum
- Wheel hub component
- Pin
- Brake drum component
- Bolt (lower end of shock absorber)
- Rear coil spring component
- Torsion beam axle component
- Bushing
Torsion Beam Axle Component Removal Note
WARNING:
- Verify that the torsion beam axle component is securely supported by a jack. If the torsion beam axle component falls off, it could cause serious injury or death, and damage to the vehicle.
1. Lower the jack slowly and remove the torsion beam axle component.
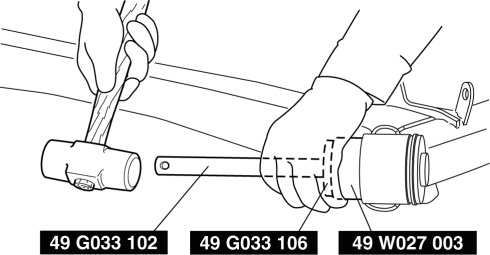
Bushing Removal Note
1. Remove the bushing using the SSTs.
2. Verify that there is no dirt in the torsion beam axle where the bushing is press-fit. Clean the area if there is any dirt.
Bushing Installation Note
NOTE:
- Press-fit the bushing perpendicular to the surface of the torsion beam axle.
1. Set the bushing to the torsion beam axle with as shown in the figure.
2. Press-fit the bushing using the SSTs.
SUSPENSION TECHNICAL DATA
Front wheel alignment (unloaded)*1

*1 Engine coolant and engine oil are at specified level. Spare tire, jack and
tools are in
designated position.
*2 Difference between left and right must not exceed 1

