Mazda 2: Valve Clearance
VALVE CLEARANCE INSPECTION
1. Disconnect the negative battery cable.
2. Remove the splash shield (RH). (See DRIVE BELT REMOVAL/INSTALLATION).
3. Remove the fresh-air duct and the air cleaner as a single unit. (See INTAKE-AIR SYSTEM REMOVAL/INSTALLATION).
4. Remove the ignition coils. (See IGNITION COIL REMOVAL/INSTALLATION).
5. Disconnect the ventilation hose. (See INTAKE-AIR SYSTEM REMOVAL/INSTALLATION).
6. Set the vacuum hose out of the way.
7. Remove the cylinder head cover. (See TIMING CHAIN REMOVAL/INSTALLATION).
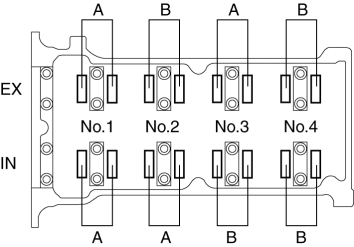
8. Measure the valve clearance.
NOTE:
- Make sure to note down the measured values for choosing the suitable replacement tappets.
- Rotate the crankshaft clockwise so that the No.1 cylinder is at TDC of the compression stroke.
- Measure the valve clearance at A in the figure.
- If not within the specification, replace the tappet and adjust the valve clearance to the median value. (See VALVE CLEARANCE ADJUSTMENT).
Valve clearance [Engine cold]
- IN: 0.27-0.33 mm {0.0107-0.0129 in}
- EX: 0.27-0.33 mm {0.0107-0.0129 in}
- Rotate the crankshaft clockwise 360
READ NEXT:
VARIABLE VALVE TIMING ACTUATOR INSPECTION CAUTION: The variable valve timing actuator cannot be disassembled since it is a precision unit. 1. Disconnect the negative battery cable. 2. Remove the Variable Valve Timing Actuator
OIL CONTROL VALVE (OCV) INSPECTION Coil Resistance Inspection 1. Disconnect the negative battery cable. 2. Disconnect the OCV connector. 3. Measure the coil resistance between terminals A and B usin Oil Control Valve (OCV)
TIMING CHAIN REMOVAL/INSTALLATION WARNING: Do not remove the jack from the engine with the bolt of engine mount No. 3 removed because the engine may fall off and cause a serious accident. 1. Dis Timing Chain
