Mazda 2: Engine System

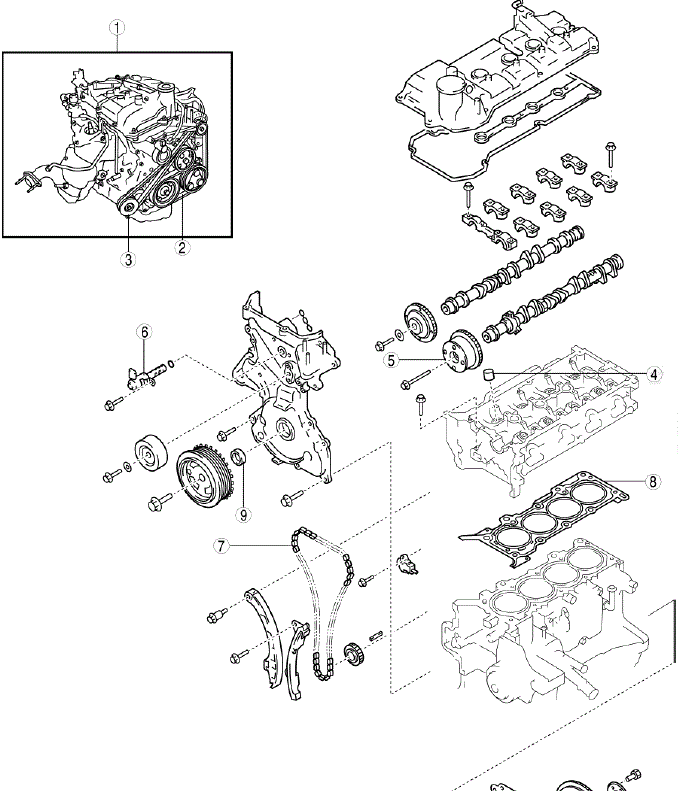
ENGINE LOCATION INDEX

Mazda 2. ENGINE LOCATION INDEX

Mazda 2. ENGINE LOCATION INDEX

  1. Engine
    • (See ENGINE TUNE-UP)
    • (See COMPRESSION INSPECTION)
    • (See ENGINE REMOVAL/INSTALLATION)
    • (See ENGINE DISASSEMBLY/ASSEMBLY)
  2. Drive belt
    • (See DRIVE BELT INSPECTION)
    • (See DRIVE BELT REMOVAL/INSTALLATION)
  3. Drive belt auto tensioner
    • (See DRIVE BELT AUTO TENSIONER INSPECTION)
  4. Tappet
    • (See VALVE CLEARANCE INSPECTION)
    • (See VALVE CLEARANCE ADJUSTMENT)
  5. Variable valve timing actuator
    • (See VARIABLE VALVE TIMING ACTUATOR INSPECTION)
    • (See VARIABLE VALVE TIMING ACTUATOR REMOVAL/INSTALLATION)
  6. Oil control valve (OCV)
    • (See OIL CONTROL VALVE (OCV) INSPECTION)
    • (See OIL CONTROL VALVE (OCV) REMOVAL/INSTALLATION)
  7. Timing chain
    • (See TIMING CHAIN REMOVAL/INSTALLATION)
  8. Cylinder head gasket
    • (See CYLINDER HEAD GASKET REPLACEMENT)
  9. Front oil seal
    • (See FRONT OIL SEAL REPLACEMENT)
  10. Rear oil seal
    • (See REAR OIL SEAL REPLACEMENT)

READ NEXT:

 Engine Tune-up

Engine Tune-up Preparation NOTE: If the accelerator pedal is depressed continuously for a specified time, the engine speed may decrease to the idle speed. This is due to the fuel cut control op

 Drive Belt

DRIVE BELT INSPECTION NOTE: Drive belt deflection/tension inspection is not necessary because of the use of the drive belt auto tensioner. 1. Remove the splash shield (RH). 2. Verify that the d

 Valve Clearance

VALVE CLEARANCE INSPECTION 1. Disconnect the negative battery cable. 2. Remove the splash shield (RH). (See DRIVE BELT REMOVAL/INSTALLATION). 3. Remove the fresh-air duct and the air cleaner as a si

SEE MORE:

 Curtain Air Bag Module

CURTAIN AIR BAG MODULE REMOVAL/INSTALLATION WARNING: Handling the air bag module improperly can accidentally deploy the air bag module, which may seriously injure you. Read the air bag system service warnings and cautions before handling the air bag module. (See AIR BAG SYSTEM SERVICE WARNING

 Door Lock Switch

DOOR LOCK SWITCH REMOVAL/INSTALLATION 1. Disconnect the negative battery cable. 2. Remove the console panel. (See REAR CONSOLE REMOVAL/INSTALLATION). 3. Remove the screws. 4. Disconnect the door lock switch connector. 5. Install in the reverse order of removal. DOOR LOCK SWITCH INSPECTION 1. In

© 2016-2023 Copyright www.ma2auto.com