Mazda 2: Wiper/Washer System
WIPER/WASHER SYSTEM LOCATION INDEX
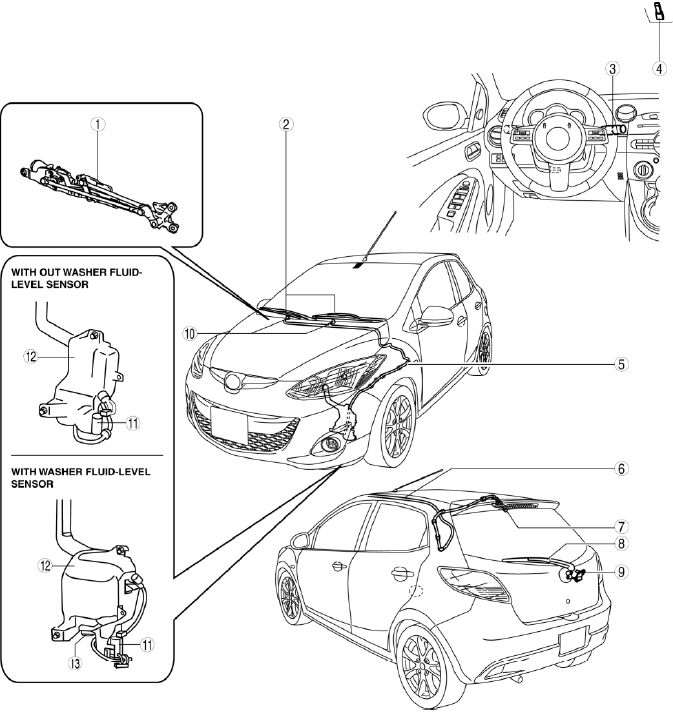
- Windshield wiper motor
- Windshield wiper arm and blade
- Wiper and washer switch
- Rain sensor
- Windshield washer hose
- Rear washer hose
- Rear washer nozzle
- Rear wiper arm and blade
- Rear wiper motor
- Windshield washer nozzle
- Washer motor
- Washer tank
- Washer fluid-level sensor
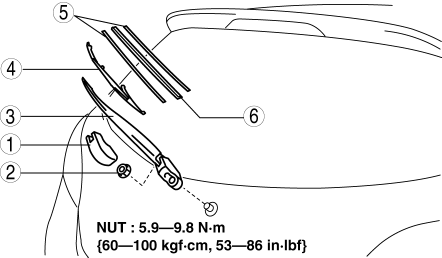
WINDSHIELD WIPER ARM AND BLADE REMOVAL/INSTALLATION
WARNING:
- When the switch the ignition to ON, and the wiper and washer switch is
in the AUTO
position, the windshield wipers could operate accidentally under the
following
conditions. Always switch the ignition, and the wiper and washer switch off
before
handling the windshield wipers; otherwise a pinched hand or fingers could
result in
injury or a wiper system malfunction:
- The windshield in the rain sensor installation area is touched.
- The windshield is subjected to an impact.
- The rain sensor is subjected to an impact from inside the vehicle.
- Water is poured on the windshield.
1. Remove in the order indicated in the table.
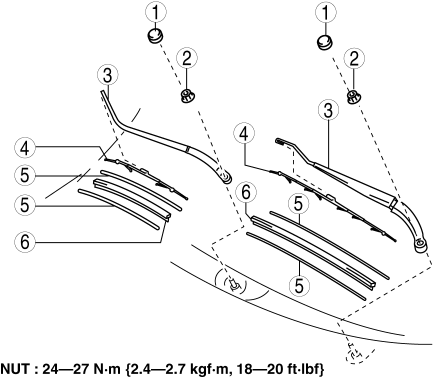
- Cap
- Nut
- Windshield wiper arm
- Windshield wiper blade
- Backing plate
- Rubber brush
2. Install in the reverse order of removal.
3. Adjust the windshield wiper arm and blade. (See WINDSHIELD WIPER ARM AND BLADE ADJUSTMENT).
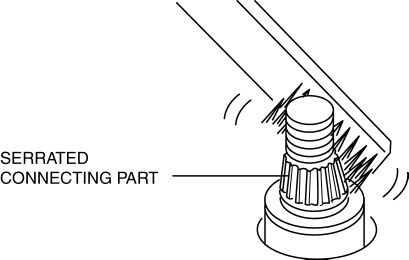
Windshield Wiper Arm Installation Note
1. Clean the serrated connecting part with a wire brush before installing the windshield wiper arm.

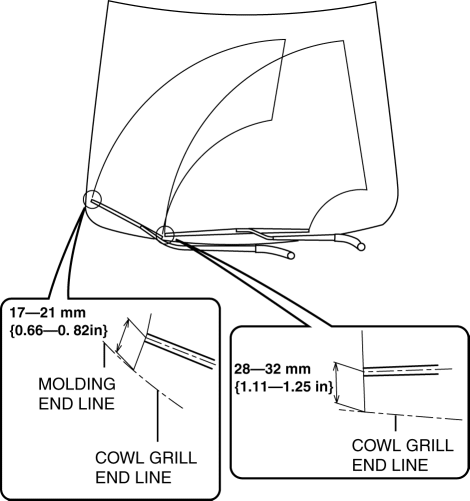
WINDSHIELD WIPER ARM AND BLADE ADJUSTMENT
1. Turn off the windshield wiper switch while operating the windshield wiper motor to stop the windshield wiper at the auto-stop position.
2. Slide the serrated connecting part and position the windshield wiper arm and blade as shown in the figure.
WINDSHIELD WIPER MOTOR REMOVAL/INSTALLATION
1. Disconnect the negative battery cable.
2. Remove the windshield wiper arm. (See WINDSHIELD WIPER ARM AND BLADE REMOVAL/INSTALLATION).
3. Remove the cowl grille. (See COWL GRILLE REMOVAL/INSTALLATION).
4. Remove in the order indicated in the table.
- Bolt
- Windshield wiper motor
- Connector
5. Install in the reverse order of removal.
6. Adjust the windshield wiper arm and blade. (See WINDSHIELD WIPER ARM AND BLADE ADJUSTMENT).
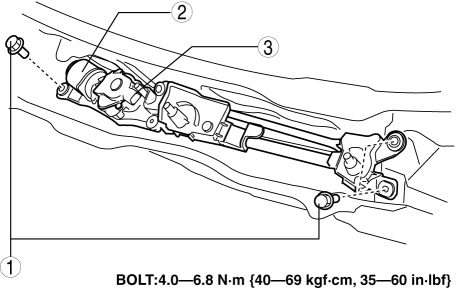
WINDSHIELD WIPER MOTOR DISASSEMBLY/ASSEMBLY
1. Disassemble in the order indicated in the figure.
2. Assemble in the reverse order of disassembly.
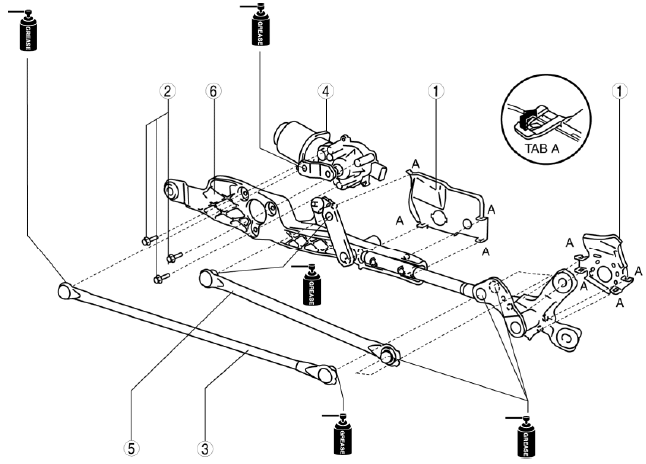
- Cover
- Bolt
- Wiper link No.1
- Windshield wiper motor
- Wiper link No.2
- Main link
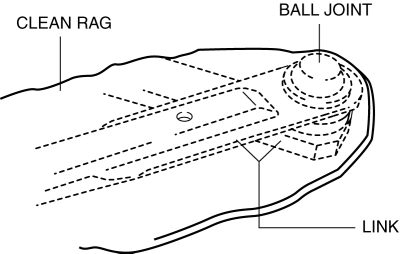
Ball Joint Assembly Note
1. Use a clean cloth to protect the link and squeeze using pliers.
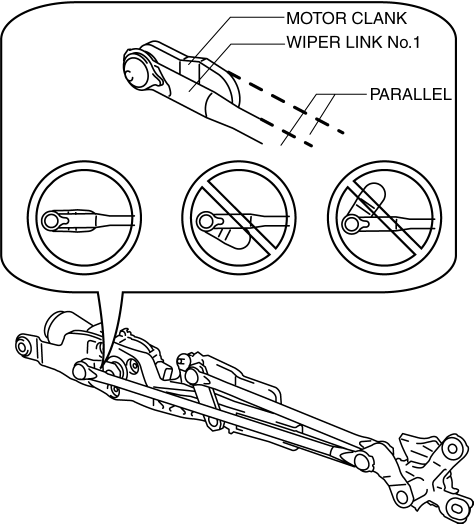
Windshield Wiper Motor Assembly Note
1. Connect the windshield wiper motor to the vehicle wiring harness connector, operate the windshield wipers, and then stop them at the auto-stop position.
2. Adjust the motor crank and wiper link No.1 so that they are parallel as shown in the figure.
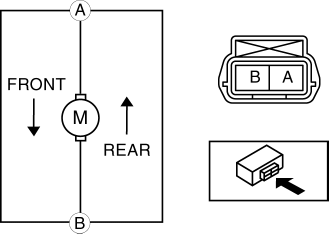
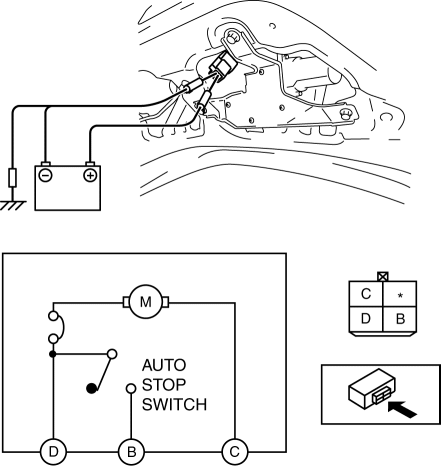
WINDSHIELD WIPER MOTOR INSPECTION
1. Disconnect the negative battery cable.
2. Remove the windshield wiper arm and blade. (See WINDSHIELD WIPER ARM AND BLADE REMOVAL/INSTALLATION).
3. Remove the cowl grille. (See COWL GRILLE REMOVAL/INSTALLATION).
4. Disconnect windshield wiper motor connector.
5. After connecting the windshield wiper motor terminal B or A to the positive battery terminal, and terminal C to the negative battery terminal, verify that the windshield wipers operate as shown in the table.
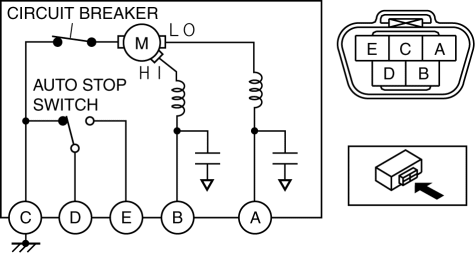
- If not as indicated in the table, replace the windshield wiper motor.
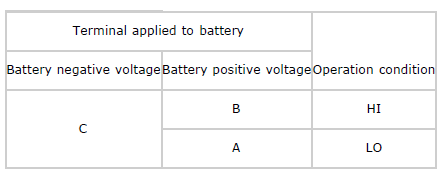
6. Disconnect the positive battery from terminal A while the wipers are operating, then verify that the wipers do not stop at the auto-stop position.
7. Connect windshield wiper motor terminals A and E, and apply battery positive voltage to terminal D.
8. Verify that the windshield wipers operate at low speed again and they are at the auto-stop position.
- If there is any malfunction, replace the windshield wiper motor.
WASHER TANK REMOVAL/INSTALLATION
Vehicles with the washer fluid-level sensor
1. Disconnect the negative battery cable.
2. Remove the front bumper. (See FRONT BUMPER REMOVAL/INSTALLATION).
3. Remove the front combination light on the left side. (See FRONT COMBINATION LIGHT REMOVAL/INSTALLATION).
4. Remove in the order indicated in the table.
5. Install in the reverse order of removal.
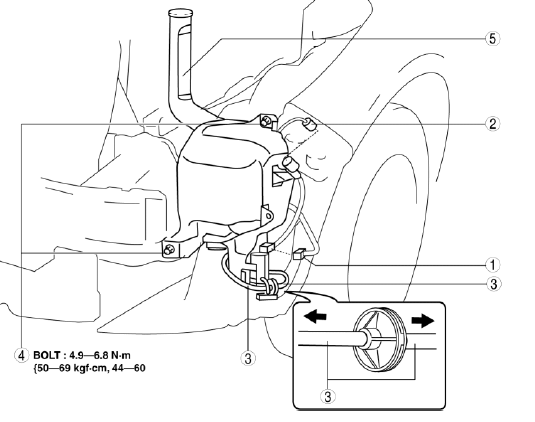
- Washer motor connector
- Washer fluid-level sensor connector
- Washer hose
- Bolt
- Washer tank
Vehicles without the washer fluid-level sensor
1. Disconnect the negative battery cable.
2. Remove the front bumper. (See FRONT BUMPER REMOVAL/INSTALLATION).
3. Remove the front combination light on the left side. (See FRONT COMBINATION LIGHT REMOVAL/INSTALLATION).
4. Remove in the order indicated in the table.
5. Install in the reverse order of removal.
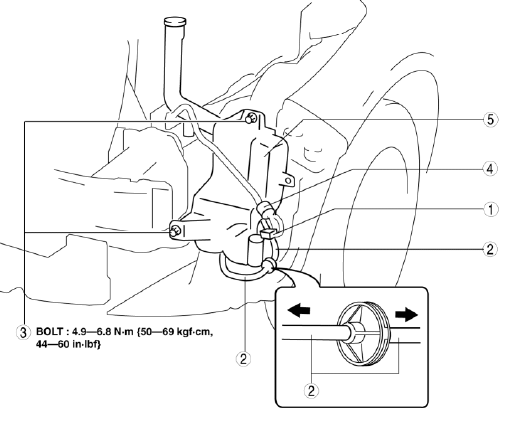
- Washer motor connector
- Washer hose
- Bolt
- Clip
- Washer tank
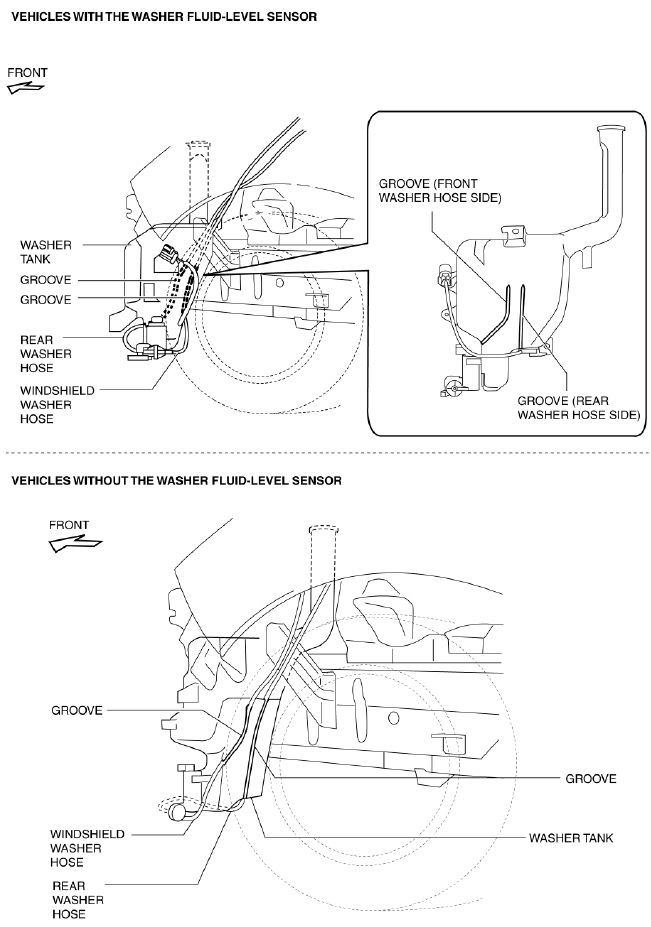
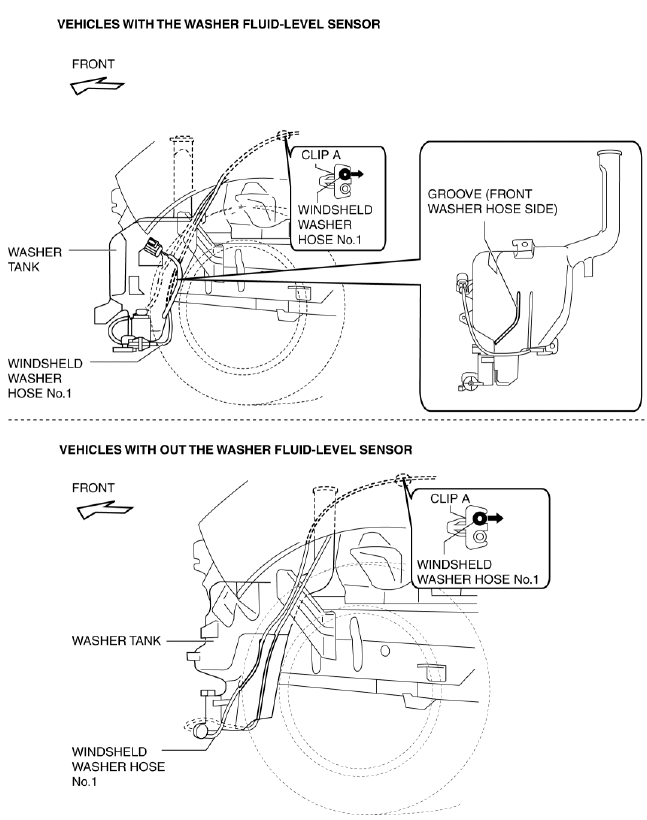
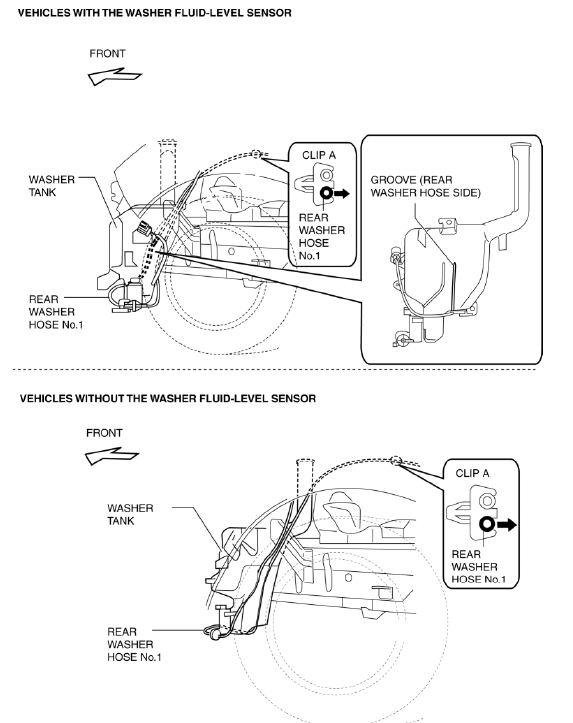
Washer Hose Installation Note
1. Install the washer hoses by inserting them in the washer tank grooves as shown in the figure.
WASHER MOTOR REMOVAL/INSTALLATION
1. Disconnect the negative battery cable.
2. Remove the front bumper. (See FRONT BUMPER REMOVAL/INSTALLATION).
3. Remove the front combination light on the left side. (See FRONT COMBINATION LIGHT REMOVAL/INSTALLATION).
4. Remove the washer tank. (See WASHER TANK REMOVAL/INSTALLATION).
5. Remove in the order indicated in the table.
- Washer motor
- Grommet
6. Install in the reverse order of removal.
WASHER MOTOR INSPECTION
1. Disconnect the negative battery cable.
2. Remove the front bumper. (See FRONT BUMPER REMOVAL/INSTALLATION).
3. Remove the washer tank. (See WASHER TANK REMOVAL/INSTALLATION).
4. Disconnect the negative battery cable.
5. After connecting washer motor terminal A to the positive battery terminal, and terminal B to the negative battery terminal, verify that washer fluid flows to the windshield washer hose.
- If there is any malfunction, replace the washer motor.
6. After connecting washer motor terminal B to the positive battery terminal, and terminal A to the negative battery terminal, verify that washer fluid flows to the rear washer hose.
- If there is any malfunction, replace the washer motor.
WINDSHIELD WASHER NOZZLE REMOVAL/INSTALLATION
1. Disconnect the negative battery cable.
2. Remove the windshield wiper arm and blade. (See WINDSHIELD WIPER ARM AND BLADE REMOVAL/INSTALLATION).
3. Remove the cowl grille. (See COWL GRILLE REMOVAL/INSTALLATION).
4. Remove the windshield washer hose from the windshield washer nozzle.
5. Press the windshield washer nozzle tab in the direction of the arrow shown in the figure to detach it.
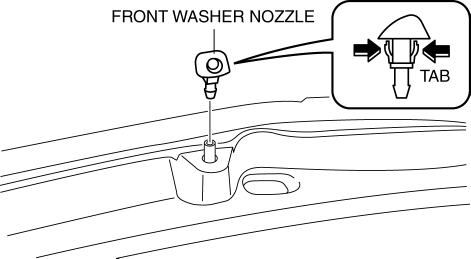
6. Pull out the windshield washer nozzle from the cowl grille and remove.
7. Install in the reverse order of removal.
WINDSHIELD WASHER NOZZLE ADJUSTMENT
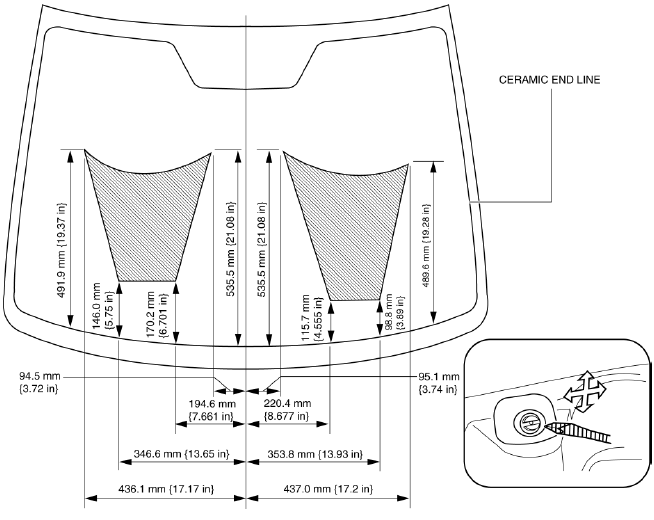
1. Insert a tape-wrapped flathead screwdriver into the windshield washer nozzle and adjust the area washer fluid is sprayed as shown in the figure.
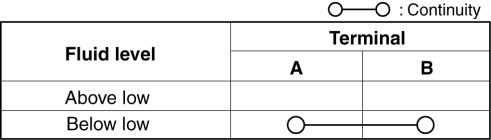
WASHER FLUID-LEVEL SENSOR INSPECTION
1. Disconnect the negative battery cable.
2. Remove the front bumper. (See FRONT BUMPER REMOVAL/INSTALLATION).
3. Disconnect the washer fluid-level sensor connector.
4. Verify that continuity between the washer fluid-level sensor terminals is as indicated in the table.
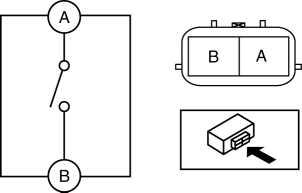
- If not as specified, replace the washer fluid-level sensor.
REAR WIPER ARM AND BLADE REMOVAL/INSTALLATION
1. Remove in the order indicated in the table.
- Cap
- Nut
- Rear wiper arm
- Rear wiper blade
- Backing plate
- Rubber brush
2. Install in the reverse order of removal.
3. Adjust the rear wiper arm and blade. (See REAR WIPER ARM AND BLADE REMOVAL/INSTALLATION).
Rear Wiper Arm Installation Note
1. Clean the serrated connecting part with a wire brush before installing the rear wiper arm.
WINDSHIELD WASHER HOSE REMOVAL/INSTALLATION
1. Disconnect the negative battery cable.
2. Remove the following parts:
- Windshield wiper arm and blade (See WINDSHIELD WIPER ARM AND BLADE REMOVAL/INSTALLATION).
- Cowl grille (See COWL GRILLE REMOVAL/INSTALLATION).
- Mudguard on the left side (See MUDGUARD REMOVAL/INSTALLATION).
3. Remove windshield washer hose No.1 from the washer tank.
4. Detach clip A.
5. Remove windshield washer hose No.1 from clip B and joint pipe A in the direction of the arrow shown in the figure.
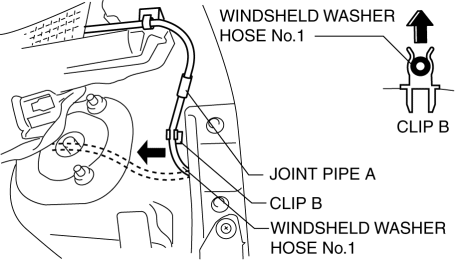
6. Remove the windshield washer base No.1 from joint pipe A.
7. Remove windshield washer hose No.1 from joint pipe A.
8. Remove the windshield washer nozzle. (See WINDSHIELD WASHER NOZZLE REMOVAL/INSTALLATION).
9. Remove the windshield washer hose from the hook.
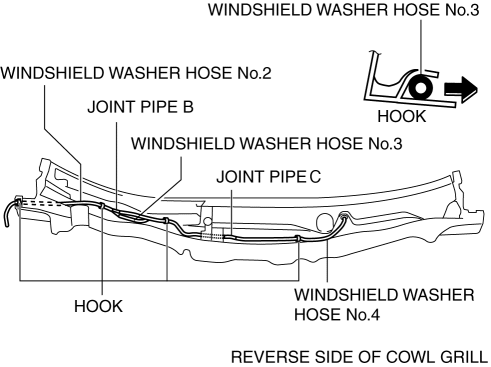
10. Remove windshield washer hoses No.2, No.3 and No.4 from joint pipes B and C.
11. Install in the reverse order of removal.
WASHER FLUID-LEVEL SENSOR REMOVAL/INSTALLATION
1. Disconnect the negative battery cable.
2. Remove the front bumper. (See FRONT BUMPER REMOVAL/INSTALLATION).
3. Remove the washer tank. (See WASHER TANK REMOVAL/INSTALLATION).
4. Remove the connector of the washer fluid-level sensor from the washer tank.
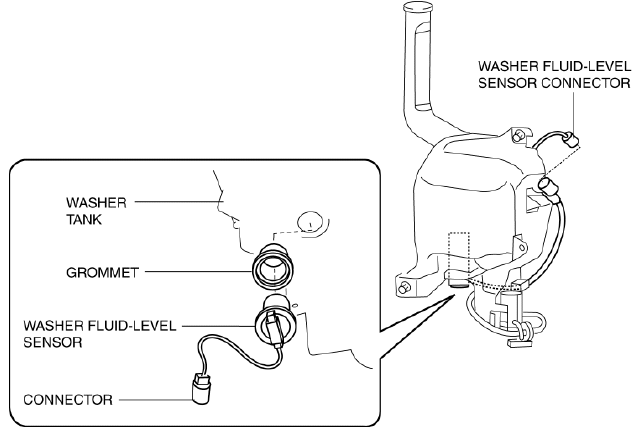
5. Remove the washer fluid-level sensor.
6. Remove the grommet.
7. Install in the reverse order of removal.
REAR WIPER ARM AND BLADE ADJUSTMENT
1. Turn off the rear wiper switch while operating the rear wiper motor to stop the rear wiper at the auto-stop position.
2. Slide the serrated connecting part and position the rear wiper arm and blade as shown in the figure.
REAR WIPER MOTOR REMOVAL/INSTALLATION
1. Disconnect the negative battery cable.
2. Remove the liftgate lower trim. (See LIFTGATE LOWER TRIM REMOVAL/INSTALLATION).
3. Remove the rear wiper arm and blade. (See REAR WIPER ARM AND BLADE REMOVAL/INSTALLATION).
4. Remove in the order indicated in the table.
- Connector
- Bolt
- Rear wiper motor
5. Install in the reverse order of removal.
6. Adjust the rear wiper arm and blade. (See REAR WIPER ARM AND BLADE ADJUSTMENT).
REAR WIPER MOTOR INSPECTION
1. Disconnect the negative battery cable.
2. Remove the liftgate lower trim. (See LIFTGATE LOWER TRIM REMOVAL/INSTALLATION).
3. Disconnect the rear wiper motor connector.
4. Apply battery positive voltage to rear wiper motor connector terminal C, and connect terminals B and D to the ground.
5. Verify that the rear wiper motor operates smoothly.
- If there is any malfunction, replace the rear wiper motor.
6. Disconnect the ground connecting rear wiper motor connector terminal D and the negative battery terminal while the rear wipers are operating, then verify that the rear wipers stop at the auto-stop position.
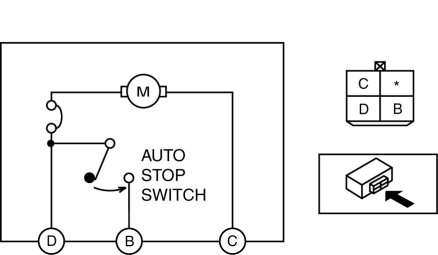
- If there is any malfunction, replace the rear wiper motor.
REAR WASHER NOZZLE REMOVAL/INSTALLATION
1. Disconnect the negative battery cable.
2. Remove the liftgate upper trim. (See LIFTGATE UPPER TRIM REMOVAL/INSTALLATION).
3. Release the tabs in the direction of the arrow shown in the figure and remove the rear washer nozzle.
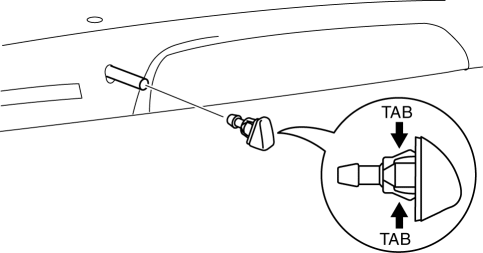
4. Install in the reverse order of removal.
5. Adjust the spray area of the rear washer nozzle. (See REAR WASHER NOZZLE ADJUSTMENT).
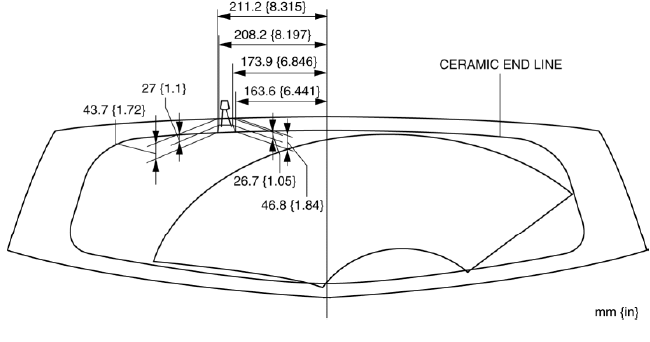
REAR WASHER NOZZLE ADJUSTMENT
1. Adjust the area where washer fluid is sprayed as shown in the figure.
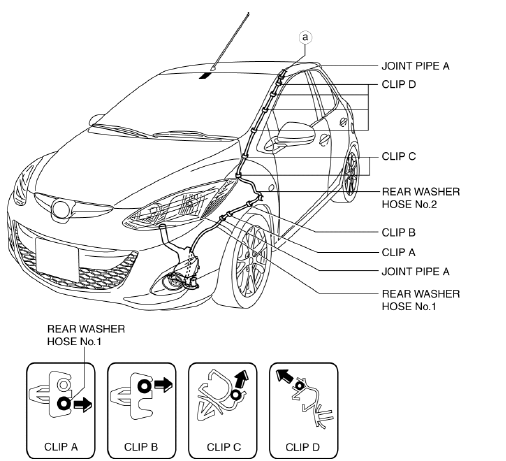
REAR WASHER HOSE REMOVAL/INSTALLATION
1. Disconnect the negative battery cable.
2. Remove the mudguard on the left side. (See MUDGUARD REMOVAL/INSTALLATION).
3. Disconnect the rear washer hose from the washer motor.
4. Remove rear washer hose No.1 from clip A.
5. Remove the A-pillar trim on the left side. (See A-PILLAR TRIM REMOVAL/INSTALLATION).
6. Remove the glove compartment. (See GLOVE COMPARTMENT REMOVAL/INSTALLATION).
7. Remove rear washer hose No.2 from clips B, C, and D.
8. Remove rear washer hose No.2 and joint pipe B.
9. Remove the following parts:
- Front scuff plate (See FRONT SCUFF PLATE REMOVAL/INSTALLATION).
- Rear scuff plate (See REAR SCUFF PLATE REMOVAL/INSTALLATION).
- B-pillar lower trim (See B-PILLAR LOWER TRIM REMOVAL/INSTALLATION).
- Front seat belt upper anchor installation bolt (See FRONT SEAT BELT REMOVAL/INSTALLATION).
- B-pillar upper trim (See B-PILLAR UPPER TRIM REMOVAL/INSTALLATION).
- Rear seat back (See REAR SEAT BACK REMOVAL/INSTALLATION).
- Rear seat cushion (See REAR SEAT CUSHION REMOVAL/INSTALLATION).
- Trunk end trim (See TRUNK END TRIM REMOVAL/INSTALLATION).
- Trunk side trim (See TRUNK SIDE TRIM REMOVAL/INSTALLATION).
- C-pillar trim (See C-PILLAR TRIM REMOVAL/INSTALLATION).
- Sunvisor (See SUNVISOR REMOVAL/INSTALLATION).
- Rain sensor cover (vehicles with rain sensor) (See RAIN SENSOR REMOVAL/INSTALLATION).
- Assist handle (See ASSIST HANDLE REMOVAL/INSTALLATION).
10. Remove joint pipe C.
11. Remove the headliner. (See HEADLINER REMOVAL/INSTALLATION).
12. Peel off the tape and remove rear washer hose No.3.
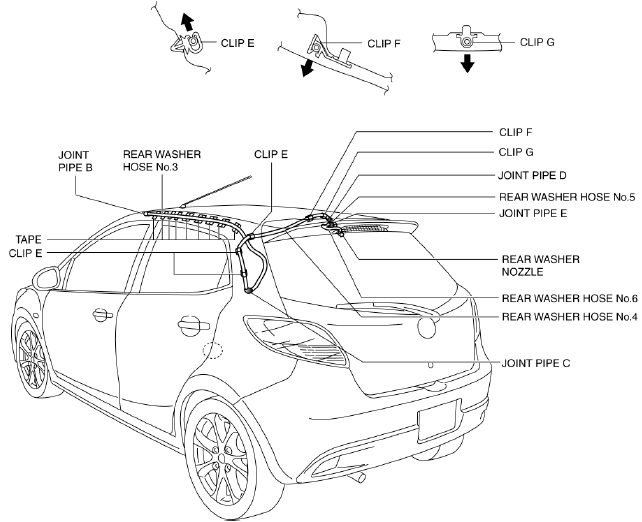
13. Remove rear washer hose No.4 from clips E, F, and G.
14. Remove rear washer hose No.4 from joint pipe D.
15. Remove rear washer hose no.5 from joint pipe E.
16. Remove the rear washer nozzle. (See REAR WASHER NOZZLE REMOVAL/INSTALLATION).
17. Remove rear washer hose No.6.
18. Install in the reverse order of removal.
WIPER AND WASHER SWITCH REMOVAL/INSTALLATION
1. Disconnect the negative battery cable.
2. Remove the column cover. (See COLUMN COVER REMOVAL/INSTALLATION).
3. Disconnect the connector.
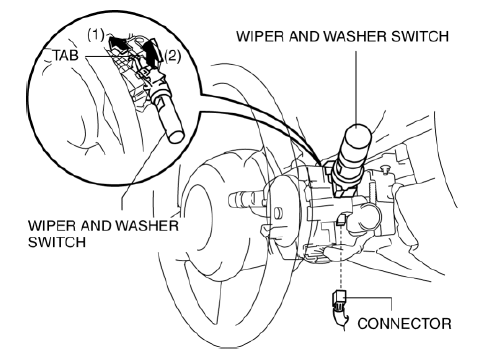
4. Release the tab in the direction of the arrow (1) shown in the figure, pull up the wiper and washer switch in the direction of the arrow (2), and remove it.
5. Install in the reverse order of removal.
WINDSHIELD WIPER AND WASHER SWITCH INSPECTION
1. Disconnect the negative battery cable.
2. Remove the column cover. (See COLUMN COVER REMOVAL/INSTALLATION).
3. Remove the wiper and washer switch. (See WIPER AND WASHER SWITCH REMOVAL/INSTALLATION).
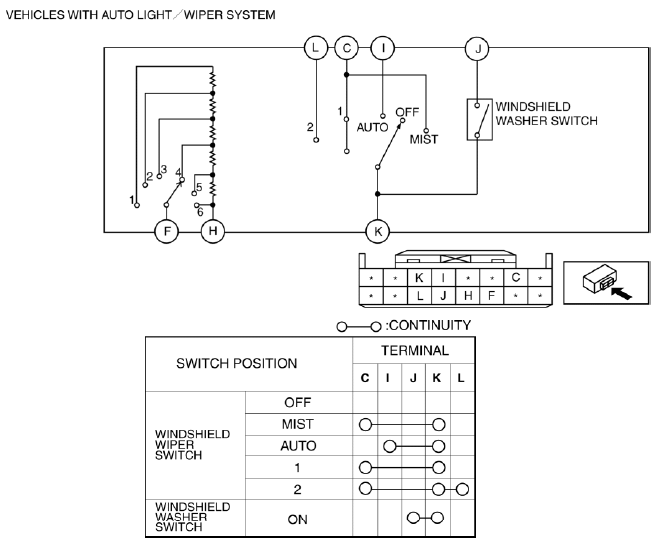
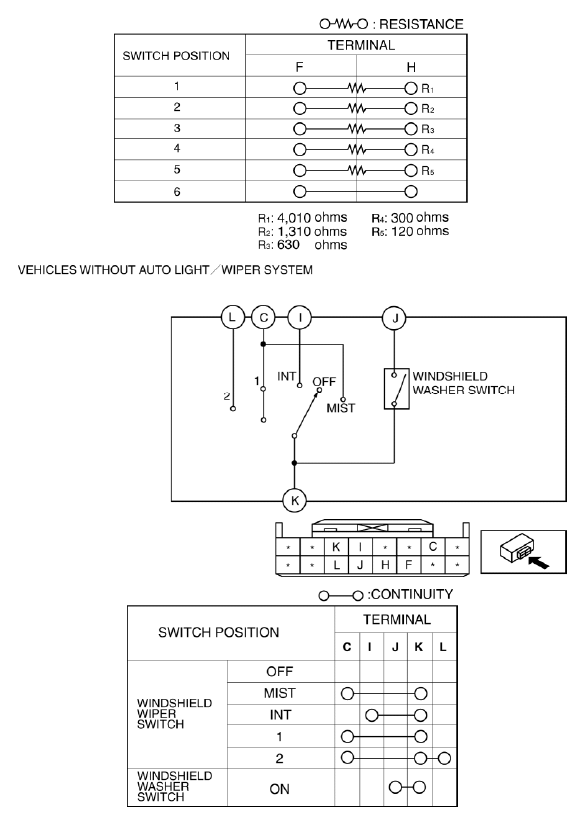
4. Verify that the resistance and continuity between the windshield wiper and washer switch terminals as indicated in the table.
- If the continuity is not as indicated in the table, or if the resistance is not within the specification, replace the windshield wiper and washer switch.
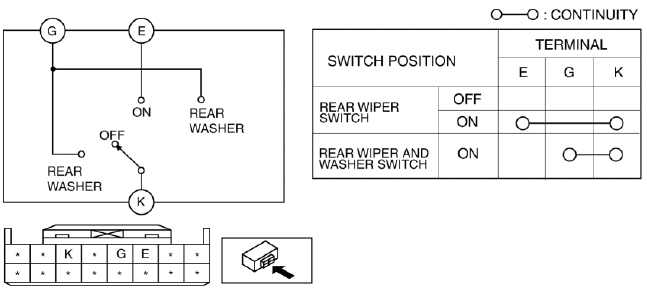
REAR WIPER AND WASHER SWITCH INSPECTION
1. Disconnect the negative battery cable.
2. Remove the column cover. (See COLUMN COVER REMOVAL/INSTALLATION).
3. Remove the wiper and washer switch. (See WIPER AND WASHER SWITCH REMOVAL/INSTALLATION).
4. Verify that the continuity between the rear wiper and washer switch terminals is as indicated in the table.
- If not as indicated in the table, replace the wiper and washer switch.
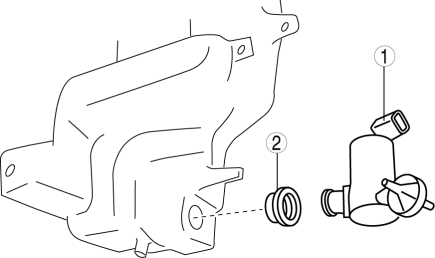
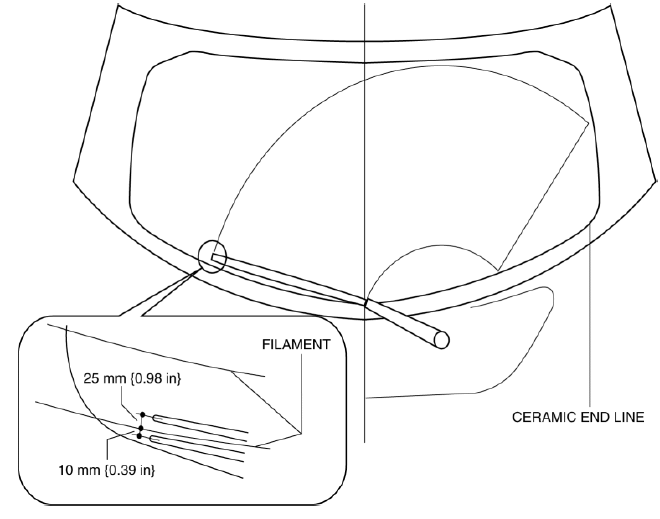
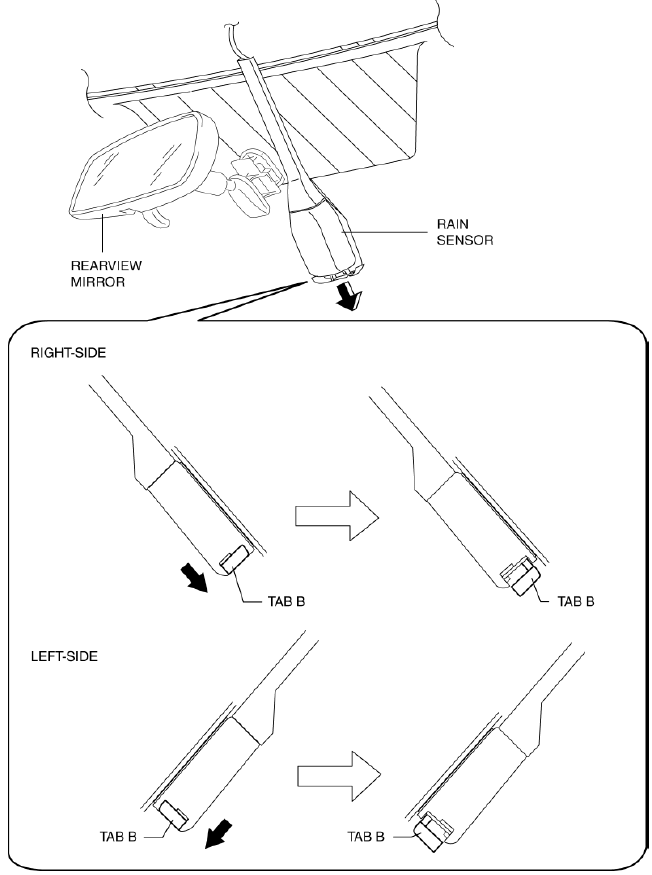
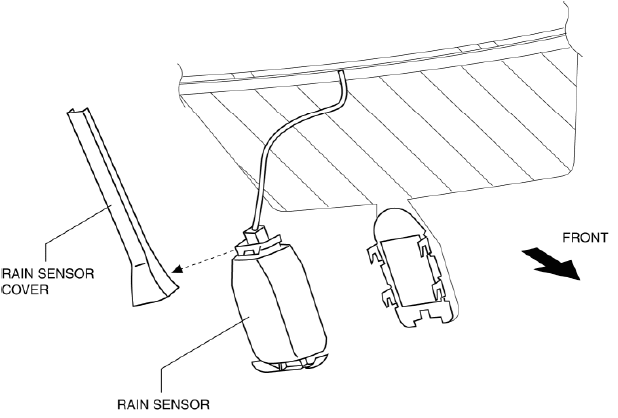
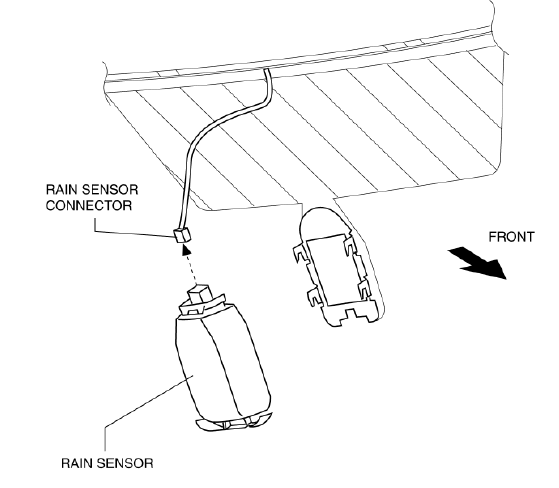
RAIN SENSOR REMOVAL/INSTALLATION
CAUTION:
- The reflection rate at the moment the ignition switch is first turned to the ON position after replacing the rain sensor with a new one is stored as the condition indicating no precipitation on the windshield. Therefore, remove water and dirt from the windshield before turning on the ignition switch.
- Perform the rain sensor initialization in the following cases: (See RAIN
SENSOR INITIAL SETTING).
- The windshield is replaced and the rain sensor is reused
- The auto wiper system operates incorrectly
1. Disconnect the negative battery cable.
2. Slide the tab B in the direction of the arrow and remove the rain sensor while supporting it with the hand.
3. Remove the rain sensor in the direction of the arrow shown in the figure.

4. Remove the rain sensor cover in the direction shown in the figure.
5. Disconnect the rain sensor connector.
6. Install in the reverse order of removal.
RAIN SENSOR INITIAL SETTING
NOTE:
- When the ignition switch is turned to the ON position, the initialization is stored after verifying the windshield condition.
Rain Sensor initialization
1. Switch the ignition to ON.

