Mazda 2: Canister Vent (CV) Solenoid Valve
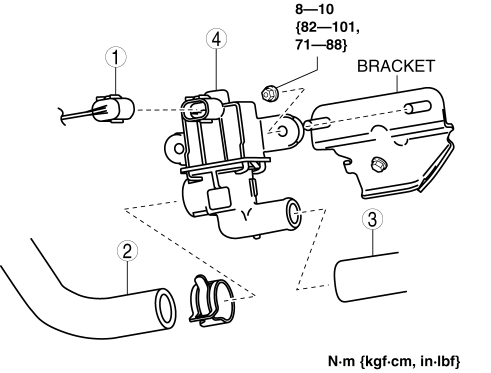
CANISTER VENT (CV) SOLENOID VALVE REMOVAL/INSTALLATION
1. Disconnect the negative battery cable. (See BATTERY REMOVAL/INSTALLATION).
2. Remove in the order indicated in the table.
CV solenoid valve connector
Evaporative hose
Evaporative hose
CV solenoid valve
3. Install in the reverse order of removal.
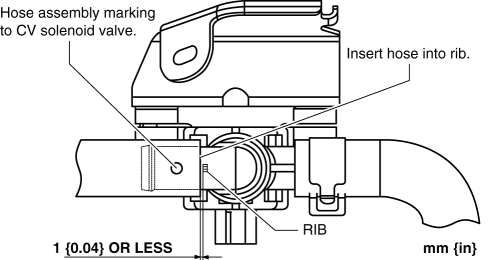
Evaporative Hose Removal Note
1. Install the evaporative hose as shown in the figure.
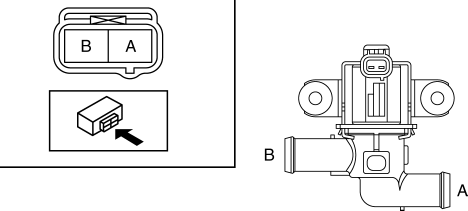
CANISTER VENT (CV) SOLENOID VALVE INSPECTION
Airflow Inspection
1. Disconnect the negative battery cable. (See BATTERY REMOVAL/INSTALLATION).
2. Remove the CV solenoid valve. (See CANISTER VENT (CV) SOLENOID VALVE
REMOVAL/INSTALLATION).
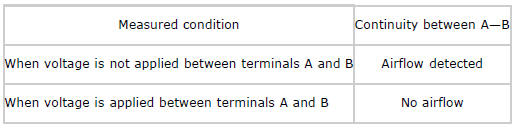
3. Inspect airflow between the ports under the following conditions.
If not as specified, replace the CV solenoid valve. (See CANISTER VENT
(CV) SOLENOID VALVE REMOVAL/INSTALLATION).
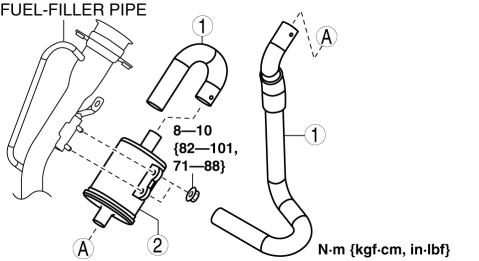
AIR FILTER REMOVAL/INSTALLATION
1. Remove the splash shield (LH). (See SPLASH SHIELD REMOVAL/INSTALLATION).
2. Remove the fuel-filler pipe protector. (See FUEL TANK REMOVAL/INSTALLATION).
3. Remove in the order indicated in the table.
Evaporative hose
Air filter
4. Install in the reverse order of removal.
READ NEXT:
IGNITION SYSTEM LOCATION INDEX
Ignition coil
(See IGNITION COIL REMOVAL/INSTALLATION)
(See IGNITION COIL INSPECTION)
Spark plug
(See SPARK PLUG REMOVAL/INSTALLATION)
(See SPARK PLUG IN
CHARGING SYSTEM LOCATION INDEX
Generator
(See GENERATOR REMOVAL/INSTALLATION)
(See GENERATOR INSPECTION)
(See GENERATOR DISASSEMBLY/ASSEMBLY)
Battery
(See BATTERY REMOVAL/INSTALLATION)
STARTING SYSTEM LOCATION INDEX
Starter interlock switch (MTX)
(See STARTER INTERLOCK SWITCH INSPECTION)
Starter
(See STARTER REMOVAL/INSTALLATION)
(See STARTER INSPECTION)
(See STARTER
SEE MORE:
HEATED OXYGEN SENSOR (HO2S) REMOVAL/INSTALLATION
WARNING:
A hot engine and exhaust system can cause severe burns. Turn off the
engine and wait
until they are cool before removing the exhaust system.
1. Disconnect the negative battery cable.
2. Remove the air cleaner cover. (See INTAKE-AIR SYS
KEYLESS RECEIVER REMOVAL/INSTALLATION [KEYLESS ENTRY SYSTEM]
1. Disconnect the negative battery cable.
2. Remove the glove compartment. (See GLOVE COMPARTMENT REMOVAL/INSTALLATION).
3. Remove in the order indicated in the table.
Connector
Nut
Keyless receiver
4. Install in the reverse order