Mazda 2: Charging System
CHARGING SYSTEM LOCATION INDEX
- Generator
- (See GENERATOR REMOVAL/INSTALLATION)
- (See GENERATOR INSPECTION)
- (See GENERATOR DISASSEMBLY/ASSEMBLY)
- Battery
- (See BATTERY REMOVAL/INSTALLATION)
- (See BATTERY INSPECTION)
- (See BATTERY RECHARGING)
BATTERY REMOVAL/INSTALLATION
1. Remove in the order indicated in the table.
2. Install in the reverse order of removal.

- Negative battery cable
- Positive battery cable
- Battery clamp
- Battery box
- Battery
- Battery stopper (50D20L(40) )
- Battery tray
Battery Box Installation Note
1. Install the battery box so that the side with the larger notch points toward the front fender (LH).
BATTERY INSPECTION
WARNING:
1. Since battery acid is toxic, be careful when handling the battery.
2. Since battery acid is highly corrosive, be careful not to allow it to contact clothing or the vehicle.
3. In case battery acid contacts skin, eyes, or clothing, flush it immediately with running water. If the acid gets in the eyes, flush with water for more than 15 min and get prompt medical attention.
Using GR8-1291:
(See GR8-1291 INSTANT TRAINING MODULE (VIDEO) ).
1. Remove the battery filler caps and check the water level. If necessary, add water to the appropriate level. Reinstall the caps.
2. Attach the small red clamp to the positive battery terminal and the small black clamp to the negative terminal.
3. Select the Battery Test icon in the Main Menu, then press the NEXT key.
4. Test the battery by following the on-screen instructions to enter the appropriate information. Refer to the Mazda GR8-1291 Instruction Manual for more information.
5. After the test, the Control Module displays a battery decision with an analysis in a series of screens. The analysis includes the battery state of health (SOH) and state of charge (SOC). Before the Battery Test results are displayed, use the keypad on the Control Module to enter the last 5 digits of the vehicle's VIN and press NEXT to continue.
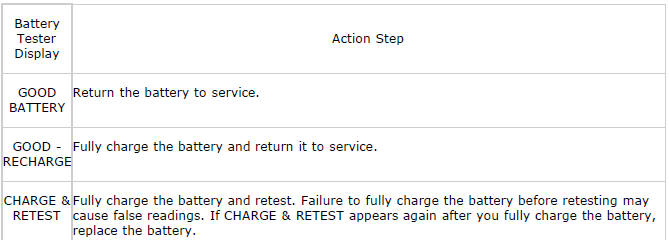
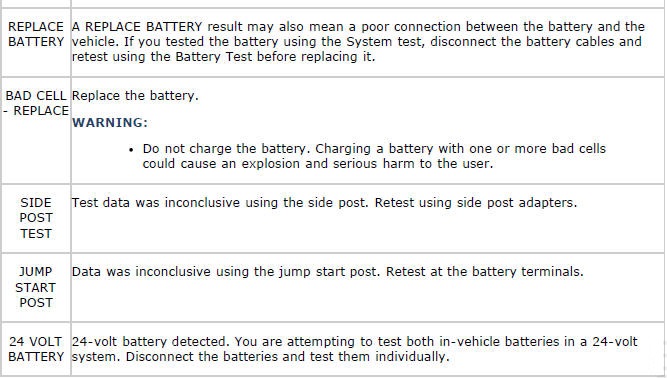
6. The Mazda GR8-1291 will print out the test results and display one of the eight possible results listed below. Review the results and follow the Action Step for the displayed result.
Using Electrolyte Specific Gravity Method:
1. Remove the battery filler caps and check the water level.
- If necessary, add water to the appropriate level.
2. Measure the electrolyte specific gravity using a hydrometer.
- If it is less than the specification, recharge the battery. (See BATTERY RECHARGING).
Battery electrolyte specific gravity [20
READ NEXT:
STARTING SYSTEM LOCATION INDEX Starter interlock switch (MTX) (See STARTER INTERLOCK SWITCH INSPECTION) Starter (See STARTER REMOVAL/INSTALLATION) (See STARTER INSPECTION) (See STARTER
Starting System
CONTROL SYSTEM LOCATION INDEX PCM (BARO sensor, PCM temperature sensor) (See PCM REMOVAL/INSTALLATION) (See PCM INSPECTION) (See PCM CONFIGURATION) (See BAROMETRIC PRESSURE (BARO) SENSOR
PCM REMOVAL/INSTALLATION CAUTION: The PCM is built into the air cleaner cover. Applying excessive pressure to the cover could damage the PCM. Be careful not to put your hands on the PCM during th
