Mazda 2: Charcoal Canister
CHARCOAL CANISTER REMOVAL/INSTALLATION
CAUTION:
- Disconnecting/connecting the quick release connector without cleaning it may cause damage to the fuel pipe and quick release connector. Always clean the quick release connector joint area before disconnecting/connecting using a cloth or soft brush, and make sure that it is free of foreign material.
1. Remove in the order indicated in the table.
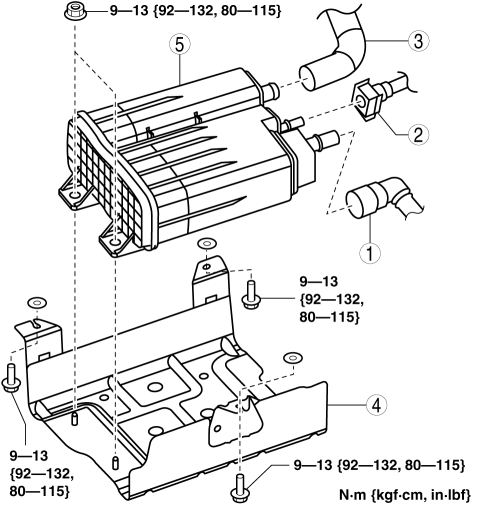
- Quick release connector
- Quick release connector
- Evaporative hose
- Protector
- Charcoal canister
2. Install in the reverse order of removal.
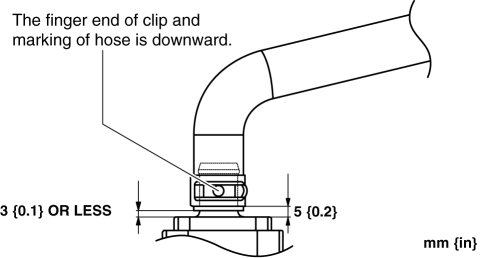
Evaporative Hose Installation Note
1. Install the evaporative hose as shown in the figure.
CHARCOAL CANISTER INSPECTION
Leakage Inspection
1. Remove the charcoal canister. (See CHARCOAL CANISTER REMOVAL/INSTALLATION).
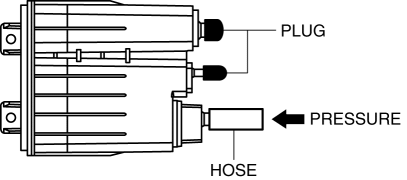
2. Perform the following procedure:
- Assemble the hose used for inspection to port A.
- Cover ports B and C with the caps.

CAUTION:
- Do not apply a pressure 20 kPa {150 mmHg, 5.91 inHg} or more to the charcoal canister for 1 min. or more. Doing so will damage the charcoal canister.
3. Apply pressure (19.6 kPa {147 mmHg, 5.79 inHg}) through the hose, and verify that air does not leak from the charcoal canister.
Airflow Inspection
1. Remove the charcoal canister. (See CHARCOAL CANISTER REMOVAL/INSTALLATION).
2. Perform the following procedure to verify the charcoal canister airflow.
Between port A and port B
- Plug the port C.
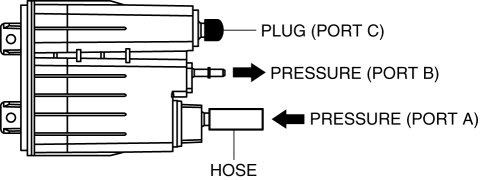
- Apply a pressure of 19.6 kPa {147 mmHg, 5.79 inHg} to port A.
- Verify that there is airflow from port B.
- If there is no airflow, replace the charcoal canister.
(See CHARCOAL CANISTER REMOVAL/INSTALLATION).
Between port A and port C
- Plug the port B.
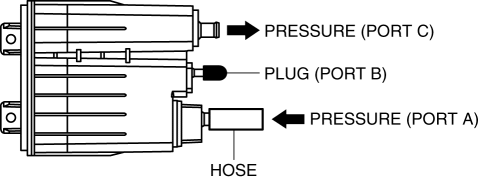
- Apply a pressure of 19.6 kPa {147 mmHg, 5.79 inHg} to port A.
- Verify that there is airflow from port C.
- If there is no airflow, replace the charcoal canister.
(See CHARCOAL CANISTER REMOVAL/INSTALLATION).
Between port B and port C
- Plug the port A.
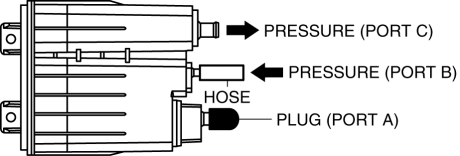
- Apply a pressure of 19.6 kPa {147 mmHg, 5.79 inHg} to port B.
- Verify that there is airflow from port C.
- If there is no airflow, replace the charcoal canister. (See CHARCOAL CANISTER REMOVAL/INSTALLATION).

