Mazda 2: Exterior Trim
EXTERIOR TRIM LOCATION INDEX
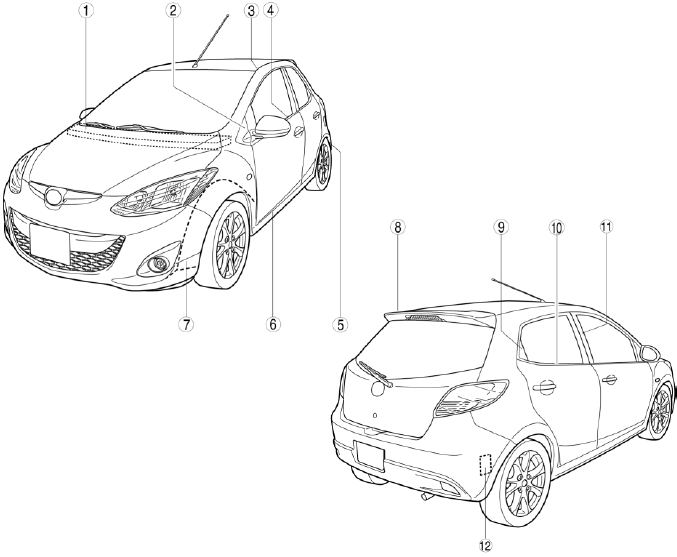
- Cowl grille
- Sail garnish
- Roof molding
- Front beltline molding
- Splash shield
- Side step molding
- Mudguard
- Rear spoiler
- Rear door garnish
- Rear beltline molding
- Door sash film
- Extractor chamber
COWL GRILLE REMOVAL/INSTALLATION
1. Remove the windshield wiper arm and blade. (See WINDSHIELD WIPER ARM AND BLADE REMOVAL/INSTALLATION) 2. Remove the front fender molding. (See FRONT FENDER PANEL REMOVAL/INSTALLATION) 3. Disconnect the windshield washer hose and the connector.
4. Remove the fasteners.
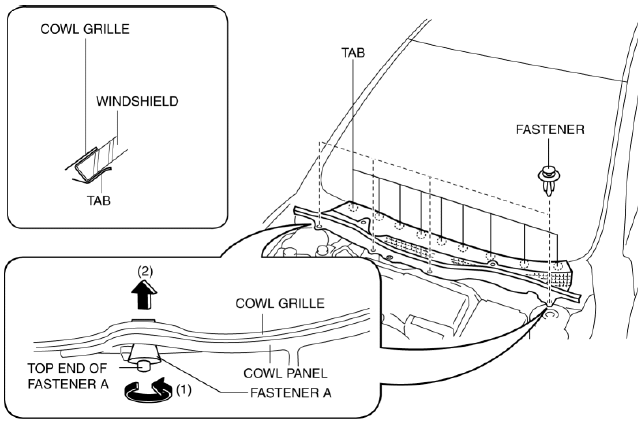
NOTE:
- A screwdriver or other tool cannot be used to remove fasteners from the vehicle body panel. Therefore, insert a hand into the back side of the cowl panel, rotate fasteners A in the direction of the arrow (1), and press them up in the direction of the arrow (2).
5. Pull the cowl grille and remove it while detaching tabs.
6. Install in the reverse order of removal.
SAIL GARNISH REMOVAL/INSTALLATION
1. Open the front door.
2. Pull the sail garnish in the direction of the arrow shown in the figure and remove it while detaching the clips.
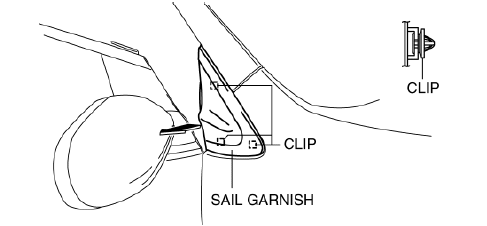
3. Install in the reverse order of removal.
EXTRACTOR CHAMBER REMOVAL/INSTALLATION
1. Remove the rear combination light. (See REAR COMBINATION LIGHT REMOVAL/INSTALLATION)
2. Remove the splash shield. (See SPLASH SHIELD REMOVAL/INSTALLATION)
3. Remove the rear bumper. (See REAR BUMPER REMOVAL/INSTALLATION)
4. Pull the extractor chamber in the direction of the arrow (1), (2) shown in the figure using a fastener remover and remove the extractor chamber.
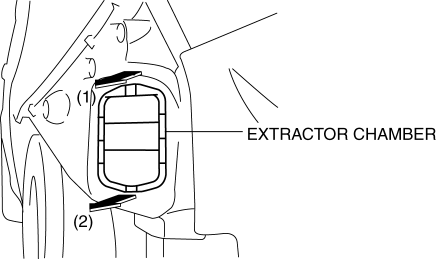
5. Install in the reverse order of removal.
FRONT BELTLINE MOLDING REMOVAL/INSTALLATION
1. Fully open the front door glass.
2. Disconnect the negative battery cable.
3. Remove the inner garnish. (See INNER GARNISH REMOVAL/INSTALLATION)
4. Remove the front door trim. (See FRONT DOOR TRIM REMOVAL/INSTALLATION)
5. Remove the power outer mirror. (See POWER OUTER MIRROR SWITCH REMOVAL/INSTALLATION)
6. Remove clip A using a fastener remover and pull the front beltline molding in the direction of the arrow (1) shown in the figure.
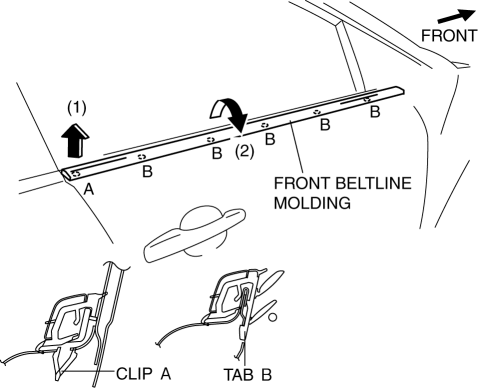
7. Rotate the front beltline molding in the direction of the arrow (2) shown in the figure and remove it while detaching tab B.
8. Install in the reverse order of removal.
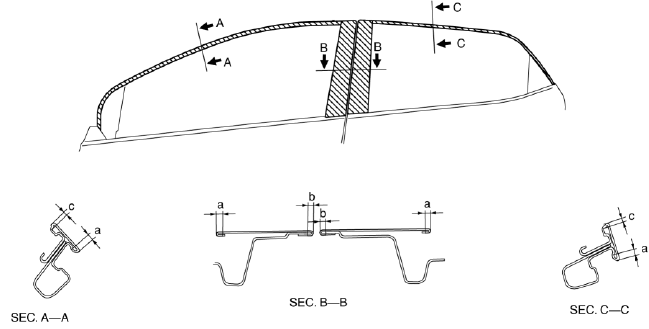
REAR BELTLINE MOLDING REMOVAL/INSTALLATION
1. Fully open the rear door glass.
2. Remove clip A using a fastener remover and pull up the rear beltline molding in the direction of the arrow (1) shown in the figure.
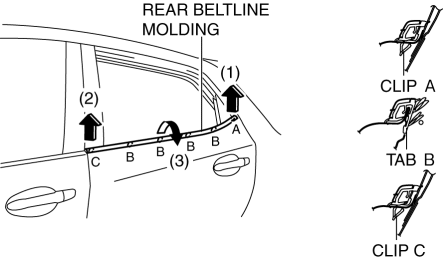
3. Remove clip C using a fastener remover and pull up the rear beltline molding in the direction of the arrow (2) shown in the figure.
4. Rotate the rear beltline molding in the direction of the arrow (3) shown in the figure and remove it while detaching tabs B.
5. Install in the reverse order of removal.
ROOF MOLDING REMOVAL
1. Insert a flathead screwdriver in the position shown in the figure.
2. Rotate the flathead screwdriver in the direction of the arrow (1) shown in the figure and remove the roof molding from the T-stud (figure A).
3. Rotate the roof molding in the direction of the arrow (2) shown in the figure, pull up the roof molding in the direction of the arrow (3) while detaching it from the clip (figure B), and then remove the roof molding.
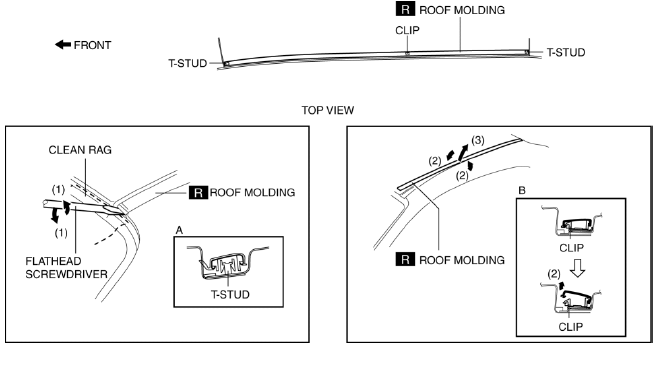
ROOF MOLDING INSTALLATION
1. Install the roof molding to the front T-stud.
2. Hook the roof molding to the clip and attach the roof molding while pressing it in the direction of the arrow shown in the figure.
3. Install the roof molding to the rear T-stud.
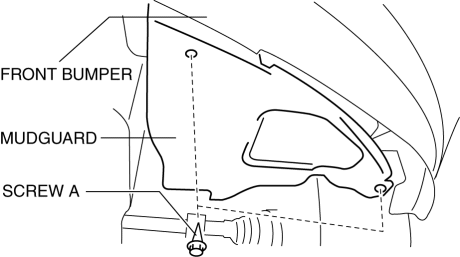
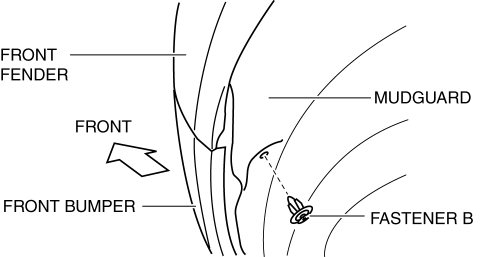
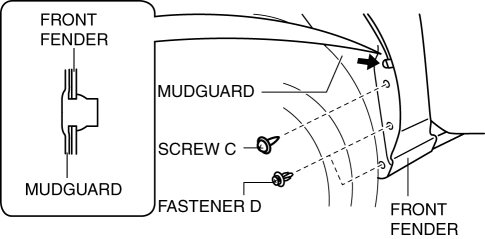
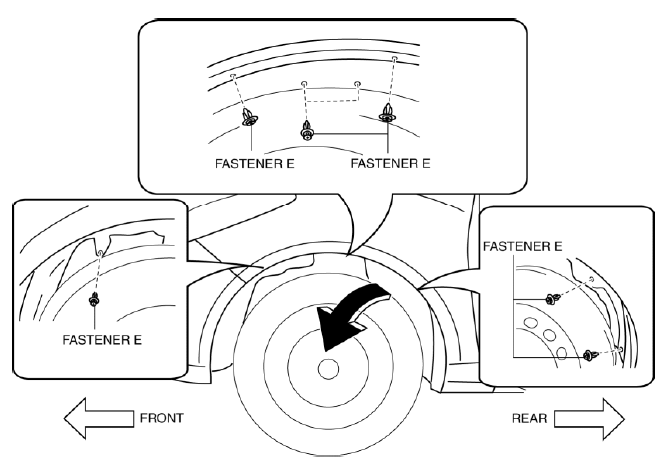
MUDGUARD REMOVAL/INSTALLATION
1. Remove screw A joined to the front bumper.
2. Remove fastener B.
3. After removing screw C and fasteners D, insert a fastener remover in the position indicated by the arrow in the figure and detach the mudguard from the front fender.
4. Remove fasteners E, then remove the mudguard in the direction of the arrow shown in the figure.
5. Install in the reverse order of removal.
SIDE STEP MOLDING REMOVAL
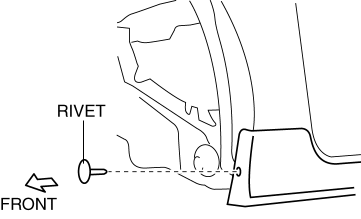
1. Remove the rivet.
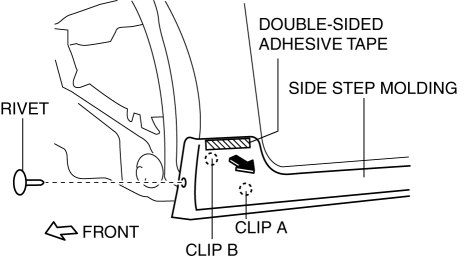
2. Cut the double-sided adhesive tape shown in the figure using a utility knife and pull clips A and B in the direction of the arrow to remove them.
WARNING:
- Using a utility knife with bare hands could cause injury. Always wear gloves when using a utility knife.
3. Cut the double-sided adhesive tape shown in the figure using a utility knife and pull clip B in the direction of the arrow to remove it.
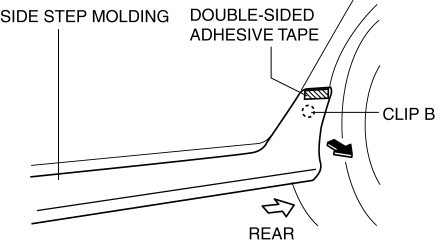
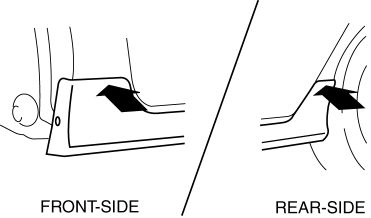
4. Slide the side step molding in the direction of the arrow shown in the figure and remove the side step molding from clips B and C.

5. After removing the side step molding, remove clips B and C from the body using a fastener remover.
SIDE STEP MOLDING INSTALLATION
NOTE:
- Double-sided adhesive tape has already been adhered to a new side step molding for installation.
- When a side step molding is to be reused, perform the following
procedure:
- Remove any grease or dirt from the affixing surface of the side step molding.
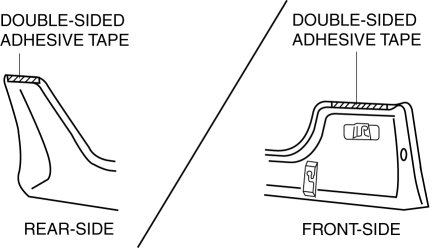
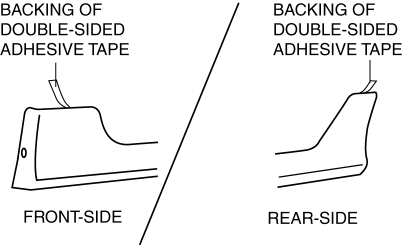
- Affix double-sided adhesive tape to the position shown in the figure.
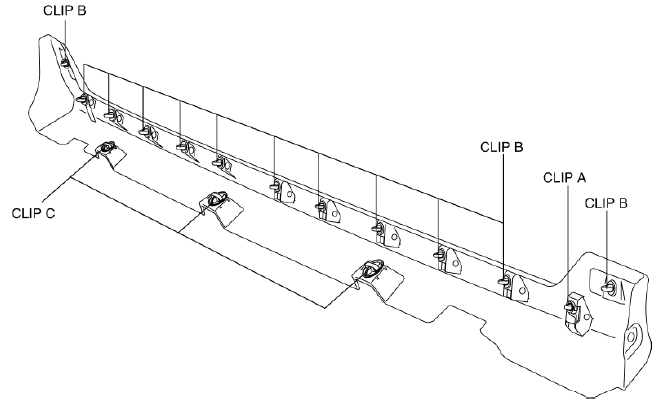
1. Install new clips A, B, C to the side step molding.
2. Peel the tape backing of double-sided adhesive tape to the position shown in the figure.
3. Install the side step molding while pushing the clip A, B and C installation area shown in the figure.

4. Press the position shown in the figure.
5. Install the rivet.
REAR SPOILER REMOVAL
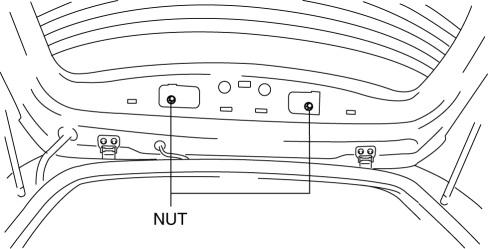
1. Remove the liftgate upper trim. (See LIFTGATE UPPER TRIM REMOVAL/INSTALLATION) 2. Remove the nuts.
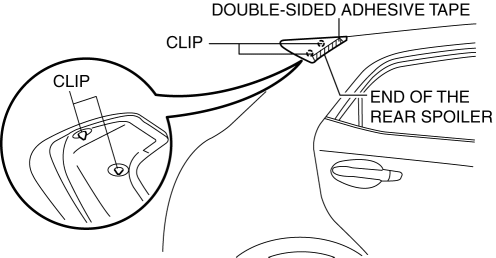
3. Peel off double-sided adhesive tape from the position shown in the figure using a utility knife.
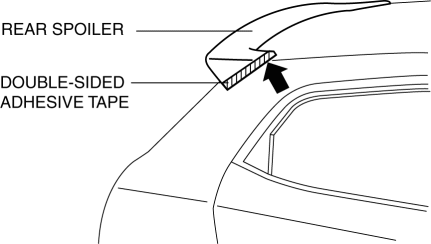
WARNING:
- Using a utility knife with bare hands could cause injury. Always wear gloves when using a utility knife.
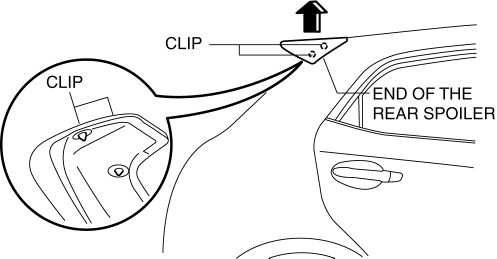
4. Pull up the end of the rear spoiler in the direction of the arrow shown in the figure and remove the clips.
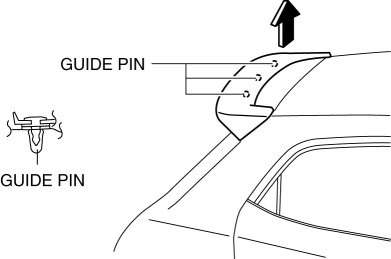
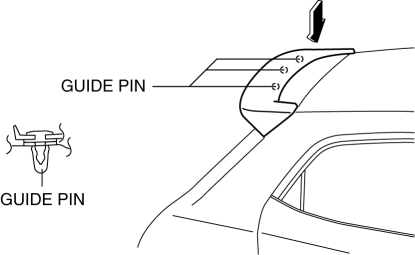
5. Pull up the rear spoiler in the direction of the arrow shown in the figure and remove it while detaching the guide pins.
REAR SPOILER INSTALLATION
WARNING:
- Using a utility knife with bare hands could cause injury. Always wear gloves when using a utility knife.
NOTE:
- Double-sided adhesive tape has already been adhered to a new rear spoiler for installation.
1. When installing a new rear spoiler, perform the following procedure:
- Remove the double-sided adhesive tape on the liftgate.
- Remove any grease or dirt from the affixing surface of the liftgate.
2. If the rear spoiler is to be reused, perform the following procedure:
- Remove the double-sided adhesive tape remaining on the rear spoiler and liftgate after removal.
- Remove any grease and dirt from the double-sided adhesive tape affixing area.
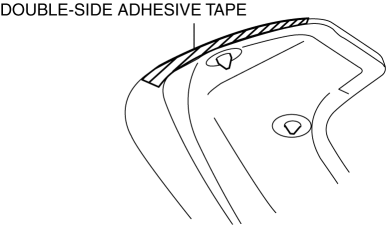
- Affix double-sided adhesive tape to the position shown in the figure.
NOTE:
- Use the 3M K500-type of double-sided adhesive tape, or the equivalent.
3. Install the rear spoiler in the direction of the arrow shown in the figure while inserting the guide pins in the vehicle side.
4. Press the end of the rear spoiler and affix double-sided adhesive tape while installing the clips.
5. Tighten the nuts.

6. Install the liftgate upper trim. (See LIFTGATE UPPER TRIM REMOVAL/INSTALLATION)
REAR DOOR GARNISH REMOVAL/INSTALLATION
1. Remove the sail inner garnish. (See SAIL INNER GARNISH REMOVAL/INSTALLATION) 2. Remove the screw from the inside of the vehicle.
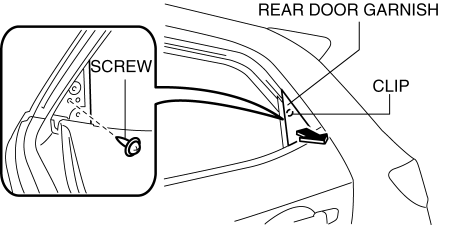
3. Pull the rear door garnish in the direction of the arrow shown in the figure and remove it while detaching the clip.
4. Install in the reverse order of removal.
SPLASH SHIELD REMOVAL/INSTALLATION
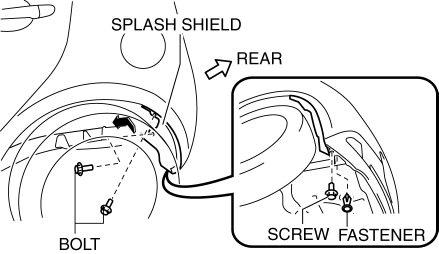
1. Remove the bolts, screw and fastener, then remove the splash shield in the direction of the arrow shown in the figure.
2. Install in the reverse order of removal.
DOOR SASH FILM REMOVAL
1. Partially peel back the glass run channel.
2. Partially peel back the door weatherstrip.
3. Remove the following parts:
- Inner garnish (See INNER GARNISH REMOVAL/INSTALLATION).
- Front door trim (See FRONT DOOR TRIM REMOVAL/INSTALLATION).
- Power outer mirror (See POWER OUTER MIRROR REMOVAL/INSTALLATION).
- Sail inner garnish (See SAIL INNER GARNISH REMOVAL/INSTALLATION).
- Rear door trim (See REAR DOOR TRIM REMOVAL/INSTALLATION).
- Front beltline molding (See FRONT BELTLINE MOLDING REMOVAL/INSTALLATION).
- Rear beltline molding (See REAR BELTLINE MOLDING REMOVAL/INSTALLATION).
- Rear door garnish (See REAR DOOR GARNISH REMOVAL/INSTALLATION).
4. Peel off the door sash film by pulling it outward from one end.
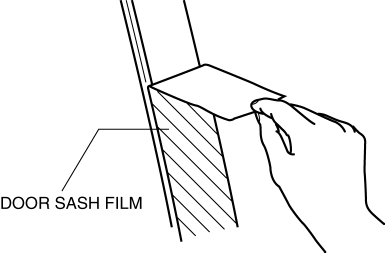
NOTE:
- Slowly remove the door sash film because it could tear easily.
DOOR SASH FILM INSTALLATION
1. Remove any grease or dirt from the affixing surface of the door.
2. Cut away the unused portion along the dotted lines.
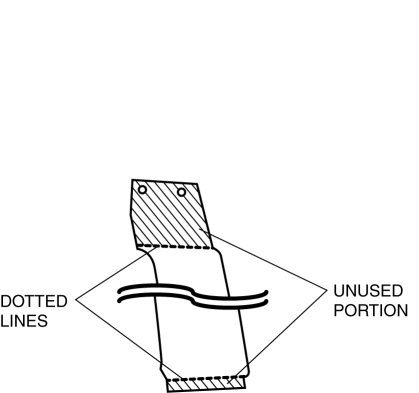
3. Peel off the tape backing and attach the door sash film onto the door as shown in the figure.
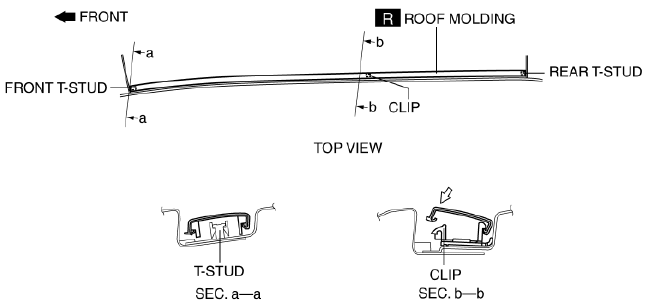
Standard clearance
- a: 4.0 mm {0.16 in}
- b: 3.0-5.0 mm {0.12-0.19 in}
- c: 3.0 mm {0.12 in} or more
4. Peel off the transparent protective film on the door sash film.
5. Install the following parts:
- Rear door garnish (See REAR DOOR GARNISH REMOVAL/INSTALLATION).
- Rear beltline molding (See REAR BELTLINE MOLDING REMOVAL/INSTALLATION).
- Front beltline molding (See FRONT BELTLINE MOLDING REMOVAL/INSTALLATION).
- Rear door trim (See REAR DOOR TRIM REMOVAL/INSTALLATION).
- Sail inner garnish (See SAIL INNER GARNISH REMOVAL/INSTALLATION).
- Power outer mirror (See POWER OUTER MIRROR REMOVAL/INSTALLATION).
- Front door trim (See FRONT DOOR TRIM REMOVAL/INSTALLATION).
- Inner garnish (See INNER GARNISH REMOVAL/INSTALLATION).

